8T88 from Star Wars Dark Forces 2

8T88

New Member
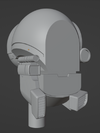
Decided I wanted 8T88 from Dark Forces 2 and after 3 days of work this is what I have.
It isn't entirely accurate but it's pretty close.
(Still very much a work in progress)
8T88.png


8T88 5.png


8T88 1.png


8T88 4.png

^^^Ran into a problem though, not sure what to do with those round things are with the arm coming off of them or how to really attach them at the top of the neck^^^

8T88 Backview 1.png


8T88 Sideview.png

upscaled pictures aren't all that useful for figuring out what to do with it.

8T88 8.png

Do I make this a functional part or just decorative?

Backview.png


8T88 6.png


8T88 7.png


8T88 3.png


My goal is to make the model printable and be able to add electronics to it but deciding what to do for interior parts is holding things up so if you have any ideas feel free to share them.
 

Attachments

  • 8T88 5.png
    8T88 5.png
    87.2 KB · Views: 19
Made some progress on the insides.
I am attempting give it a quick release to help get stuff out of the way for testing or swapping parts in and out of it.
8T88 9.png

In game the holoprojector doesn't move but I think maybe they wanted it to so decided mine will.

8T88 10.png

A look at the other side of the wall where the holoprojector goes.

8T88 11.png

After I got to this point I could start seeing this be a part reused for other props or droids.

8T88 12.png

And finally the most uptodate picture.
Still need to add some base supports to the band the rear bowl attaches to and also some sort of frame connecting the band and head.

I have to redo the holoprojector dome and hollow out the sensors but other then that it might be print ready in a few days.
 
This is amazing! I was just telling JarodPenn yesterday my model of 8t88 was going to take awhile and you nearly finished it in only 3 days, lol.
If you haven't already seen it, there is a nice 3d model of 8t88 that looks pretty accurate from Jon Voltz over on Deviant Art.

When I modeled Weegee, I realized that the lightsaber isn't actually small enough to fit in the hidden compartment, and the other half of the disc drive seemed to be free floating...and the jet placement didn't make sense from what I could see in the screen grabs. I'd say make those decorative.

Are you planning on making a projector work with this housing?
Awesome work so far!
"This is amazing! I was just telling JarodPenn yesterday my model of 8t88 was going to take awhile and you nearly finished it in only 3 days, lol."
I would be interested to see your version.
lol yeah day one was me remaking the main head shell 4 or 5 times until it looked right otherwise it would've only been 2 days of work.

"If you haven't already seen it, there is a nice 3d model of 8t88 that looks pretty accurate from Jon Voltz over on Deviant Art."
I have seen it but I think it looked a little too stylised where as I am trying to make mine as accurate as I am able to.

"When I modeled Weegee, I realized that the lightsaber isn't actually small enough to fit in the hidden compartment, and the other half of the disc drive seemed to be free floating...and the jet placement didn't make sense from what I could see in the screen grabs. I'd say make those decorative."
yeah can you only do so much with screen grabs and unfortunately they are mostly all dark.
I saw your version of Weegee on thingiverse and it looks really good, have you printed it out yet?
Sadly I don't have the space to print Weegee full size which is why I passed on doing my own one.

"Are you planning on making a projector work with this housing?"
Yes at some point so trying to future proof it so I only have to print main shell once.

"Awesome work so far!"
Thank you!
I might have more to share tonight.
 
I haven't got much further than I was over a year ago because I keep going back to correct mistakes. Haven't had a lot of time to play with it.
1711434237601.png

I'm not able to model internal housings yet like what I'm seeing here though.
I recently added a picture of a resin printing at 5% scale there.

1711434706922.png


I've since printed a slightly bigger one for my desk with the flaps open so I can have it accept the lightsaber and disc as little props and less of the finer pieces broke off.
Very ambitious work though. Great job so far!
 
Last edited:
I haven't got much further than I was over a year ago because I keep going back to correct mistakes. Haven't had a lot of time to play with it.
View attachment 1803700
I'm not able to model internal housings yet like what I'm seeing here though.
I recently added a picture of a resin printing at 5% scale there.

View attachment 1803701

I've since printed a slightly bigger one for my desk with the flaps open so I can have it accept the lightsaber and disc as little props and less of the finer pieces broke off.
Very ambitious work though. Great job so far!
Looking good so far!

I may have to print Weegee out to go with my Kyle figure.

I didn't get too much done on mine tonight just the attachment point for the center panel.
8T88 13.png


8T88 14.png

Think I am pretty much done the internals, just have to add the neck pivot.

I'll probably do a more simple model next.
While I was watching a Jedi Outcast play through and saw something I forgot about the mouse droid door lock, I think it would be cool to print a few out to stick at the base of the fridge or wherever else shin height.
Mouse Droid Door Lock.png

It'll be a little trickier since it's a low pixel texture.
 
Last edited:
Those internals look awesome. I need to learn how to do that with more of my work. Can't believe you worked that out for 88.

Hold off on printing Weegee for a little bit. After printing it a few times, I realize that I need to revise a few platings that are too thin and scale the arm up a tad.
Ah, low pixels. I'm currently trying to make the ceiling map from screen grabs and use it as the base to hold up Weegee.

1711465364390.png

Haha, that would be hilarious on a fridge.
 
Last edited:
Those internals look awesome. I need to learn how to do that with more of my work. Can't believe you worked that out for 88.

Hold off on printing Weegee for a little bit. After printing it a few times, I realize that I need to revise a few platings that are too thin and scale the arm up a tad.
Ah, low pixels. I'm currently trying to make the ceiling map from screen grabs and use it as the base to hold up Weegee.

View attachment 1803727
Haha, that would be hilarious on a fridge.
Thank you!
Yeah it's my first time trying internals on a model to so I'm happy with how it turned out.
Oh ok. I know how that goes lol model something and it looks perfect, print it just to find out some areas need bulking up.

That ceiling map looks like a hard nut to crack.
 
A more complete view to give a feel for how it will look with the bowl and top panel removed.
I may need to beef the band for the bowl up some more though, it still needs attachment points so I'll decide how to tackle that at the same time.

8T88 15.png
 
I think it would be really cool if the little neck greeblies were attached to stepped or regular potentiometers that turn the electronics on
 
This is all great.
Ya know, I'm not too great with electronics either but I've been finding a lot of success using AI to answering questions and filling in code to program simple things for arduino and their modules to run motors, switches and buttons with leds and displays. Arduino software also comes with several templates to download for free that may already do what your looking for.

Folks on here have been helpful filling in the gaps too.

Are you planning on making the rest of 8t88's body? Or the hand to hold the disc?
Might have to give AI a go but some of my parts require older arduino IDE's since some libraries aren't maintained.

Maybe at some point down the road but as of right now I had only planned to make the head.
For the time being I just want to make models I am able to display and have the time to finish so I can move onto other droids or droid accessories, looking forward to my next model though because it's a mix of both and I think it is just too cool to put off until later.

The mouse droid door lock will have to wait lol
 
*smh

...and I just noticed that you mentioned this was your first time modeling internals.

Do the holes have a purpose for wiring or saving on material/time? If the latter, is there a method to knowing where you are cutting out the holes for the internals to save on material while maintaining strength or do you use a something like generative design?

This might be a good reference for your door lock:
 
Last edited:
*smh

...and I just noticed that you mentioned this was your first time modeling internals.

Do the holes have a purpose for wiring or saving on material/time? If the latter, is there a method to knowing where you are cutting out the holes for the internals to save on material while maintaining strength or do you use a something like generative design?

This might be a good reference for your door lock:
All of the holes are for wiring, screws, pins, access panels, airflow, sound passthrough and wherever else I think it might be useful.
Printing more simple objects prior to modelling this it seems like the more holes you add the longer it takes to print on an FDM printer but it also depends on how the holes are laid out and the frequency of them plus printer and infill settings of course.

Drill Guide.png
I can't give you exact print times because I am away for the weekend but for something like this in this position it can take an unnecessarily long time to print at 100% infill, this is a drill guide for a pin connector I was making and even though it's a small part it was annoying to wait for.
Case.png
I made the drill guide to go along with this case and even though it's a larger part then the guide print time is more or less about the same.
(Correction, I guess 88 is my first time doing internals on a much larger scale and that case is actually my first since it will have wood and metal parts coving most of it.).
Offsetting holes so they aren't printed on the same layers will help speed up print times but spreading them out more or doing them on another axis will also help.

So when it comes to how I add holes to a model I try to have a reason for it.

(I'll edit this reply Tuesday or Wednesday with the estimated print times my slicer gave me for the drill guide and case when I get home.)
 
Almost finished
8T88 20.png

I wasn't happy with the holes for the holoprojector so gave it a spoked opening instead.
8T88 21.png

All of the remaining parts have been hollowed out with screw holes added and corresponding mounting points for where they all go.
8T88 22.png
8T88 23.png
8T88 24.png


I still need to do some work on the chin sensors, the neck connection and top panel support but the model is mostly finished so it should be print ready this week.
 
That was a very helpful explanation. Thanks for taking the time to write it.
This all looks commercially made. Well done!
 
That was a very helpful explanation. Thanks for taking the time to write it.
This all looks commercially made. Well done!
You are very welcome.
I'm not sure if there are too many tutorials on the subject floating around online but I've taken loads of stuff apart since I was a kid so all I've really done was apply some of what I remember to my own models. Something I forgot to mention is I have also been giving joining areas a clearance gap of 0.2mm hopefully to cutdown on filing and sanding everything once it's been printed, not sure if it will make a difference or not though.

That's quite the complement, Thank you!

8T88 25.png

Added connection points to the top support panel.
8T88 26.png

Added a few spots for magnets to the support but I also plan to add some holes for locking tabs and maybe some weight reduction holes.
8T88 27.png

Got the neck hinge made but using the full hinge is optional. I designed it so a 84mm long 8mm OD rod or pipe could be used instead of the slider piece, the rod or pipe would be locked into the head with the side panels once both are screwed on.
I'll probably do both just to make sure not goes anywhere.

Just have to finish the chin sensors, do a final pass on the model as a whole to see if I missed anything or if I think I need to make any changes and then I can start getting it ready for printing.
 
.2mm seems to be the magic number. I use that number for sliding tubes on the lightsabers I've made.
I understand how you modeled everything but visualizing the snaps/connectors and how all the internals would piece together inside the model would be overwhelming at my current skill.
Excited to see the end result.

FYI, I've updated the Weegee model on Thingiverse but haven't had time to test print it yet.
 

Your message may be considered spam for the following reasons:

If you wish to reply despite these issues, check the box below before replying.
Be aware that malicious compliance may result in more severe penalties.
Back
Top