You are using an out of date browser. It may not display this or other websites correctly.
You should upgrade or use an alternative browser.
You should upgrade or use an alternative browser.
1/72 Hoth Echo Base Hangar diorama
- Thread starter gt350pony66
- Start date
gt350pony66
Master Member
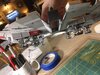
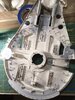
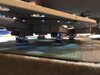
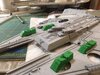
got the lower markings air brushed, paint flaked and the washed. checked all the landing gear for proper fit and clearance. Tomorrow I'll streak the lower, install that gear and the doors I've modded, then start on the landing lights. Then I suppose I'll rip the shield generators off and fit the proper looking ones that I got from Haystack on the upper and start the markings for the upper hull.
Attachments

gt350pony66
Master Member
Thanks my friends, long way to go yet with this one but it's coming along. I planted the gear, finished and installed the doors, and streaked the hull and put a few random rusty spots. Also got out the soldering iron and gashed the lower hull as these don't come with. I also did the docking collar while I was at it. The doors came out really well...I think
Attachments
gt350pony66
Master Member
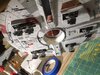
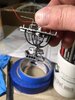
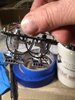
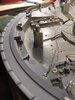
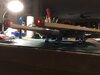
using some evergreen tubing for light cans, placed all in the lower hull. this time I decided since there was room for it, I'd do the two on each side of the docking collars in a larger diameter as they should be. On the PG I didn't  the two nearest the rear I had to use a couple of CHIP led's so I could clear the engine panel...we'll see if they are brighter or dimmer...
I still have the four in the center rear to do
the two nearest the rear I had to use a couple of CHIP led's so I could clear the engine panel...we'll see if they are brighter or dimmer...I still have the four in the center rear to do
Attachments
I've been away too long! The landing gear is stunning! Gorgeous!
gt350pony66
Master Member
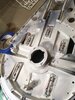
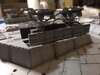
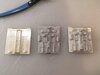
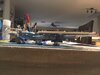
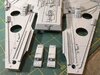
I couldn't adapt the HH jaw panels to the FM, so I cut out the important stuff, sanded to fit and thinned the contact surface. Much better than the anemic panels in the kit. I sliced off what little was on the stock panels and stuck this stuff down. Better. Also did a marathon session with the soldering lron and hooked up everything that's in place...so far
Attachments

gt350pony66
Master Member
Thanks Ged! I don't know about all that, but I do think my skills are improving...with the lighting anywayI still remember the frustration you were undergoing adding lighting to your Bandai 1/72 X-wing way back when this particular thread started Ross ...., and now I reckon you’re swanning around amongst the best , in the echelons of light - wizardry !
Terrific work mate.
gt350pony66
Master Member
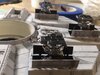
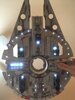
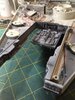
So I sacked up today and cut the shield projectors I got from Haystack and fitted them to the FM, it worked out pretty good and they look WAY better than that jalopy style crap that FM puts in the kit. Since I didn't FO the gun turrets I mounted an LED in the tunnel piece for ambient light. I also didthe inner mandible panels and added some FO to the center. The instructions have you attach these to the upper hull, but I don't really see an issue with building UP, like you would an MPC. Hopefully I won't have any troubles later by doing it that way.
Attachments

gt350pony66
Master Member
Actually, I don't think that's an error on the part of Fine Molds. Their Falcon is mostly patterned after the 32" Falcon, and those parts look mostly correct for that version. The green replacements are modelled after the five foot Falcon's parts.
Well I guess now we know who's not paying attention to finer detail and differences, duh on me
I suppose then the pieces are correct...however! LOL I much MUCH prefer the other style. Haystack, I know you've been glancing in on this from time to time, Thanks for that extra stuff you sent that time, I've made use of a good deal of it, and finally the shield projectors. Yeah, I could have scratched some, sure...but I probably wouldn't have gone to the trouble and just left the jalopies on it LOLgt350pony66
Master Member
Wow... FM sure missed the boat on that area... Great job on fixing it!
Well Nkg had the low down on that point, BUT, I'm sure glad Haystack sent me those, I probably wouldn't have scratched any, but I had the greenies and it was just a matter of cutting and shaping. My stress was getting the other ones off without jackin something up...never should have put them on, but I ran across the green ones afterwards when I was looking for something else!
Thanks for the info Nkg
gt350pony66
Master Member
Well after seeing Nkg's comment, I guess they weren't necessarily "wrong"...but I builds 'em the way I wants 'em LOLI never realized how lacking some areas of the Fine Molds were. You sure fixed that!
gt350pony66
Master Member
No worries - I mean, it all depends on what you're going for. Personally I think virtually all the greeblies on the five foot Falcon look cooler than the 32" Falcon, so...
I agree, the 5 footer is the most attractive.
Similar threads
- Replies
- 55
- Views
- 5,687