1960's robin costume

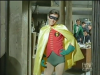
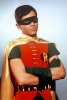
so i wanted to go with something a little on the simpler side this year, not so much heavy construction and eva foam armor. since i have a "armored" bat suit already i decided to go with robin. but i thought that the best one for nostalgia and just sheer silliness (not to mention closeness to comic book counter part) would be the burt ward robin suit. which i think looks nice and is a simple sew job. i wasn't too happy with the look of purchasable costumes for this specific style, especially at the price point i was able to make my costume for about 40 dollars.

so how i started was by just looking up pictures of the costume. which there was a few references on google
 

Attachments

  • robin no belt.png
    robin no belt.png
    240.1 KB · Views: 4,379
  • Batman_'66_-_Burt_Ward_as_Robin.jpg
    Batman_'66_-_Burt_Ward_as_Robin.jpg
    59.4 KB · Views: 462
okay so the next step was to buy the material i went to wal-mart and got two things to start off. two yards of red 100 % cotton cloth and two yards of yellow satin looking cloth. this cost a little under 20 bucks. later on i went for a second trip where i bought a red zipper (3.00), 1 yard of green 100% cotton material(3.00), yellow/gold shoe string(2.50), and medium eyelets (4.00)and an eyelet tool(4.00). so this cost me around 16 dollars (none of the prices are accurate but around what i remember paying because i didn't keep the receipts handy).

so i have my materials.

next i started with the vest. i simply looked at pictures and figured it was a simple vest with a little skirt added to the bottom. copied where the seam lines should be and made a rough plan. i got an old polo shirt and cut off the neck and sleeves. then i cut that into 3 parts, the back and two parts for the front. i used this to be my template. so i cut the red material and sewed the back to the two front parts and then added the zipper to the front this is where my mistake came. i seem to have gotten a zipper that doesn't open all the way, so it would be great for shorts or a bag or something. not so much for a jacket. so i can't make it open all the way but it still makes it easier to put on then without it. again im not 100% sure this is an accurate pattern since i free handed it and based it on the seam lines is saw in pictures. 20151022_185842.jpg20151022_185904.jpg
 
i made the holes for the chest laces, by simply punching threw the material with scissors. then i followed directions on the eyelets. which where simple enough. bottom goes on the inside top on the outside (you want to work on the reverse as not to damage the visible front), sandwich with the tools and strike with a hammer. bam! pow!, that's it... do it again and again. i did measure out the vertical distance and horizontal distance and marked the material with white color pencil to make sure they where even. all except one where pretty spot on, one came out a little off but it's not very noticeable so i'm happy. the red R i made out of felt and hot glued it on.


okay, so now i worked on the cape which was pretty easy. i cut out the neck which was two same size rectangular strips, one of the ends on the rectangle are slightly angled out to be the collar. so i sewed the two parts together and flipped it inside out so the seams are inside. then moved out to the cape. i folded the remaining material in half, i drew a 1/4 circle that ended at the desired length which was about butt level, and cut that out making the cape round half circle at the bottom. then simply hemmed the ends all around. once done i attached the collar to the top. added a button and an attached loop of shoe string to put it on and off. 20151022_190041.jpg
 
the shorts are really easy, i went on pintrest and found a plain template marked shorts. the simplest template i could find. i didn't want the super small panties he wears because i don't think that would be work appropriate but the shorts are still pretty damn small. so i cut out two sides off the green material. and sewed them together. if i can find the template i'll post it. i was pretty happy except i thought the shorts rode a little low on the waist, and since this is 1960's and the vest is pretty high up i added a long rectangle of material at the top and added some elastic so the waist band would make the shorts not fall off. i sewed one end of the rectangle to the already done shorts and then put elastic inside folded the rectangle in horizontal half. then sewed it on the inside. so this was enough to elongate the shorts to the desired waist length and now they're stretchy at the waist.20151022_190522.jpg4001dbf21db428bea6db93076170393b.jpg
 
so to finish it up i had a green t-shirt i could put on underneath the vest that was close to the right color and fit. i actually need to wear this to work so i didn't make the shoes i'm going to wear this with converse and work gloves instead of the cool green ones. which i might make later on. and since i wear glasses i opted out on the mask for work since masks are a no. 20151021_023746.jpgnow i still need some adjustments such as the neck on the cape needs a little tightening, also the laces where not adjusted and tied at the ends for the picture, it was the first time trying on the costume and i didn't bother to make it look nice or even comb my hair.
 
i know it's not perfect, but i found that at the cost and the comfort of it fitting to my specific size it was a great deal. i hope people like it. it was fairly simple to make and so far it's fun to wear. i'll update so more pics as soon as i can.
 
Back
Top