Clone Wars Kay
New Member
I recently started to get into cosplay and EVA foam and though I am far from skilled, I’d like to share my progress.
I started this Anakin Skywalker Season 1-2 Clone Wars cosplay because I honestly just liked his armour. And despite the fact that I am not a male, I still thought this would be a fun project to carry out.
The templates only took a few hours to figure out. I started by measuring my chest, how far down I wanted the armour to go and the approximate width I was looking for. I then did a rough sketch on paper and solidified the lines.
When the templates had been cut on paper and taped, and when I got a shape I was happy with, I made a rough draft of the armour. I like to use camping mats that I bought from Dollarama for $4 a roll because they’re easy enough to cut, glue and to get an idea of what the finished project will look like. I used this method a lot with the Ahsoka cosplay I am currently working on. I pretty much refer to this material as “test foam”.
.jpeg")
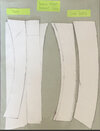
I will attach the templates I made below, feel free to use them and comment if you do! I'd love to see them.
The centre front piece (pieces) and centre back piece (pieces) are made from 1 cm EVA foam floor mats. I got them at Walmart in a pack of 4 for about $20. The side pieces that drape over the shoulders are made from 5 mm EVA foam purchased at Michael's. For reference, the pink is 1 cm foam, the white is 5 mm.
.jpeg")
.jpeg")
I heat sealed and shaped everything slightly with a heat gun before contact cementing. A word of advice; the shoulder pieces that connect to the front and back panels are slightly curved, try and straighten them out more or cut them at a less drastic angle before attaching. I had to go back in with super glue because the contact cement wan't sticking at the ends. After everything was connected, I went to prime and paint. I didn't add the rink that goes around the inside, simply because my head didn't fit. That's another thing to make note of; ensure your head fits through the hole.
The Canadian equivalent of Plasti-Dip is Rust-Oleum Automotive Peel Coat ( Verify Your Identity ), which I sprayed everything with before applying spray paint. I used a gloss dark grey and found that it fit nicely ( Rust-Oleum 340g Painters Touch 2X Grey Gloss Alkyd Paint | Home Hardware ).
So far, this is my progress (pictures below). I can't wait to see how this turnes out and I hope this post helped!

.jpeg")

.jpeg")
Templates:
.jpeg")
.jpeg")
.jpeg")
.jpeg")
I started this Anakin Skywalker Season 1-2 Clone Wars cosplay because I honestly just liked his armour. And despite the fact that I am not a male, I still thought this would be a fun project to carry out.
The templates only took a few hours to figure out. I started by measuring my chest, how far down I wanted the armour to go and the approximate width I was looking for. I then did a rough sketch on paper and solidified the lines.
When the templates had been cut on paper and taped, and when I got a shape I was happy with, I made a rough draft of the armour. I like to use camping mats that I bought from Dollarama for $4 a roll because they’re easy enough to cut, glue and to get an idea of what the finished project will look like. I used this method a lot with the Ahsoka cosplay I am currently working on. I pretty much refer to this material as “test foam”.
I will attach the templates I made below, feel free to use them and comment if you do! I'd love to see them.
The centre front piece (pieces) and centre back piece (pieces) are made from 1 cm EVA foam floor mats. I got them at Walmart in a pack of 4 for about $20. The side pieces that drape over the shoulders are made from 5 mm EVA foam purchased at Michael's. For reference, the pink is 1 cm foam, the white is 5 mm.
I heat sealed and shaped everything slightly with a heat gun before contact cementing. A word of advice; the shoulder pieces that connect to the front and back panels are slightly curved, try and straighten them out more or cut them at a less drastic angle before attaching. I had to go back in with super glue because the contact cement wan't sticking at the ends. After everything was connected, I went to prime and paint. I didn't add the rink that goes around the inside, simply because my head didn't fit. That's another thing to make note of; ensure your head fits through the hole.
The Canadian equivalent of Plasti-Dip is Rust-Oleum Automotive Peel Coat ( Verify Your Identity ), which I sprayed everything with before applying spray paint. I used a gloss dark grey and found that it fit nicely ( Rust-Oleum 340g Painters Touch 2X Grey Gloss Alkyd Paint | Home Hardware ).
So far, this is my progress (pictures below). I can't wait to see how this turnes out and I hope this post helped!
Templates: