You're mounting it to plywood? What for?
I just recently had to draft a pattern for the 1989 cape for a local. Here's what I've come up with. If anyone else reads this and finds a glaring mistake I've missed, or details about the original I’m not aware of please point it out!
Per Propstore's high detail description and photos we know the longest finished length is 51". If you're drafting from a circle, setting 51" as the radius would be a mistake -- you'd want to include a few extra (in this case I'm guessing maybe 2"?) because part of the middle of the circle was cut out for the neck.
Notice how the panel doesn’t meet a point here because the fabric is cut out for the neck:

Michael Keaton is 5'10" and my model is 5'11" so I added an extra inch to the length to be proportionate. I'm going with 54" as a radius (let’s hope my guestimate is right!).
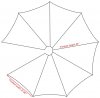
Radius x 2 = 108” diameter. Circumference is diameter times pi, so 108x3.14 = 339.12”. Now, if you count the panels in the image below there are 8. BUT, I didn't want the cape to completely cover the costume so I’m calculating for 9 panels. One of those 9 panels will be left out so that there is a gap for the costume beneath to show. So circumference divided by 9 will give us a width of 37.68”. I’m calculating in 5/8” seam allowance on either side, so each panel will be 38.93” wide and 54” long. Well, except for the front panels. Those will get extra fabric so I can make a sleeve for dowel rods – totally optional. I’m choosing to skip the lining on the front panels also.
Note: if I cut out the slight curve at the bottom before sewing the panels together I have to remember to leave that 5/8” shelf on either side or it’ll never come to a point at the bottom. Because of this I’m thinking I’ll just wait until each panel is sewn together before cutting the curve.
A thing I noticed was that each panel is not the same width at the opening of the neck. Since the bottom panels appear to be the same width I think either the angles were wider on some parts, or the opening for the neck was cut off center once the cape was draped over (after all, the chest and shoulders don’t make a perfect circle, they make a more ovaline shape). Since I’m on a time crunch I’m going to just make each panel with the same angle and revisit it if the weight of the fabric seems to be pulling it in an awkward way.

So right now it’s looking like I’ll be making a triangle on folded fabric that’s 54” long (that’s 1 ½ yds), measure out half my width (19.465”) from the fold, and then just drawing a line from the end of the width to the end of the length. I’ll need 12 yds of fabric (1 ½ yds per panel, 8 panels).
I *think* it should come out looking something like this:

Looking at this image I think it’s likely that the hems of each panel were pressed open and sewn down. Also, if you’re working with leather or faux leather you shouldn't need to do any hemming as those types of fabrics don’t fray.