So I was at the Goodwill last week when I came across this vest... It wasn't exactly the right color or style, but it was close enough to Marty's vest that it put the idea in my head to do a Marty for an upcoming con where one of the movie cars will be appearing. I'd planned to go as Doc Brown, but I'm tired of that costume.
Anyway, the vest was like $6, so on a lark I decided to just check out the shoe section, and lo and behold, a pair of Nike Airs for $5 which were also close enough to Marty's Bruins. Or they would be once I painted the swoosh red.
Uh oh, I'm in trouble!
So I picked up the shoes and the vest, and masked off the swoosh, and attempted to paint one with some Krylon Banner Red I had laying around, but the paint wasn't taking to the leather properly, it was just pooling up, so I wiped it off and then primed it gray and then painted it red again and it turned a nice dark red. Then I did the rest.
I didn't paint the heel because of the embroidery... I've seen what spraypaint can do to thread and it ain't pretty. And I thought the swoosh alone being red looked better anyway.
The next couple days I went out to the Goodwill again, as well as another place where they have cheap used stuff called Savers, and I found a maroon t-shirt ($5), a white dress shirt with a black grid pattern ($5), and new tight fitting jeans ($10).
Finally, I went out again yesterday and found a boxy silver walkman ($5), and in the backroom I spied an ugly skateboard. When I inquired about it they said that box was for stuff they couldn't sell, but they asked the manager, and stuck a $5 sticker on it for me, and off I went with my prize!

I already had some black paint on hand, and some gloss clear coat, but later that evening I picked up a little bottle of purple acrylic paint for $2. I also grabbed some yellow, but I ended up not needing it.
(Current total: $43)
After picking up a color changing hat ($27 at Newbury Comics - Ouch! I couldn't find one used online cheap) cause you gotta have the color changing hat, I got to work on the skateboard. But not before first printing up a "save the clocktower" flyer to go with my sports almanac.
The first order of business was trying to remove some of the tar from those wheels. I tried washing them but that did nothing. I tried olive oil, because I read that would remove tar from clothes, but that also did nothing. I even tried wiping them down with a gasoline soaked rag, because that too was said to remove tar. The wheels stayed stubbornly black though. Finally I considered sanding them when it occurred to me that I have a dremel with a sanding wheel, and that made quick work of the layer of tar!
With the wheels looking presentable it was time to tackle the paint. This was gonna be tough.
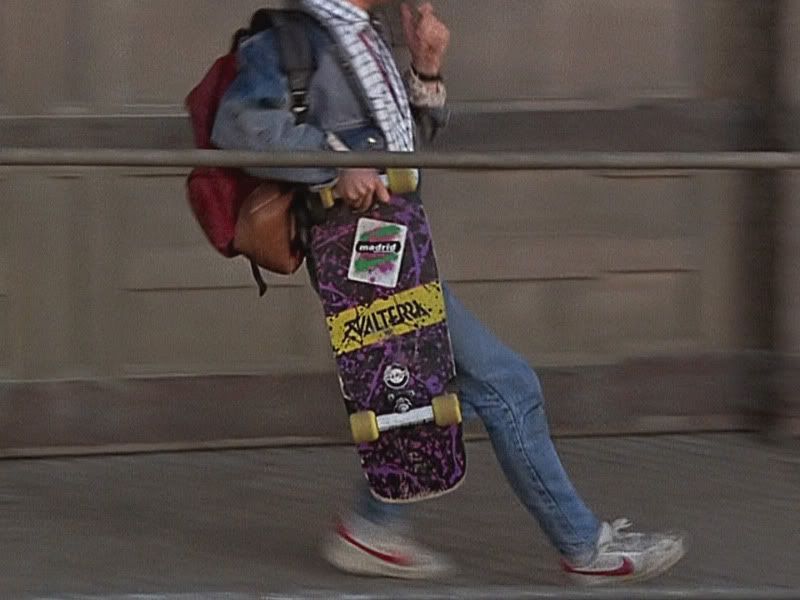
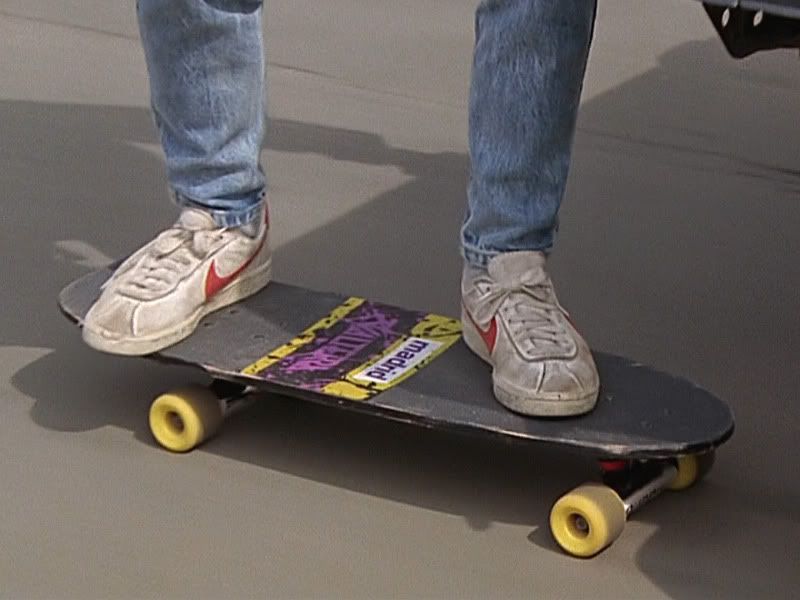
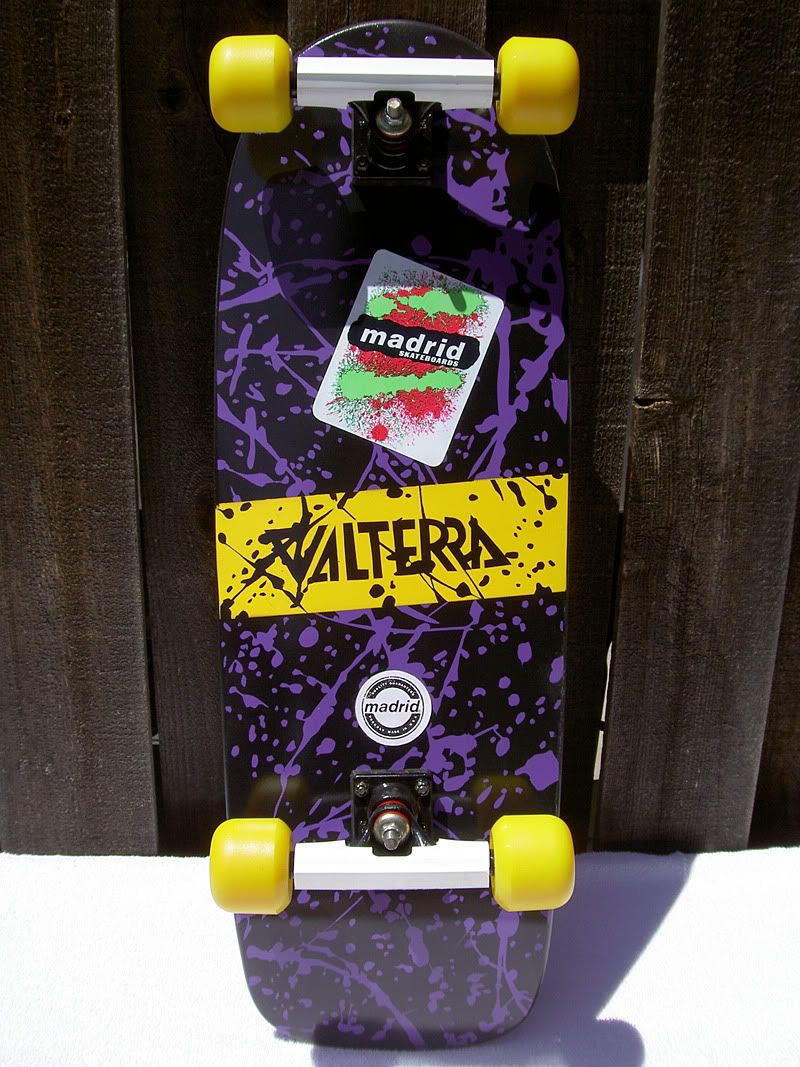
Here's some pics of what I was going for:


$500 replica on Ebay:

I'm not sure if the paint is hot pink or purple, but it looks purple in that scene above, and as you can see, someone's selling replicas with purple paint, and I liked the purple, so purple it is.
Anyway...
First I masked off the top half of the trucks, and painted the bottom flat black, then hit it with the clear gloss coat.
Then, after removing the stickers and sanding off the residue, I masked off the grip tape on top and painted the whole thing flat black.
I then grabbed the label someone had made for the top of the board in this thread:
http://www.therpf.com/f9/bttf-valterra-skateboard-191219/
...and modified it by cropping the Valterra logo, and editing it in photoshop to be black on yellow. I printed that up on sticker label paper, and did the same for the Madrid logo. I didn't bother with the logo on top of the board because the board I got had grip tape over the whole top of the board I wasn't about to cut out a section and sand off all the glue just to make a fairly inaccurate replica which I'll always be holding with the bottom side out when posing for photos.
I then used a razor blade to cut the sticker to the right shape, and stuck it to the board. Then I masked it off with painter's tape. This was a horrible mistake. I'll get to that in a moment.
Now I was all set to apply the purple paint. After putting down a large tarp, I grabbed a plastic knife and my purple paint and proceeded to go all Jackson Pollock on the thing. I tried to mimic the density and direction of the splatters, but it was almost impossible to get a line or a spatter when I wanted it. But it came out looking good and it was close enough for me.
Unfortunately, the paint was way too thick and I was not patient enough to let it dry for several days, so I broke out the heat gun and began to dry it that way. This caused some of the paint to bubble, and I ended up having to go over it and do touch up. But when it's not under crappy lighting as in the following photos, it looks fairly well done. I'll have to take some photos outside tomorrow if the sun comes out.
Once the acrylic purple paint was dry, it was time to remove the painters tape from my Valterra sticker... But the damn tape stuck to it and it was only thanks to having put down paper in the middle of the label and tape around the edges that I was able to save the label. But the sides were all ripped up with white paper showing. It was awful.
So I broke out the yellow and black paint markers. And I painted over the white sections six times until they didn't look like fuzzy paper any more. It didn't look great, but it was close enough. Or so I thought.
The next step was to apply the clear coat. This was going to adhere the sticker to the board permanently and hopefully make it look like paint. Well, the middle of the sticker darkened up a bit, and became a bit translucent. It looked pretty cool actually. And I would have been happy with it that way. The only problem was, the torn edges which I had painted over with the marker remained bright yellow. Ugh!
So, I took the marker and went over all the yellow portions of the label with it. I wasn't trying to do a perfect job, I just scribbled around, trying to avoid drawing over the black bits, figuring that the overall effect would be fine so long as it was consistent.
And here's the end result after mounting the wheels on the board once more, and applying the Madrid sticker I made by putting clear tape over my matte adhesive label paper:

I'm happy with it. For a few hours work on a $5 skateboard it looks good enough to me!
(And I know I'm missing the square sticker... But I didn't like it.)
I'll update the thread with photos of the full costume at the end of this month after the con. The only parts I'm missing right now are a jean jacket, and maybe suspenders. Going to try to get a deal on those too.
Anyway, the vest was like $6, so on a lark I decided to just check out the shoe section, and lo and behold, a pair of Nike Airs for $5 which were also close enough to Marty's Bruins. Or they would be once I painted the swoosh red.
Uh oh, I'm in trouble!
So I picked up the shoes and the vest, and masked off the swoosh, and attempted to paint one with some Krylon Banner Red I had laying around, but the paint wasn't taking to the leather properly, it was just pooling up, so I wiped it off and then primed it gray and then painted it red again and it turned a nice dark red. Then I did the rest.
I didn't paint the heel because of the embroidery... I've seen what spraypaint can do to thread and it ain't pretty. And I thought the swoosh alone being red looked better anyway.
The next couple days I went out to the Goodwill again, as well as another place where they have cheap used stuff called Savers, and I found a maroon t-shirt ($5), a white dress shirt with a black grid pattern ($5), and new tight fitting jeans ($10).
Finally, I went out again yesterday and found a boxy silver walkman ($5), and in the backroom I spied an ugly skateboard. When I inquired about it they said that box was for stuff they couldn't sell, but they asked the manager, and stuck a $5 sticker on it for me, and off I went with my prize!

I already had some black paint on hand, and some gloss clear coat, but later that evening I picked up a little bottle of purple acrylic paint for $2. I also grabbed some yellow, but I ended up not needing it.
(Current total: $43)
After picking up a color changing hat ($27 at Newbury Comics - Ouch! I couldn't find one used online cheap) cause you gotta have the color changing hat, I got to work on the skateboard. But not before first printing up a "save the clocktower" flyer to go with my sports almanac.
The first order of business was trying to remove some of the tar from those wheels. I tried washing them but that did nothing. I tried olive oil, because I read that would remove tar from clothes, but that also did nothing. I even tried wiping them down with a gasoline soaked rag, because that too was said to remove tar. The wheels stayed stubbornly black though. Finally I considered sanding them when it occurred to me that I have a dremel with a sanding wheel, and that made quick work of the layer of tar!
With the wheels looking presentable it was time to tackle the paint. This was gonna be tough.
Here's some pics of what I was going for:


$500 replica on Ebay:

I'm not sure if the paint is hot pink or purple, but it looks purple in that scene above, and as you can see, someone's selling replicas with purple paint, and I liked the purple, so purple it is.
Anyway...
First I masked off the top half of the trucks, and painted the bottom flat black, then hit it with the clear gloss coat.
Then, after removing the stickers and sanding off the residue, I masked off the grip tape on top and painted the whole thing flat black.
I then grabbed the label someone had made for the top of the board in this thread:
http://www.therpf.com/f9/bttf-valterra-skateboard-191219/
...and modified it by cropping the Valterra logo, and editing it in photoshop to be black on yellow. I printed that up on sticker label paper, and did the same for the Madrid logo. I didn't bother with the logo on top of the board because the board I got had grip tape over the whole top of the board I wasn't about to cut out a section and sand off all the glue just to make a fairly inaccurate replica which I'll always be holding with the bottom side out when posing for photos.
I then used a razor blade to cut the sticker to the right shape, and stuck it to the board. Then I masked it off with painter's tape. This was a horrible mistake. I'll get to that in a moment.
Now I was all set to apply the purple paint. After putting down a large tarp, I grabbed a plastic knife and my purple paint and proceeded to go all Jackson Pollock on the thing. I tried to mimic the density and direction of the splatters, but it was almost impossible to get a line or a spatter when I wanted it. But it came out looking good and it was close enough for me.
Unfortunately, the paint was way too thick and I was not patient enough to let it dry for several days, so I broke out the heat gun and began to dry it that way. This caused some of the paint to bubble, and I ended up having to go over it and do touch up. But when it's not under crappy lighting as in the following photos, it looks fairly well done. I'll have to take some photos outside tomorrow if the sun comes out.
Once the acrylic purple paint was dry, it was time to remove the painters tape from my Valterra sticker... But the damn tape stuck to it and it was only thanks to having put down paper in the middle of the label and tape around the edges that I was able to save the label. But the sides were all ripped up with white paper showing. It was awful.
So I broke out the yellow and black paint markers. And I painted over the white sections six times until they didn't look like fuzzy paper any more. It didn't look great, but it was close enough. Or so I thought.
The next step was to apply the clear coat. This was going to adhere the sticker to the board permanently and hopefully make it look like paint. Well, the middle of the sticker darkened up a bit, and became a bit translucent. It looked pretty cool actually. And I would have been happy with it that way. The only problem was, the torn edges which I had painted over with the marker remained bright yellow. Ugh!
So, I took the marker and went over all the yellow portions of the label with it. I wasn't trying to do a perfect job, I just scribbled around, trying to avoid drawing over the black bits, figuring that the overall effect would be fine so long as it was consistent.
And here's the end result after mounting the wheels on the board once more, and applying the Madrid sticker I made by putting clear tape over my matte adhesive label paper:

I'm happy with it. For a few hours work on a $5 skateboard it looks good enough to me!
(And I know I'm missing the square sticker... But I didn't like it.)
I'll update the thread with photos of the full costume at the end of this month after the con. The only parts I'm missing right now are a jean jacket, and maybe suspenders. Going to try to get a deal on those too.
Last edited:


