Hello Everyone! A friend of mine recently commissioned me to make him Lelouch's helmet from "Code Geass: Lelouch of the Re;surrection" and I'm going to catalog the build process with this thread! Cheers!
Something I always do after I have accepted a commission is see if someone else has already made stl files I can use. There were a couple of files out there, but none of them seemed to be to a standard that I would deem accuratley. I took it upon myself to model the helmet on my own using Blender.
Since I was relatively new to Blender this phase took me about 3 weeks to complete... I then scaled it to fit my friend using Armorsmith.
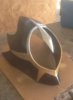
For the next phase I simply 3D printed the parts using my slightly modified Ender 3 using "e-SUN Pro Pla+" I've had great success using this filament with the stock Ender-3 creawesome profile in Cura. I also downloaded "CHEP" cura profiles and I highly recommend you do the same if you are using an Ender-3.
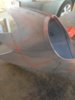
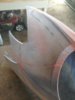
I printed all the parts using .2mm layer height and it provided me with a great base to work with. I then glued the parts together and actually melted the seems together using a soldering iron. Honestly I probably wouldn't be even had to have done that had I use daily a better glue. I used "Loctite Super Control Gel" and I do not recommend using that for helmets. I then used spot putty to cover up the seams and then sanded it down.
I then attached the front spire and began treating that until it was smooth as well. Unfortunately I did not get pictures but I then custom made a small metal bracket that goes behind the spire to provide more rigidity.
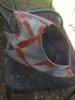
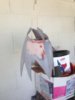
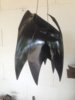
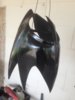
At this point the helmet was ready for paint. I decided to go with (Rustoleum 2X ultra cover paint & primer gloss black). This paint is provides great coverage and dries quickly. I pondered using Enamel but that paint takes forever to dry.
I then brought out my airbrush and sprayed the helmet using Alclad Aqua Gloss. I only used it because I know familiar with it. Any other gloss coat would have been fine. I then masked off the helmet where necessary and used painted on the silver (Alclad Aluminum) and gold (Alclad Pale Gold)
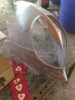
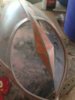
For the visor I simply painted a faceless chrome mask using (Alclad-Hot Metal Violet).
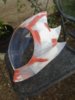
This being a fairly transparent paint it allows the visor to maintain its see through characteristics. I then used a matte clear coat because the paint scratches off easily. It left me with a really unique crystal ball like finish! i then attached it to the helmet using hot glue. Finally a gave the helmet a wash using acrylic black paint in order to make the helmet look somewhat battle tested. Finally the project was complete. The finished product is what you see in the OP.