For nearly a year, I have been enjoying seriously upping my game in cosplay by taking classes on Stan Winston School of character arts. Hair additions, makeup, scars and bruising, aging up or down, camera techniques, the list goes on. This build, as Dicaprio as Hugh Glass, impersonation cosplay, was a worthy challenge.
The split screen above was a technique I picked up on accident when I was trying to see lighting differences. What I did see, instead, was every spot that my face did not match my target. People tell me it shows them how close I already was but I see the differences and was then able to fix the facial hair in the chin and eyebrows, match the lip shape, repose my expression and pick my custom contact color. I realized that the split screen fooled the brain into treating both sides as you, as just you. So noticing a difference is as instinctual as seeing your eyebrows don't match when getting in front of the bathroom mirror or checking if you screwed up while shaving. We do this every day of our lives, so this split screen trick uses your built-in instinct to have both sides of your face be exactly the same. But that is well along in my build, so putting it in reverse and starting from the beginning: picked my target poses and headed to second hand stores to get the basics.

I knew this was going to require sewing the coat by hand but I started with a thrift store suede and pulled all the stitches to get my coat parts. I then purchased fake sinew wax thread and colored it to match with powdered makeup.

I hand stitched the parts back together and then cut in my bear claw damage and sewed that back, as well, to match Dicaprio's coat.

I then colored blood stain on the appropriate spots, mostly around the claw marks and on the sleeves using coolaid. I then made a custom bear grease replacement using a mix recommended by Chris Ellerby from Stan Winston school. A beard oil modified to what I had available, tallow, paraffin lamp oil and bee's wax. This covered the entire coat but intentionally splotchy, not total coverage, trying to match the inspiration photos.
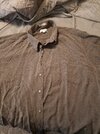
In the picture is also the antler coat clasp made from a spare antler given to me by my neighbor.
The grey undershirt did not match the original as it was completely button front. I fixed this in the pose by pulling the shirt to the side and pinning it so that it looked like the bottom was not button front. I also made the two top shirt buttons because I did not have a match. I greased up the shirt and then used charcoal tooth brushing powder to dirty up the shirt and the coat.


This was my intended inspiration picture.
and a good picture of the shirt from the movie
The pants were my old Jack Sparrow nurses scrubs, greased and drug in the dirt. I made the neck bandages from strips of grey stained bedsheets. I mixed some black Rit dye with lots of water and spattered it on the cloth. I also used this dye to darken the coat and the fake suede I later used to make the traveling pouch. I bound the neck bandages and sewed them together at several points then cut between two of the sewed points. At these ends I sewed an elastic loop and on the other, a button. This allowed me to make the neck bandages removable.

For the hand wraps, I used ace bandage stained with red coolaid powder, charcoal and grease.

I totally sluffed on the boot mocassins and instead wore my own powder grey boots.
The leg wraps were small fur pelts held on with elastic straps with a button sewn to one end and a loop on the other. Two elastics, per leg, to somewhat match the onscreen folds.
The hoody portion was made from a grey door mat. To get the proper fit, hang it on your head and line up the front to be about 1/2 inch behind the front point of your cheekbone. Reach around the back of your head and pinch the back where the two halves of the folded mat will touch without pulling it away from your face. Pull the mat off your head, folding it in half at the point that was at the top of your head. Make sure this is the right spot because you will be cutting it at this line.( 9/8/22 added NOTE: You are not cutting across the top, just starting your one and only back cut (back of head) starting where the top fold meets where you pinched it together in the back. Think of this as the top back corner.) Sew it from the fold down about 7 inches following the line where the two sides met in the back. I then sewed this to the coat on top of each shoulder as in the movie. Then you can trim it to length to match the onscreen hoody but in proportion to your own finished coat size. Make it look right, instead of cutting it to any measured length.
This is one of my poses with the finished hood piece.
The beard was partially mine and partially add ins on lace costume beard. Spirit glued to my face to fill in the missing sections. I also used cookie frosting to add the ice to the beard.


I cut the patches I needed from a full fake beard using a paper pattern I made on my face.

I made the matching Possibles bag from a second faux leather jacket matching what I could see of Dicaprio's bag.
As well as making a powder horn. There are full videos online for this prop and similar bags but none had the right pattern. I painted the straps to screen match using leather paint.

I added the small white yarn detail to the hoody using dollar tree yarn.

I then focused on the makeup bruising, bleeding and frostbite damage. Chris Ellerby recommended rigid colloidion for the puckering of frostbite, lined by a faint red makeup pencil. The bruising is violet, red, blue and charcoal stippled on using some eraser patterns I cut into pencils.


I added in some extra eyebrow hairs with spirit gum and eyeliner pencil to match Dicaprio (Dicaprio eyebrow below):

When all put together, I opted to take my photos on a white, rather than green, background due to the snow scenes I would be pasting into. Thereby, doing as little lighting adjustment as possible. And here are my final pics and then some fun memes. In several shots I put me in with Dicaprio instead of removing him from the shot: Oh almost forgot... I carved the walking stick from a tree that was downed in my backyard using some awesome Ryobi battery powered carving tools.
Only you oldtimers are going to understand the donut reference.
Attachments
Last edited:

