Galactus Helmet: first build

John Thompson

New Member
This is my first build on the forum. I've been lurking for a while and finally decided to contribute something. I've wanted to make my own Galactus helmet for years, have scoured the web for patterns and finally decided I'd have to make my own. This is heavily influenced by Bowen's bust and John Byrne's art.

I started by rolling card stock into a cone that would fit my head and sketching the features onto that. I folded the cone in half, cut it down the center and filled out the linework.
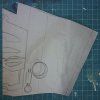
helm_pattern.jpg

Just in case anyone else would like to create their own version of this, I straightened out the photo and re-drew the linework in Adobe Illustrator. The grid is in 1-inch squares.
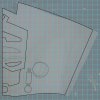
01_pattern_grid.jpg
 
Last edited:
I bought a blue camping mat for the helmet base- probably my biggest mistake of the project as I'll discuss later. I cut out the main helmet from the camping mat, and added the raised faceplate details with craft foam. I used contact cement to glue the parts together. I wasn't sure at this point how I would make the extended "bill" above the brows, but I knew I wanted a slot to anchor it into the foam.

02_cut_pieces.jpg

A quick test fit of the foam:

03_test.jpg
 
I began to putty some of the cut edges to prepare them for plastic coating. Here I'm using a mixture of Paper clay and wood glue for added flexibility.

04_putty.jpg

I wanted to hard coat the foam to make it stronger, but I didn't want to use fiberglass or anything else with toxic fumes. I decided to give StyroSpray a try and ordered their sample kit. The instructions recommend around 72 degrees F or higher for the best curing, and at the time I was doing the hard coating it was just below that. Placing the helmet in the sun warmed it enough to cure but the plastic also had time to run a bit. I was brushing the Styrospray on in thin layers, but the slow cure combined with the camping mat texture meant I had a lot of puttying and sanding to do later.

06_plastic_coat.jpg
 
Last edited:
Pictures are showing for me now.

Next step: The horns/antlers/ear.... things were made out of foam core board covered on both sides with styrene sheet for durability. For the cone shaped base of the horns I looked for existing objects like yogurt cups or sour cream containers, but nothing had the shape I wanted. I eventually made my own from cardstock and coated them with several layers of StyroSpray plastic.

05_horns_test.jpg

Styrospray hardens but is still very flexible. I needed some kind of putty that wouldn't crack if the foam shell of the helmet was pinched or flexed. Still looking to avoid the fumes of Bondo, I tried Durham's Water Putty mixed with wood glue instead of water. This provided me with a nice hard shell that sanded well and was able to flex a bit. I could apply this in thin layers with a palette knife so I didn't have to add too much material.

07_horntest2.jpg
 
Last edited:
On to the details: there is a "grille" area over the chin that is filled with vertical lines in the comics. I decided to interpret these as thin tubes. I found some bamboo chopsticks lying around that I cut and shaped to fit the hole in the chin. These were glued to a small piece of craft foam that was then glued in place.

08_grille.jpg

For the piping detail around the face I raided the plastic sprue from an old model kit. I heated and curved this to form the arch over the chin piece.

09_grille2.jpg
 
Last edited:
More plastic sprue piping going around the face and across the brows. This was attached with gel superglue and reinforced with epoxy putty. Gaps between pieces were also filled with epoxy putty.

11_piping_complete.jpg

Between the face and the "ears" are a simple cylinder and box connected by short tubes. The cylinders were cut from empty pill bottles and the boxes were made from blue camping mat covered in paper clay. More plastic sprue made up the tubes.
10_details.jpg
 
Last edited:
After more putty and sanding, it was time for some paint. At this point I had missed Halloween and Comicon, but my company was having a masquerade for their holiday party and I figured this qualified as a mask! Time was running out though so I wasn't able to finish everything I had wanted. There are details at the top of the helmet that I had to exclude for now but will complete later. I also didn't have time to shade the paint and weather the helmet to bring out the details. At this point it is a giant fluorescent pink monster!
12_pink_monster.jpg

Here I am at the company party at the Copacabana in NYC. The helmet was a hit!

13_party.jpg
 
Last edited:
You can place the StyroSpray in boiling water to raise temperature before mixing. One customer of mine even heats it in the microwave however I would not recommend this.
 
Back
Top