Golden Snitch wings (Harry Potter)

ATL Kenobi

Sr Member
RPF PREMIUM MEMBER
1 Quidditch3-full.jpg
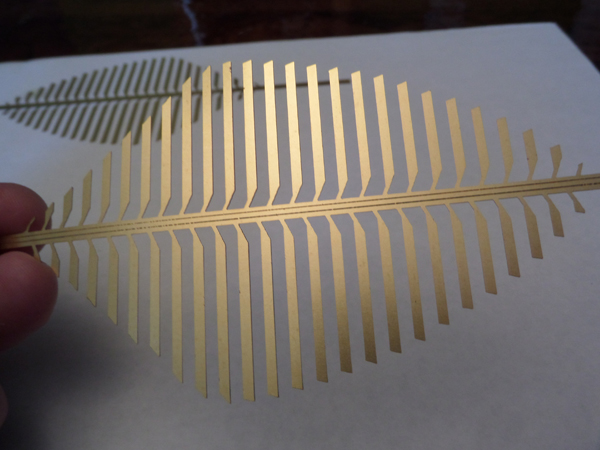
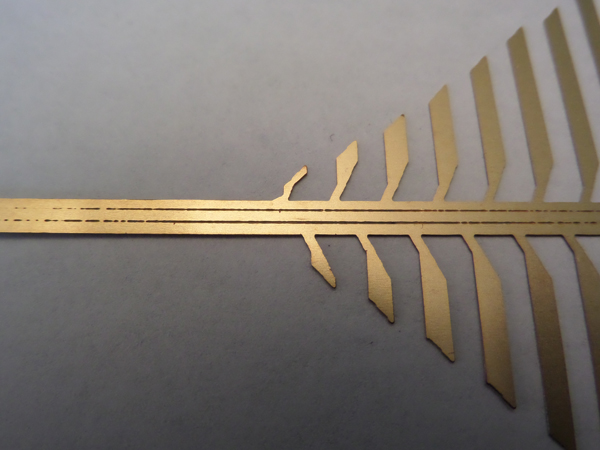
After studying various pictures of the Golden Snitch and then trying to reason out how the original prop was made, I finally figured out how I could make a set using available materials and the tools I have. It's made of a pewter-like material (50063M) which I cut out using an X-Acto knife.

1 wing.jpg

2 wing.jpg

3 wing.jpg

They are every bit as fragile as they look! :unsure One of the feathers has already broken off which I hope I'll be able to glue back on.

I have a pair of Turbo Sausage's Golden Snitches. I believe his design and model are very accurate.
4 Shapeways snitch.jpg
Shapeway's description of this version though was "smoothed and polished". I do understand that the 3-D printer process works on depositing successive layers of resin, but to call this "smoothed and polished" is a bit of a stretch. The next part of this project will be to actually smooth and polish the plastic without removing all the detail so that I can apply gold leaf to it.

I plan to mount the wings out to the sides as in this picture:
5 Snitch.jpg
Not sure yet how that'll be done.

ATL
 
The wings look very good considering your material choice! This is something ive been wanting to build for a while, I have got as far as buying very thin brass as I want to chemical photo etch them as I believe they did in the film but its a long process. Currently trying to find more things to print to make the shapeways postage to the UK worthwhile!

Nice job.
 
Looking good so far. I modeled my own Snitch out of a ping pong ball and photo etched the wings years ago. Sold a few sets of the wings here.
snitch5.jpgsnitch8.jpg
 
I don't know if this would work well enough, but if you're able to get some thin sheets of spring steel you could use that for the wings, since it'd be more resilient than most other metals.
 
Brass etching sounds the way to go about it. There was a tutorial someone had on here on how to do it in your kitchen sink and a straw when they were brass etching a Lament Cube.
 
Wow fantastic wings

Thanks Stoney!


I was fortunate enough to be able to go to Leavesden Studio and get a good high resolution picture of the Golden Snitch prop:
DSCN 1545.jpg

My intent was to replicate the prop (RPF) as accurately as I could using the tools I have and material I could afford. I zoomed in and studied this picture for a while until I understood what I was seeing. Looking at the wing that goes off to the left, it finally dawned on me that the wing started as a folded piece of sheet metal of some sort (I suspect sterling silver) and every other feather is on the opposite fold. If laid flat it would look like this:

Snitch wing template.jpg

Looking at the wing going off to the right, the fold is flat across the top.

I considered using brass. I have a Caswell plating kit to make it silver in color, and although they offer a metal etching kit ($75), I just don't have the capability of bending sheet brass such that the fold would be flat across it's length. Also, since the sheet metal would have to be folded before it was etched, I had my doubts as to how well that would work since there are some very narrow areas.

I suppose other hard metals, spring steel, chrome-moly, titanium, Inconel, would be much more resilient, but I couldn't justify buying a home CNC mill, and the needed engraving bits, for a one time projects.

The pewter worked for me. It's not terribly expensive, it's the right color, I could bend it around a form, I was able to burnish the fold so it's reasonably flat, and I could cut it with an X-Acto. It just took several nerve-wracking hours.

ATL

edit 9Sept2016 : This method is wrong. Each wing is done in 2 overlapping pieces soldered together at the rib.
 
Last edited:
I never noticed the double layer to the feathers before. Definitely gives it a bit of depth and simple complxity. Nice!
 
I just don't have the capability of bending sheet brass such that the fold would be flat across it's length. Also, since the sheet metal would have to be folded before it was etched, I had my doubts as to how well that would work since there are some very narrow areas.

The piece wouldn't be folded before it was etched, it would be done after. The process used in photoetching to create a line in which you want to bend along is called a half etch. The piece gets both fully etched and half etched at the same time. There is no doubt that the piece is going to be VERY difficult to manipulate after etching, especially depending on the thickness of metal you will be using.

While I am not the person PoopaPapaPalps is referring to, I do have a photoetching tutorial on Youtube, and have posted it on this site also
.
https://www.youtube.com/watch?v=UsmE1gLbHqI

If you don't mind, I'd like to give your design a try over the weekend. If it works well, I can send you a set for yourself :)
 
If you don't mind, I'd like to give your design a try over the weekend. If it works well, I can send you a set for yourself :)

By all means please do! Thanks!

As drawn, scale the template so the "rib" is 5" long, although it's important to make the "rib" at least an inch longer (to the right side) to use for anchoring inside the Snitch body. If you'd prefer a DWG, or PDF I can send later. LMK.

Great video BTW!

ATL
 
A little update, as promised. Last night I did some touch ups on the artwork. I changed where the “feather” meets the “rib” just to give it a few more pixels of beef. I made the rib about an inch and a quarter longer as suggested to aid in attachment. If it happens to be a bit long, it can be cut fairly easily. Tonight I will make the stencil and do the exposing. I'm able to get both wings on a single sheet of brass, so that's a bonus on cost and time. I’m going to save the etching part until Monday. I plan on taking video of the etching of the wings mainly because I think it’ll look really cool in time lapse.

snitch wing.jpg

snitch wing 2.jpg
 
My only suggestion at this point would be that where the "feathers" meet the "rib", there should be a slight arc. Hopefully that shows up in the attached image,snitch wing 2.png

..and I agree that beefing up the area where they meet is a really good idea!

The material thickness I determined from scaling the picture was 0.014 inches (27 AWG) thick. The pewter I used was 0.010 .
 
Last edited:
This may be a better picture to show the change I made. This is the original...

snitch wing 3.jpg


This is what I changed it to...

snitch wing 4.jpg


Just had to give that connecting point a tiny bit more.

As far as thickness goes, when it comes to common brass sheets, they come in 4" x 10" sheets or 6" x 12" sheets. 4 x 10 come in .005", .010, .015, .032 while 6 x 12 sheets are .010, .020, and so on. I hppen to have some 6 x 12 .010 sheets here, so that's what I used. The smaller sheets were just to small to do both at the same time. I'm really impressed that you were able to figure out thickness by that picture.

Last night I did get the brass, prepped, exposed, and developed. Pictures of developed metal aren't that exciting, so unless someone wants to see it, I won't put it up. Later today I'll do the etching and make a video from that.
 
TDP - since your artwork is done it's a moot point, but where the blue line is on the attached is what I was suggesting should be slightly curved.

snitch wing arc.png

I used AutoCAD to determine the thickness. I place a PNG of the Snitch picture into model space. Scaled the body to 35mm, and then used the measuring function to measure the visible edge of the metal in several places and averaged those together.
 

Attachments

  • snitch wing arc.bmp
    103.4 KB · Views: 462
Im looking forward to seeing the results! Ive been meaning to get a .dxf or vector drawn up of the unfolded wings for a while but im curious to see how yours turns out, especially if you're making a time lapse too.
 
ATL - I see what you're talking about now. Unfortunately, that didn't show in any way in the first picture, so it isn't in this version. That isn't to say that it can't be done again, but it isn't going to be like that in this version.

Time to etch.
 
Good news, bad news, and I'm going to redo the pieces. The front of each piece turned out really well...

3.jpg


I didn't pay enough attention to the half etch lines on the back...

2.jpg


1.jpg


So I'm going to start over. I'll redo the artwork with the curve. I also need to add some beef to the half etch lines, and pay more attention to those lines during the developing phase. The spotted dotted lines are ares that didn't get properly developed, making bending cleanly impossible.

I'll check the video to see how it turned out. I had it on while I was working, but I wasn't able to pay a lot of attention to it as I had my hands in acid at the time. Good news is that if the video is bad, I'll have another chance to do it right when I make the next set. I'll likely start doing corrections later in the week.
 
This thread is more than 4 years old.

Your message may be considered spam for the following reasons:

  1. This thread hasn't been active in some time. A new post in this thread might not contribute constructively to this discussion after so long.
If you wish to reply despite these issues, check the box below before replying.
Be aware that malicious compliance may result in more severe penalties.
Back
Top