Venom1989
Active Member
Hello everyone
I am a big fan of Iron Man and I always wanted to build a complete Suit for myself. I had quite some experience in building cosplay props and costumes with Eva Foam, but after 3d printing became affordable in the recent years I decided to tackle this project with new enthusiasm and this new miraculous technology.
I bought a used Elegoo Neptune 3 plus for 250€ in December 2023. naturally, like everyone who gets his fingers on a new toy i was quite excited, but had to realize that I need to learn a bunch of new things before I can finally build my dream project. After a steep and intense learning curve I was finally able to print some decent objects with a nice quality. Of course there were some setbacks, like some loose belts, lack of experience and problems with the right size calculation of some parts which led to reprint the whole back and front of the chest, but all in all it went well. And hey - That’s the funpart - right? Learn from your mistakes and take the chance to improve yourself - the journey is the goal.
Damn - what a long Journey. Endless hours of sanding - priming - sanding again - priming again, over and over.
I know this is my very first 3d costume and a lot of things aren’t super smooth and clean - but hey, just give it a good washing and a used / damaged look and no one will see the imperfections (unless you get veeery close)
I want to share my experiences and work with you guys. I hope to improve myself and my work and would like to hear what other (3D print) cosplayers could tell me to progress more.
So I started with the most important part: the Faceplate & Helmet

Even If the N3+ is a very big sized printer i decided to split the helmet (newbie’s choice)

I was very impressed of what this machine is capable of - if tuned properly (many hours of YouTube research + trail & error)

Next parts where the hands +

Attaching both sides of the gloves with magnets & hot glue to open/close them

The obvious must-have picture while building a costume

The gloves & wrist shield now with some damage-look

Added the LED eyes (bought on Amazon for ~ 30€) and of course: used the washing and damage look to hide some minor imperfections

Next parts where the shoulder, the bizeps and the forearm. After some trouble with a loose belt and some very frustrating troubleshooting with a damaged bearing i was able to print, prime, sand and paint this in 2 weeks

Slowly it’s starting to look like my dream-project. At this point I’m back into cosplay making for 10 weeks (after a 4 year break)

The massive backplate (which I had to split of obvious reasons into 4 parts) - sanded, primed & painted with the basic color.

Another load of work for masking the different parts

Clean - good.

Dirty & rough: better

The very first time the suit came from a puzzle of different shaped objects that made my living room a mess to something you could say is at least 1/3 Ironman

Some details added: the arc reactor. I used a simple LED tent light I literally glued into the front plate

Gluing different parts together with elastic straps and bucklelets (Bizeps /ellbow / forearm / handcover)

I made a new stand for the suit
At this point it’s around may/june

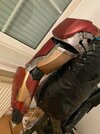
The backside of the suit.
New part: the belt , butt & cod cover are attached

Time to start with the legs
I separated the shins for better comfort while suiting up

Next update will be in a separate post
I am a big fan of Iron Man and I always wanted to build a complete Suit for myself. I had quite some experience in building cosplay props and costumes with Eva Foam, but after 3d printing became affordable in the recent years I decided to tackle this project with new enthusiasm and this new miraculous technology.
I bought a used Elegoo Neptune 3 plus for 250€ in December 2023. naturally, like everyone who gets his fingers on a new toy i was quite excited, but had to realize that I need to learn a bunch of new things before I can finally build my dream project. After a steep and intense learning curve I was finally able to print some decent objects with a nice quality. Of course there were some setbacks, like some loose belts, lack of experience and problems with the right size calculation of some parts which led to reprint the whole back and front of the chest, but all in all it went well. And hey - That’s the funpart - right? Learn from your mistakes and take the chance to improve yourself - the journey is the goal.
Damn - what a long Journey. Endless hours of sanding - priming - sanding again - priming again, over and over.
I know this is my very first 3d costume and a lot of things aren’t super smooth and clean - but hey, just give it a good washing and a used / damaged look and no one will see the imperfections (unless you get veeery close)
I want to share my experiences and work with you guys. I hope to improve myself and my work and would like to hear what other (3D print) cosplayers could tell me to progress more.
So I started with the most important part: the Faceplate & Helmet
Even If the N3+ is a very big sized printer i decided to split the helmet (newbie’s choice)
I was very impressed of what this machine is capable of - if tuned properly (many hours of YouTube research + trail & error)
Next parts where the hands +
Attaching both sides of the gloves with magnets & hot glue to open/close them
The obvious must-have picture while building a costume
The gloves & wrist shield now with some damage-look
Added the LED eyes (bought on Amazon for ~ 30€) and of course: used the washing and damage look to hide some minor imperfections
Next parts where the shoulder, the bizeps and the forearm. After some trouble with a loose belt and some very frustrating troubleshooting with a damaged bearing i was able to print, prime, sand and paint this in 2 weeks
Slowly it’s starting to look like my dream-project. At this point I’m back into cosplay making for 10 weeks (after a 4 year break)
The massive backplate (which I had to split of obvious reasons into 4 parts) - sanded, primed & painted with the basic color.
Another load of work for masking the different parts
Clean - good.
Dirty & rough: better
The very first time the suit came from a puzzle of different shaped objects that made my living room a mess to something you could say is at least 1/3 Ironman
Some details added: the arc reactor. I used a simple LED tent light I literally glued into the front plate
Gluing different parts together with elastic straps and bucklelets (Bizeps /ellbow / forearm / handcover)
I made a new stand for the suit
At this point it’s around may/june
The backside of the suit.
New part: the belt , butt & cod cover are attached
Time to start with the legs
I separated the shins for better comfort while suiting up
Next update will be in a separate post