Just another ANH Hero DL-44 build

tennantlim

Well-Known Member
Edit 12 April 2020: Second build with a Field Marshall kit here.

Earlier this year, my buddy Vincent came to me with a gold MGC Mauser C96, a genuine Hensoldt Wetzlar Ziel Dialyt scope, and a couple of quality parts and requested I build a DL-44 for him. This had been a dream project of mine for a while now and I have been absolutely inspired by the amazing builds here by Scott Juarez, John Miller, and Adam Karolian. Being located in Asia and specifically Indonesia, gun replicas and real vintage scopes are extremely hard to acquire due to stringent gun control and customs restrictions, so of course I jumped on the opportunity to work with such gems!

Before I continue, I want to give a shout out to John aka @chubsANDdoggers for all the pointers and information he generously shared with me through my build. Thank you brother!

Here's a breakdown of the parts;
MGC Mauser C96

Hensoldt Wetzlar Ziel Dialyt 3x scope
Fieldmarshal scope mount
DEC wooden grips, flash hider and bull barrel
Grill and antennae greeblies from John Miller

Ok here we go.

MGC MAUSER
20180225-_DL-44_build_Vincent-012.jpg
20180225-_DL-44_build_Vincent-013.jpg
20180225-_DL-44_build_Vincent-019.jpg
20180225-_DL-44_build_Vincent-020.jpg

THE SCOPE
20180225-_DL-44_build_Vincent-007.jpg
20180225-_DL-44_build_Vincent-008.jpg
20180225-_DL-44_build_Vincent-009.jpg

SCOPE MOUNT
20180317_184946-02.jpg

EVERYTHING ELSE
20180225-_DL-44_build_Vincent-005.jpg
20180225-_DL-44_build_Vincent-003.jpg
20180225-_DL-44_build_Vincent-004.jpg

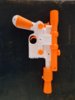
First order of things is my favorite part: tear everything apart!
20180225_213426.jpg

Removing the original scope mount was a little tricky, but thankfully someone on Facebook gave me a step-by-step and I managed to pry the dial assembly off.
20180302_203221.jpg
20180302_203107.jpg

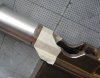
There are several prep work with the MGC to get through so I tackled the trigger first.
20180225_214625.jpg
20180306_083316-01.jpg
20180306_083348-01.jpg

Here we can see the MGC trigger is rather broad compared to the reference.
20180304_213043.jpg

I filed it down to a slimmer profile so it matches the reference more.
Photo_Grid_1520306373361-01.jpg

The recess is filled with putty and sanded down.
20180306_224751-01.jpg

I use an industrial strength paint stripper to remove the gold color and sanded it down to the bare metal. This is to ensure the upper receiver will take the blueing agent more efficiently.
20180322_083354.jpg

The lower receiver will be spray painted but I need the bare metal surface for the disc detail.
20180226_084129-01.jpg
20180226_085427.jpg
 

Attachments

  • 20180303_141044.jpg
    20180303_141044.jpg
    86.6 KB · Views: 410
Last edited:
The barrel needs to be filed down at the taper so the bull barrel can sit further back.
20180303_141044.jpg
20180304_101358.jpg
20180302_221632.jpg

The barrel is shortened to flush with the end of the bull barrel.
20180304_101258.jpg
20180302_203356.jpg

It pained me a lot to grind the MGC logo out.
20180306_113029-01.jpg

The flash hider screw had to be shortened so it sits flushed.
20180307_230350-01.jpg
20180308_092648.jpg

It was my first time blueing anything and I enjoyed the process a lot. Wipe down with alcohol, warm the surfaces with hairdryer on high, apply blue agent, wash with cold water, steel wool, repeat. I love how the patina ages beautifully with every coat.
20180423_071858.jpg
20180426_083603-01.jpg

To replicate the weathering on the cross bar and screws, I enlarged the reference to the same scale as the parts, traced the details onto adhesive labels with carbon paper, stick the labels on and cut the mask out.
20180423_070355-01.jpg
20180426-DL-44_build_Vincent-001_color.jpg
I should add that the screws were blued to a light shade of gray before paint to match the reference.

The DEC wooden grips were the last to arrive. Some sanding is required to fit them onto the MGC grip frame perfectly.
20180503_221902-01.jpg

I didn't photograph the rest of the build, so here's a summarized rundown in words;
- Stained the grips and scribed the "P" and scuff marks to match the reference.
- Got 1 inch round decals made to use as mask for the mystery disc. The decal has crosshairs to mark the centre point where I used a centre punch to mark the drill site.
- Spray painted the lower receiver flat black, applied graphite powder and clear coat.
- Stuck the grill and antennae greeblies on.
- Applied clear epoxy putty around the edges of the grills, as is visible in the reference.
- Painted the scope rings black and used steel wool to scuff it up.
- Final assembly.
 
Last edited:
To complete the commission, I customized an aluminium tool case into a carry case complete with foam, laser etched aluminium BlasTech Industries and armorer tags, and ANH styled dices that function as keychain for the case locks.

My art files for the tags and their actual incarnations.
BTI_label.png
20180507_084905-01.jpg
Armorer_plate.png
20180516_212758.jpg
20180516-_DL-44_build_Vincent-004.jpg

The dices are literally a one-day build.
20180507_073619.jpg
20180516_212528.jpg
20180516-_DL-44_build_Vincent-010.jpg

Here's everything put together.
20180515-_DL-44_build_Vincent-001.jpg
20180516-_DL-44_build_Vincent-009.jpg
20180516-_DL-44_build_Vincent-008.jpg
The foam cut-out is pretty rough because I didn't have the proper cutter to cut the intricate angles.

I was heartbroken to hand her over, but I take comfort in knowing she's going to a good home where she will be well taken care of and appreciated.
FB_IMG_1526519241846.jpg

Well that's it. It's been an immense pleasure working on this project and I am quite satisfied with the outcome. Thanks for looking!
 
Last edited:
Great work my man!!! Top to bottom you killed it. Beautifully done, extremely informative and hats off. Thanks for sharing!! [emoji482]
 
Last edited:
Hey, folks!
I'm new here, and new to prop building. With that in mind I hope you will be forgiving of any stooopid questions I may perpetrate.
So, what is the general consensus on the paint finish on the Greedo killer; is it a gloss, a satin or a matte black? And on the topic, what are the thoughts regarding the color of the grips?

Cheers in advance!
 
Consensus is that for GK, they used the black MGC. And with the black MGC, it’d not be overly glossy. I chose black satin for mine. Hope this helps.
 
Consensus is that for GK, they used the black MGC. And with the black MGC, it’d not be overly glossy. I chose black satin for mine. Hope this helps.

Great, satin it is! It looked like it in screen caps, but I wasn't 100%. Thanks, M4vrick!
 
Nice build man, I especially like the pic of your friend receiving the prize.

I was actually the receipient. Thanks! tennantlim is a master

Great, satin it is! It looked like it in screen caps, but I wasn't 100%. Thanks, M4vrick!

np... i actually did blue mine and had it de-blued. So with my gold MGC, i went with black satin. Unless you have a black MGC, you don't need to do anything to it.
 
Last edited:
I was actually the receipient. Thanks! tennantlim is a master


np... i actually did blue mine and had it de-blued. So with my gold MGC, i went with black satin. Unless you have a black MGC, you don't need to do anything to it.
You recall I mentioned that I was new to prop making? Well, I'm REALLY new. So new that... well... This is where I'm starting. I figured this would be a good way to learn airbrushing, weathering, etc. Umm...
 

Attachments

  • Toy DL 44.jpg
    Toy DL 44.jpg
    1.3 MB · Views: 123
I looked at many different versions of this blaster and I don’t think there is one better than the other. No matter how it’s painted or blued they all look great. Have you started a build thread or just doing it incognito?
 
You recall I mentioned that I was new to prop making? Well, I'm REALLY new. So new that... well... This is where I'm starting. I figured this would be a good way to learn airbrushing, weathering, etc. Umm...

You've certainly come to the right place, RPF is awesome for this. Interesting choice this, the DL44 to be your first weathering project (y) Do share your build man

what I would do to make it realistic is to indent the gun where needed and then spray paint it.

Yeap, and what Bobelix have is a great toy gun to start with.

I looked at many different versions of this blaster and I don’t think there is one better than the other. No matter how it’s painted or blued they all look great. Have you started a build thread or just doing it incognito?

Agree. This here was my recent build: the Greedo Killer
m4vrick Greedo Killer build
 
I looked at many different versions of this blaster and I don’t think there is one better than the other. No matter how it’s painted or blued they all look great. Have you started a build thread or just doing it incognito?
What is this build thread of which you speak, Biggs? I assume it is a forum thread that shows the step-by-step of a project from start to finish?
 
What is this build thread of which you speak, Biggs? I assume it is a forum thread that shows the step-by-step of a project from start to finish?
Bobelix My thread is a start to finish (almost finished, still have to glue my grille on). Check it out if you need some inspiration or tips. Any questions just let us know.
 

Your message may be considered spam for the following reasons:

If you wish to reply despite these issues, check the box below before replying.
Be aware that malicious compliance may result in more severe penalties.
Back
Top