You are using an out of date browser. It may not display this or other websites correctly.
You should upgrade or use an alternative browser.
You should upgrade or use an alternative browser.
K7 Bluebird 1/43 scale model
- Thread starter Keith
- Start date
Keith
Sr Member
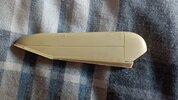
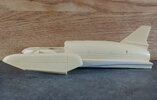
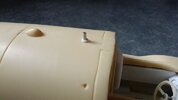
I noticed a fault with the shape at the back of the sponsons. The angle at the bottom doesn't cut in enough. This inaccuracy would be even more obvious when the K7 logo decal was fitted in that area, so in the photo below, I have made a couple of cuts, ready to correct the angle.
Attachments
Keith
Sr Member
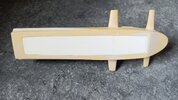
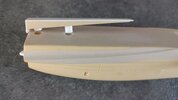
Both sponsons with the angle at the back corrected, but then I noticed that the side panels that run along the bottom of the hull were the wrong shape and too thin.
I used automotive body filler to fill in the side panels and then sculpted back the correct shape.
I used automotive body filler to fill in the side panels and then sculpted back the correct shape.
Attachments
Keith
Sr Member
Some of the older members here may remember that I don't like to permanently attach parts on models if it can be avoided.
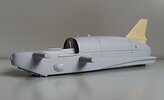
The tail fin was something that needed to be glued from the inside of the hull ideally, before the belly was fitted. This would have put the tail at risk of being broken throughout the build.
Also, if it was ever damaged in the future, the whole model would need repainting to fix it properly.
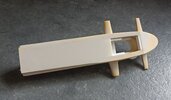
So I began building a plastic housing I side the model to hold the fin in place and added a large tab to the bottom of the fin.
The tab has a steel rod running along the bottom of it.
The tail fin was something that needed to be glued from the inside of the hull ideally, before the belly was fitted. This would have put the tail at risk of being broken throughout the build.
Also, if it was ever damaged in the future, the whole model would need repainting to fix it properly.
So I began building a plastic housing I side the model to hold the fin in place and added a large tab to the bottom of the fin.
The tab has a steel rod running along the bottom of it.
Attachments

Keith
Sr Member
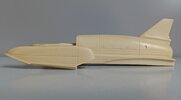
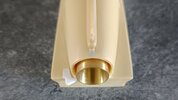
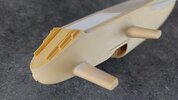
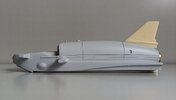
Another fiddly thing about the fin was getting it positioned perfectly straight.
The housing inside the body ensures that the tail is straight and makes it impossible for it to lean to either side.
The tail fin is fitted here and you can just see the metal rod in the slot of the housing
The housing inside the body ensures that the tail is straight and makes it impossible for it to lean to either side.
The tail fin is fitted here and you can just see the metal rod in the slot of the housing
Attachments


joberg
Legendary Member
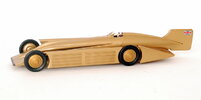
Interesting model and very rare...not a lot of a market for these, almost, obscure historical things. I bought, in Brussels, several years ago this tin car (you'll recognize it right away) made by Schylling (Dutch manufacture). They also made The Blue Bird in that same tin construction.
Eager to see your next update.")
Eager to see your next update.
Attachments
Keith
Sr Member
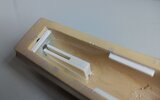
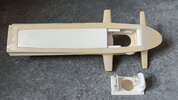
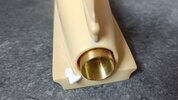
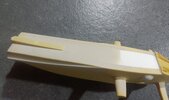
I built a plastic box to hold a magnet. The box was then filled in withe epoxy resin, so the magnet will never get wet while cleaning the model.
There are also two little magnets below the white strip on the main spar. These magnets will hold in the cockpit, which will be removable.
There are also two little magnets below the white strip on the main spar. These magnets will hold in the cockpit, which will be removable.
Attachments
Keith
Sr Member
Oh yes, very nice indeed. I think Bravo Delta do a nice wooden model of that too.Interesting model and very rare...not a lot of a market for these, almost, obscure historical things. I bought, in Brussels, several years ago this tin car (you'll recognize it right away) made by Schylling (Dutch manufacture). They also made The Blue Bird in that same tin construction.
Eager to see your next update.
Keith
Sr Member
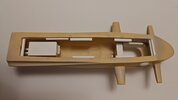
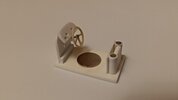
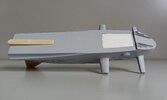
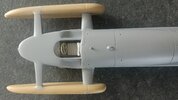
Here is the scratch built cockpit so far, still some work to do.
The large round magnet on the cockpit floor doesn't do anything, as is only there as a removal tool, so I can extract the cockpit out of the bottom of the model, using anything made of metal.
Also shown here is a replacement bottom for the hull, as the resin one was very rough.
I made a housing for a more powerful magnet on the inside of the bottom panel, also filled with epoxy resin. This will hold the model to the display base.
Attachments
Keith
Sr Member
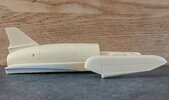
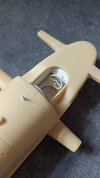
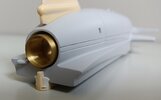
The bottom of the hull glued into place.
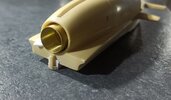
Shown here is the removable cockpit in position and a new tailpipe I made out of brass tube. The tailpipe has a magnet on the inner end of it which attaches to a metal bulkhead inside the model.
Shown here is the removable cockpit in position and a new tailpipe I made out of brass tube. The tailpipe has a magnet on the inner end of it which attaches to a metal bulkhead inside the model.
Attachments

Keith
Sr Member
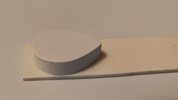
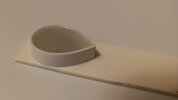
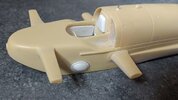
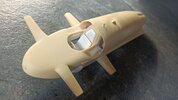
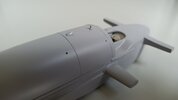
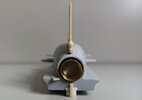
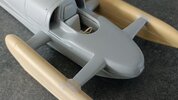
I made a base for the antenna using a tiny metal tube that runs inside the body. The antenna itself will slot into this tube and be removable. I also made the little dome out of an offcut of resin from the unused hull bottom.
Attachments
Keith
Sr Member
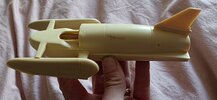
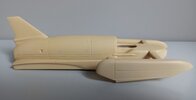
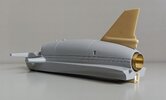
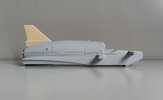
A scratch built pilots seat and the hydrofoil added. The hydrofoil attached with a magnet that's in one of the poles added to it. This magnet meets up with the bottom of the magnet box that holds the tail fin in position.
Attachments


Keith
Sr Member
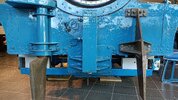
I went to Coniston the see the real restored Bluebird (it was raised from the lake bed in the year 2000). Here is one of the photos I took to use for reference
The hydrofoil included with the kit was too big. After finally finding some references photos of the hydrofoil, I made a new one the correct size.
The hydrofoil included with the kit was too big. After finally finding some references photos of the hydrofoil, I made a new one the correct size.
Attachments
Keith
Sr Member
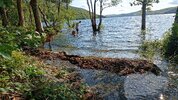
I did a fair amount of research on the Bluebird subject and found the exact spot where the famous crash footage was filmed from and also where they measured the speed.
It's around the opposite side of the lake to where Bluebird was launched from on the east side.
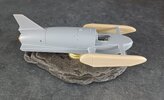
Here I am with our Dogs, looking for a suitable rock to make a display base for the model with. Because the model will attach to the display base using the magnet built into it, my plan is to have a few optional display bases
It's around the opposite side of the lake to where Bluebird was launched from on the east side.
Here I am with our Dogs, looking for a suitable rock to make a display base for the model with. Because the model will attach to the display base using the magnet built into it, my plan is to have a few optional display bases
Attachments
Keith
Sr Member
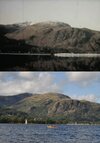
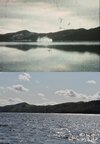
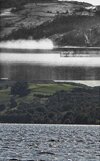
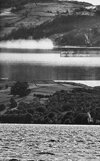
Just out of interest, here are some then and now photos I took while I was there.
January 1967 at the top and my photos bottom.
I added the bluebird to my last photo using a photo app on my phone.
January 1967 at the top and my photos bottom.
I added the bluebird to my last photo using a photo app on my phone.
Attachments
Keith
Sr Member
The "Dragons Teeth" panel added to the nose and the model in its first coat of Tamiya fine surface primer.
Although the finish is better than I thought it would be after the first coat of primer, there are the unusual pin holes in the filler to sort out.
Although the finish is better than I thought it would be after the first coat of primer, there are the unusual pin holes in the filler to sort out.
Attachments
-
 IMG_20240904_164115.jpg1.2 MB · Views: 71
 -
 IMG_20240904_163808.jpg1.3 MB · Views: 71
 -
 IMG_20240904_164145.jpg819.5 KB · Views: 74
 -
 IMG_20240904_164227.jpg1.1 MB · Views: 72
 -
 IMG_20240904_164304.jpg958.9 KB · Views: 72
 -
 IMG_20240904_163638.jpg1.5 MB · Views: 77
 -
 IMG_20240904_164330.jpg1.2 MB · Views: 77
 -
 IMG_20240904_164401.jpg941.1 KB · Views: 78
 -
 IMG_20240904_164436.jpg1,001.4 KB · Views: 69
 -
 IMG_20240903_140808.jpg1.7 MB · Views: 99

Keith
Sr Member
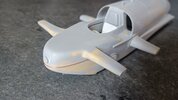
I wanted to paint the model without the sponsons attached to make things easier, but the spars needed filling work where they join onto the sponsons.
I filled in the holes at the rear of the sponsons for the rear spars and cut those spars down shorter. I drilled holes all the way through the spars into the main body for a brass rod to pass through and into holes drilled into the filled in area of the sponsons.
The front spars were more tricky, as they slot into square cutouts in the sponsons, that needed a lot of filling work.
I got around the problem by drilling all the way through the front spars into the nose section, then cutting the very ends of the front spars off.
The little cut off spar pieces were then glued into position in the sponsons and the joint filled. The holes in the front spars and the end cut off end pieces line up perfectly for the brass rod, as they were drilled before the ends were cut off.
The new joint doesn't need any filling.
Attachments

Keith
Sr Member
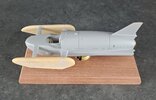
I've just received a nice HMF acrylic case for it that's the perfect size, but as well as the case, I'll be having a mahogany plinth and the rock I got out of the lake at Coniston, close to where Bluebird went down.
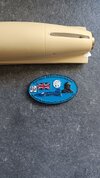
I may use this limited edition geocoin as a plaque for the display base.
I may use this limited edition geocoin as a plaque for the display base.