Mr Mold Maker
Master Member
Hey folks, I recently picked up a Lord Marshal helmet from Casey McCabe. I'm told that it originates from a pre-production piece, and judging by the fantastic sculpture work there is no mistakes about it. Miles' work is just out of this world! Of course with everything I post, I try to grab photos along the way to provide somewhat of a write up.
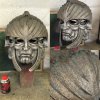
This particular piece came already trimmed, and all I had to do was touch up the seam. Casey did a fantastic job both molding and casting this so the clean up was a breeze. This thing is a tank, and without a doubt the best resin piece I've ever owned. Here is a photo I got from him.

It was primed using some Bondo Hotrod Black filler primer, and then lightly gone over with a scotchbrite pad to knock down any unwanted texture.
I base coated the piece with a dark metal paint, Magnetic Steel, or something to that effect. I let the base dry over night, and then I could begin the process of adding the metal tones and color texture to the piece.
The metal tones come from a product called Shrapnel from Imperial Surface Technologies. I used two shades of Shrapnel, one right out of the can and one toned down with some gun metal paint. I sprayed these two tones, and a straight matte black, on in very spatter-y layers through my HVLP gun. The goal was to let all these different tones come together and mix on the surface to get an organic metal look. I was really happy with the results. You can see just how messy it made my little spray booth.. Not as happy about that!!
Here we can see it with the metal tones applied and the wonderful product that made it happen! A side note, I've used a LOT of metal paints.. Nothing even comes close to the stuff Imperial Surface puts out. It is really the best paint on the market, and there is a reason why all the professionals use it.
The spray booth lighting washed out my phone pretty bad and I didn't realize it for a while so you'll have to forgive the bad photos!!

A close up of the metal tones. The spatter technique works really well for me as I'm a huge fan of the natural and organic breakup.

For my next step, I went in and started to add the brass tones to the upper helmet, as well as in certain spots on the face plates. The goal was to keep the brass tones very thin to allow all those metal tones to peek through. I don't have the greatest photos of this step but hopefully it shows what I mean.
This is also when I began to add the more aluminum dry brushed tones to the faceplates. There is very subtle blues, pinks, reds, and purples lightly mottled on the dome as well.

Here you can see where I've begun to map out the green patina tones on the upper helmet and fins.

From there I went in and did a little more dry brushing around the face, as well as added more brass high lights here and there. The whole helmet was shaded with some shading grey to help the sculpture pop out a little more as well.

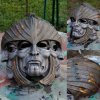
Finally, I sealed the whole piece with an automotive clear, and began applying the gold leaf! Now there are quite a few different helmets each with different paint jobs out there. I couldn't tell you which one(s) were on screen and which weren't. Personally I really liked the look of the Propstore London helmet and that's what I aimed for with this one, so gold leaf was a necessity! So here is the finished piece! I added the gold leaf and did some final painting. Painting on and around the gold leaf, adding more patina, and highlighting the faces with silver Rub-N-Buff for example. It was a very rainy and over cast day when I grabbed the photos, so you'll have to take my work when I say the faceplate is a lot more metallic than it looks!

So I hope you guys enjoy! I also hope you learn something! It was a very fun project, and in the end a pretty simple paint job. Just a whole lot of layers! I've got a spray booth to clean, so I'll catch ya guys next time! :lol
This particular piece came already trimmed, and all I had to do was touch up the seam. Casey did a fantastic job both molding and casting this so the clean up was a breeze. This thing is a tank, and without a doubt the best resin piece I've ever owned. Here is a photo I got from him.

It was primed using some Bondo Hotrod Black filler primer, and then lightly gone over with a scotchbrite pad to knock down any unwanted texture.
I base coated the piece with a dark metal paint, Magnetic Steel, or something to that effect. I let the base dry over night, and then I could begin the process of adding the metal tones and color texture to the piece.
The metal tones come from a product called Shrapnel from Imperial Surface Technologies. I used two shades of Shrapnel, one right out of the can and one toned down with some gun metal paint. I sprayed these two tones, and a straight matte black, on in very spatter-y layers through my HVLP gun. The goal was to let all these different tones come together and mix on the surface to get an organic metal look. I was really happy with the results. You can see just how messy it made my little spray booth.. Not as happy about that!!
Here we can see it with the metal tones applied and the wonderful product that made it happen! A side note, I've used a LOT of metal paints.. Nothing even comes close to the stuff Imperial Surface puts out. It is really the best paint on the market, and there is a reason why all the professionals use it.
The spray booth lighting washed out my phone pretty bad and I didn't realize it for a while so you'll have to forgive the bad photos!!

A close up of the metal tones. The spatter technique works really well for me as I'm a huge fan of the natural and organic breakup.

For my next step, I went in and started to add the brass tones to the upper helmet, as well as in certain spots on the face plates. The goal was to keep the brass tones very thin to allow all those metal tones to peek through. I don't have the greatest photos of this step but hopefully it shows what I mean.
This is also when I began to add the more aluminum dry brushed tones to the faceplates. There is very subtle blues, pinks, reds, and purples lightly mottled on the dome as well.

Here you can see where I've begun to map out the green patina tones on the upper helmet and fins.

From there I went in and did a little more dry brushing around the face, as well as added more brass high lights here and there. The whole helmet was shaded with some shading grey to help the sculpture pop out a little more as well.

Finally, I sealed the whole piece with an automotive clear, and began applying the gold leaf! Now there are quite a few different helmets each with different paint jobs out there. I couldn't tell you which one(s) were on screen and which weren't. Personally I really liked the look of the Propstore London helmet and that's what I aimed for with this one, so gold leaf was a necessity! So here is the finished piece! I added the gold leaf and did some final painting. Painting on and around the gold leaf, adding more patina, and highlighting the faces with silver Rub-N-Buff for example. It was a very rainy and over cast day when I grabbed the photos, so you'll have to take my work when I say the faceplate is a lot more metallic than it looks!

So I hope you guys enjoy! I also hope you learn something! It was a very fun project, and in the end a pretty simple paint job. Just a whole lot of layers! I've got a spray booth to clean, so I'll catch ya guys next time! :lol
Attachments
Last edited:


