Making a Obi-Wan motorized stunt from a cheap Chinese Luke v2.

Steiro912

New Member
Hi.

So I'm not very good at documenting my builds, but I thought this was a small and easy project that could be fun to folllow.

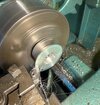
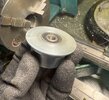
I bought a lathe last year, been wanting one for years. And one of the missing sabers that I haven't done yet is a ANH Obi-Wan stunt.
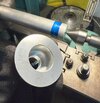
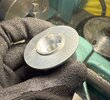
Browsing Aliexpress late one evening I found a saber that might be a good base for the project, so I ordered a couple.

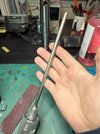
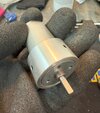
Let's see how it turns out, this is what I ordered:
lukev2.jpg
 
Last edited:
...and this is what showed up in the mailbox. Not exactly like the picture, but hey...

It's not that bad actually. Apart from the weathering, which could not fool a small child. In the night.
But mechanically and dimension wise it's pretty ok.

I'll take it apart and start making some small changes that hopefully will make it look like a proper motorized Obi stunt.
IMG_2600.jpg
 
Last edited:
Right, so let's start with the pommel, the part that I think will require the most work to look like it should.

I need to fix the ugly sound vents, remove the "not such a mystery chunk anymore", replace the D-ring and do something about the horrible chemical "weathering".

IMG_2601.jpg
 
Last edited:
I ended up sanding off the weathered layer first with some fine sandpaper and 3m scotch brite pads.
Then it went into the lathe to remove the chunk and sound vents.
 

Attachments

  • IMG_2533.jpg
    IMG_2533.jpg
    1.6 MB · Views: 20
  • IMG_2535.jpg
    IMG_2535.jpg
    1.7 MB · Views: 24
  • IMG_2536.jpg
    IMG_2536.jpg
    1.4 MB · Views: 22
  • IMG_2537.jpg
    IMG_2537.jpg
    1.4 MB · Views: 20
  • IMG_2538.jpg
    IMG_2538.jpg
    1.4 MB · Views: 25
Now to make a plug for the big hole I just made. And drill a hole for the motor wiring.
 

Attachments

  • IMG_2544.jpg
    IMG_2544.jpg
    1.3 MB · Views: 17
  • IMG_2540.jpg
    IMG_2540.jpg
    1.6 MB · Views: 18
  • IMG_2539.jpg
    IMG_2539.jpg
    1.5 MB · Views: 18
  • IMG_2545.jpg
    IMG_2545.jpg
    1.8 MB · Views: 19
Last edited:
And here's the result, finished off with a correct D-ring from roygilsing at Wannawanga. I'm pretty pleased with how it came out. Fortunately nobody knows it came loose from the lathe while machining. If anybody asks about the scuff marks I'm definitely claiming screen accuracy.

IMG_2602.jpg
 
Last edited:
this is wild - interesting to see one of those cheap chinese sabers. A few companies I think completely copied some Anakin Starkiller hilts and there was some drama

you're going to learn so much about this saber trying to fix it, I've done this with projects and afterwards i felt like I understood the prop better. Your endcap alone is a big deal!
 
Next was the clamp section. The inner diameter is much too big for the electric motor I got, so needs a simple adaptor.
IMG_2552.jpg
 
Last edited:
Another piece of aluminium in the lathe... And a couple of M4 hex screws to hold the motor.
Next i also did drilled and tapped two hex screws in the clamp cage to secure the adaptor that secure the motor. You get the idea. Came out pretty good I think.

IMG_2571.jpg
 

Attachments

  • IMG_2567.jpg
    IMG_2567.jpg
    1.5 MB · Views: 6
  • IMG_2558.jpg
    IMG_2558.jpg
    1.7 MB · Views: 6
  • IMG_2557.jpg
    IMG_2557.jpg
    1.9 MB · Views: 6
  • IMG_2554.jpg
    IMG_2554.jpg
    1.8 MB · Views: 8
  • IMG_2569.jpg
    IMG_2569.jpg
    1.8 MB · Views: 8
Last edited:
Here is the completed part, added a bubble strip and a v2 lever from Wannawanga.
The China-clamp is not very accurate, but since this is a low-budget build, it will stay, and can easily be changed later.
IMG_2604.jpg
 
Last edited:
Only the emitter left, first removed all paint with some thinner, then made an adapter for the ball bearing.
IMG_2608.jpg
 

Attachments

  • IMG_2573.jpg
    IMG_2573.jpg
    1.6 MB · Views: 8
  • IMG_2589.jpg
    IMG_2589.jpg
    1.8 MB · Views: 6
  • IMG_2590.jpg
    IMG_2590.jpg
    1.6 MB · Views: 6
  • IMG_2591.jpg
    IMG_2591.jpg
    1.5 MB · Views: 11
It's around -10C outside, and no heating in the workshop, so painting was done with a spray can on the porch, and cured in front of my wood burning stove.;)

IMG_2607.jpg
 
Then I cut a piece of 8mm stainless roundbar, chamfered the ends and attached a coupler for the motor.

IMG_2610.jpg
 

Attachments

  • IMG_2596.jpg
    IMG_2596.jpg
    2.4 MB · Views: 8
  • IMG_2609.jpg
    IMG_2609.jpg
    1.9 MB · Views: 6
Back
Top