My Life-sized 1979 Boba Fett Kenner Action Figure Project

azheat01

Master Member
RPF PREMIUM MEMBER
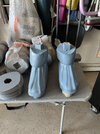
Another project started that I've been wanting to do for a while; a life-sized Boba Fett Kenner action figure. This will be complete with blaster and rocket firing jetpack. I've printed all the pieces, and as you can see I started gluing some of them together, seaming with Bondo, and sanding.

I found the file on Etsy, it's been challenging to say the least. It's an incredible model, but every mortise and tenon joint connector has needed to be heavily sanded to fit. I've also had zero luck contacting the designer of the file because I have a few questions due to the lack of instructions (outside of the jetpack). I've been trying for a month on Etsy, Facebook, and on his website. I really hope the man is OK.

I recently purchased an AnyCubic Kobra 2 Max hoping I could print some of the larger pieces in one go, that was a joke. I had multiple failed prints of the helmet, literally wasted almost 3 complete spools of filament. After days of back and forth with AnyCubic trying to recalibrate and troubleshoot, no luck, so I folded and returned it. I just decided to cut the larger pieces into multiple parts on my Bambu A1.

I have a few more touchups, then I can clean these and start primer / paint. My inner child is going crazy at the idea of a life-sized action figure!

IMG_1394.JPG


IMG_1395.JPG


IMG_1396.JPG
 
I love this project! I know someone who did this and seeing it in person was most awesome. They did theirs as the rocket-firing prototype. Are you going to paint yours up the same as the Kenner figure?

That's awesome, definitely painting mine like the Kenner figure. And now I gotta buy the files for that life-size vintage R2, only $20. Another project in the que!
 
Last edited:
Got some more sanding done and one final mockup before everything gets washed, primed, and painted. I still need to install the rocket firing spring and lever. Not gonna lie, this build was much tougher than I was expecting, but seeing it at this point is incredibly satisfying........

IMG_1429.JPG


IMG_1427.JPG


IMG_1430.JPG
 
So today I tried to finalize everything before I prep for paint and ran into yet another issue. When I assembled the jetpack to test the rocket firing mechanism I noticed the rocket would not lower into the jetpack. It seems, for whatever reason, the opening of the top "cap" of the jetpack was too small for the missile to go all the way down. Also, the back wall of the jetpack was canted in a manner that even after opening the bottom with a Dremel, it still wouldn't lower.

So I also Dremel'd out a section of the back wall and that worked, but it looked like hell. So, I modified the file and I'm reprinting it.

Below you can see in red the ideal amount of material I had to remove...............

1.jpg


And how it looks modified.............

2.jpg


The lower lip is still maintained so the plunger will still stop when firing the rocket and won't come out the top.

Another solution would have been to just resize the rocket and reprint it. But I didn't want to do that because 1), I already had the aluminum rod and spring and those would have needed to be replaced and 2) I wasn't going to be happy with the proportionate size of the new rocket to the size of the jetpack, it would've looked too small in my opinion.

A second issue was the hole size in the rocket itself. The hole didn't extend enough to the top, so when I pulled the lever and plunger down, the missile would hang on the aluminum guide rod. If I let the plunger go it would just collide with the bottom of the rocket instead of smoothly pushing it out the top; and it didn't launch but a few inches. Having the plunger smack the rocket was not gonna work for me. I could have cut the rod down some but I wanted to keep the original length to help keep the rocket straight, and it also makes it easier to load.

The red line below is the original end to the hole, the green line is the new one. Now the rocket will stay on the plunger when it's pressed all the way down.

3.jpg


Anyway, I thought I would share in the event anyone else was going to take on this project. Still no response from the original designer, but if anyone wants these files I'd be happy to share.

Thanks......AZ
 
I really want to make a functional backpack and put a foam missile in it, then dress up as this action figure and then go around cons and let people fire it. I'd totally not get away with doing that (more than once!), but it would be a fun idea!
 
hehe, OMG that is very amazing, I love it.

got a few questions, about how much does the figure weigh? and is there balancing issues?
 
hehe, OMG that is very amazing, I love it.

got a few questions, about how much does the figure weigh? and is there balancing issues?

Haven't weighed him yet, but I'm guessing around 50 lbs? No stability issues, as long as you have your leg to hip joints nice and secure, he's pretty stable and solid. He also has a peg hole in his foot, so I'll be making him a round black figure stand just like the vintage 3.75" figures.
 
Trying to test some paint options, having a hard time finding the MB Trout color, so I picked up a few other brands / colors. I completely abandoned the grey for obvious reasons. The French Blue was too blue, so I'm leaning towards the Rustoleum Slate Blue. It's still a tad too blue, but I like that it's a darker blue rather than a lighter blue.

And after looking at my original vintage figure, I also decided on going with a Satin finish. The original figure is a bit glossy, but I think at this scale it's too much. I also didn't want to go with Flat.

I'm gonna look at a few other color options before I start painting everything.

IMG_1468.JPG


IMG_1466.JPG


IMG_1470.JPG
 

Attachments

  • IMG_1466.JPG
    IMG_1466.JPG
    4.4 MB · Views: 21
OK, I think I found my final color. It's going to be difficult to get to the original color with rattle cans, but I found this can at Lowes that I somehow previously overlooked; Satin Midnight Garden.

IMG_E1483.JPG


It's still not the best, but I like it more than the Slate Blue as it's a little less "blue" and more grey. The picture is not the greatest, but I think you get the point. It's a little darker than I'd hoped, but I'll take it darker over the blue hue.

IMG_1481.JPG


I'll repaint the feet tomorrow and start on the other pieces.
 
what would you reckon at the cost of 3D printer “juice” (couldn’t immediately tell or be sure if these parts were Filament or FDM). If you said “0 mistakes or reprints”

What would your raw production cost be?

Ive got no idea when it hits THAT scale, lol.
 
Back
Top