KristinaLeigh
Well-Known Member
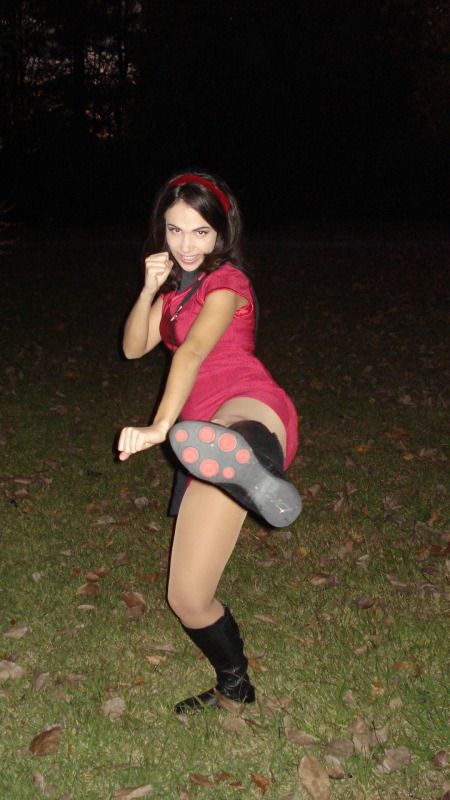
I had a friend mention that I should post this on here...I hadn't thought about it sooo...This is my Star Trek (2009) Uhura Duty Uniform / Communications Officer. I made this from late 2009 through a good part of 2010. It's a really comfortable costume and I've worn it as Uhura and just as a communications officer...
Retro look...

The Process:
I started with researching as soon as the Blu-Ray DVD was available. I got a hold of some pictures of the hero costume on exhibit and bought the Uhura Barbie as an additional resource. I patterned the dress and mocked it up in muslin, though in retrospect I wish I had went ahead and mocked it up in spandex. The dress is fairly complicated for such a simple silhouette. It features a raglan sleeve with shoulder darts, a faux empire waistline, Hong Kong finished seams and three curved style lines on the skirt.

I dyed jumbo spandex to match the Rittenhouse card that a fellow costumer was kind enough to let me borrow. To dye it, I used acid dye in a dye vat to get that vibrant red color so even.

I bought the cotton spandex in heather grey for the under shirt (which Joe later told me is a leotard! Thanks again, Joe!) and dipped it in black to get the charcoal grey needed.

The printing was the big challenge for me because I had never screen printed before. I used the transparency/emulsion method to burn my screen and thickened the dye with thickener and urea. Unfortunately the process was very tedious and problematic, so I ended up switching to a second option. I had originally thought about dye sublimation, which would be printing my un-dyed fabric on a wide format printer developed for printing fabric. However, the jumbo spandex fabric is matte on one side (the outside, printed side) and shiny on the other side (the inside). When it’s dyed both sides are the same color and the shiny side is used in the Hong Kong finish, which shows on the outside. Which makes the Dye Sub technique not so great because it only prints on one side, keeping the shiny side white. It would work if you printed one side and dyed more fabric the same as the printed image to use as seam binding. J But while working this all out, I ran across a family friend who has a business as a sign printer. They use a wide format UV light printer to print large signs and advertising pieces. The printer lays down ink and then cures it with a high-powered UV light…and we had the crazy idea to throw fabric up there and give it a shot. After some troubleshooting, it worked! I do want to go back to the screening method on the rest of the fabric after I learn more about screen printing with dye, but at the time I was ecstatic that the UV printer method worked.
Not the best picture quality because it's being taken with a cellphone, but here is the fabric on the UV printer:

You cannot look at the printer head while it's printing because of the high powered UV rays, so it was a little nerve racking! But thankfully it all worked out...

The design is not quite as crisp as I would like...but it looks pretty darn good for using a completely different method. I'm hoping to perfect the screening method one day and see about getting it closer to the Rittenhouse card.") And for the rest of the costume...
And for the rest of the costume...
I got the DKNY Dia boots, but I'm constantly on the lookout for the DKNY Hyper 2 boots...I'm afraid the movie might have bought them all!

And the Alexis Bittar pod earrings…

And voilà!


I’m hoping to add a QMX 09 phaser and communication’s earpiece soon!
For more in depth process, here is my build thread in my pre-RPF days: http://img.photobucket.com/albums/v20/LadyVader/DSC02033.jpghttp://starfleet1701st.yuku.com/topic/1580/Uhura-Female-Short-Sleeve-Pattern#.TvAWsUyZP60
An instrumental resource while building: http://magpies-trek.livejournal.com/
Retro look...
The Process:
I started with researching as soon as the Blu-Ray DVD was available. I got a hold of some pictures of the hero costume on exhibit and bought the Uhura Barbie as an additional resource. I patterned the dress and mocked it up in muslin, though in retrospect I wish I had went ahead and mocked it up in spandex. The dress is fairly complicated for such a simple silhouette. It features a raglan sleeve with shoulder darts, a faux empire waistline, Hong Kong finished seams and three curved style lines on the skirt.
I dyed jumbo spandex to match the Rittenhouse card that a fellow costumer was kind enough to let me borrow. To dye it, I used acid dye in a dye vat to get that vibrant red color so even.
I bought the cotton spandex in heather grey for the under shirt (which Joe later told me is a leotard! Thanks again, Joe!) and dipped it in black to get the charcoal grey needed.
The printing was the big challenge for me because I had never screen printed before. I used the transparency/emulsion method to burn my screen and thickened the dye with thickener and urea. Unfortunately the process was very tedious and problematic, so I ended up switching to a second option. I had originally thought about dye sublimation, which would be printing my un-dyed fabric on a wide format printer developed for printing fabric. However, the jumbo spandex fabric is matte on one side (the outside, printed side) and shiny on the other side (the inside). When it’s dyed both sides are the same color and the shiny side is used in the Hong Kong finish, which shows on the outside. Which makes the Dye Sub technique not so great because it only prints on one side, keeping the shiny side white. It would work if you printed one side and dyed more fabric the same as the printed image to use as seam binding. J But while working this all out, I ran across a family friend who has a business as a sign printer. They use a wide format UV light printer to print large signs and advertising pieces. The printer lays down ink and then cures it with a high-powered UV light…and we had the crazy idea to throw fabric up there and give it a shot. After some troubleshooting, it worked! I do want to go back to the screening method on the rest of the fabric after I learn more about screen printing with dye, but at the time I was ecstatic that the UV printer method worked.
Not the best picture quality because it's being taken with a cellphone, but here is the fabric on the UV printer:
You cannot look at the printer head while it's printing because of the high powered UV rays, so it was a little nerve racking! But thankfully it all worked out...
The design is not quite as crisp as I would like...but it looks pretty darn good for using a completely different method. I'm hoping to perfect the screening method one day and see about getting it closer to the Rittenhouse card.
And for the rest of the costume...I got the DKNY Dia boots, but I'm constantly on the lookout for the DKNY Hyper 2 boots...I'm afraid the movie might have bought them all!
And the Alexis Bittar pod earrings…
And voilà!
I’m hoping to add a QMX 09 phaser and communication’s earpiece soon!
For more in depth process, here is my build thread in my pre-RPF days: http://img.photobucket.com/albums/v20/LadyVader/DSC02033.jpghttp://starfleet1701st.yuku.com/topic/1580/Uhura-Female-Short-Sleeve-Pattern#.TvAWsUyZP60
An instrumental resource while building: http://magpies-trek.livejournal.com/
Last edited by a moderator: