Limited Run Star Wars - Jedi training remote SFX aluminium box base

Hey there!
batch 2 is finally finished! and, I'm very happy with the result :)
I'm going to be sending out the pre-filled cart by emails so you guys can purchase those :)
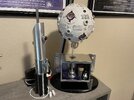
here are some (phone) photos of the finished batch. For studio photos, the previous batch is still representative of what you are getting.
In the future, I will be able to recognize from which batch a box comes but they are very much alike, just always pushing myself to do better if possible, so I tried to push even further batch 2 but it's extremely subtle :)

(there are names on most boxes because I did 5 different kind of adapters for this batch, so I needed some organization.
Boxes will come as shown on the right of the photo, 1st one on the left is an assembled example.
when you receive your box, you'll need to:
- remove plastic sleeves on the gear
- check the rod wasn't pushed down during shipping, if so, untight a bit the aluminium clamp and push on the rod gently. It should only be proud 1mm or so in the bottom.
- screw gear on bottom of the rod with provided M4 hex dome screw
- (depending on adapter, it will be attached or not.)
- remove plastic sleeve on bottom plate
- screw feet and bottom plate with the provided long screws
- attach your motor if you have one with the provided phillips dome screw and washer as seen in the refs
IMG_20241209_173553.jpg

IMG_20241209_174054.jpg

IMG_20241209_173608.jpg

IMG_20241209_173613.jpg

IMG_20241209_173622.jpg

IMG_20241209_173700.jpg

IMG_20241209_173715.jpg


cheers all and thank you for your support!
 
Hi there,

thank you for the 9 RPF members that paid their order right away last night, much appreciated!
I got to work right away. There are 4 boxes that are now gone to their owners, you should have received an email for tracking, if not check your spams. And 3 more packages done this afternoon. The last 2 I haven't finished are more of a custom order so i'll need to figure things out tomorrow.

My Christmas gift to you guys, I have upgraded the shipping of the oversea orders to the faster/fully insured shipping option, that is a 25€ upgrade per package because I'm a bit crazy, but I wanted to be sure for those since we are close to Chrismas! I hope they will get there quick and un-damaged!

this is the packaging mess in the workshop this morning, or maybe the mess of a workshop, I don't know! it's a small and busy workshop and I make do with what I have:
IMG_20241210_121127.jpg

and tonight with 3 more boxes done, the 2 last ones to pack tomorrow and only 3 boxes unpaid still:
IMG_20241210_164202.jpg


cheers all!
 
Hello there,
the first 3 boxes arrived to their new homes in Germany today :)
here is a photo courtesy of rooker2k, thank you so much for the nice pic, looks really great with the base and motor :)
IMG_9286.jpeg


There might be a tiny fitting issue with the motor possibly not reaching the proper depth so I'll be waiting for the first customers to confirm as it seems Rooker didn't manage to put it at the proper depth on the first try and he will be keeping me in the loop in the next few days.
hopefully it's good and you guys won't need a bit of filling from the bottom of the box to get the perfect fit. Really sorry for this, I don't have a motor in hand and I might have made the second batch too tight...

I've been monitoring tracking, all the US orders have reached customs in Paris and I hope their trip in the US will be short and safe and you guys will all receive before Christmass :)

thank you all again for your trust and support of my work :)
cheers all!
 
Hi there,

I think the first people in the US are about to receive their boxes. Please be carefull as I see one already that was put at the post office as the recipient was absent with apparently only 4 days to collect it. not a lot of time! we don't want those to be sent back!

for people wondering how to assemble those, there isn't a lot to do, there was a quick assembly guide written there if you missed it:

Important information for this batch:

alright, now for the not so fun part... I am officially confirming the issue raised in the previous message. I made a mistake with the size of the deeper hole of the motor space on that second batch...
The start of the hole inside the box is correct, I had measurements of the motor for this hole from someone in the first run. However, the deeper, thinner hole under that opening is slithly too small on the second batch. This one i didn't have measurements for and it was a last minute thing to figure out on the first run, and I didn't write it down. When I did the second batch, I made it too small...

To ilustrate how this works, here is quick 3 model cutout of how the motor goes inside the hole:
TR_mistake01.jpg

The larger hole at the top is roughtly 2mm deep and it accomodate for the larger diameter of the motor of 27mm. but there is that small recessed section at the top of the motor that needs to go under the hole as well to allow the larger part to sit at the 2mm deep recess I machined on my plates. That thinner section is 25.3mm and I made the thinner hole 24mm... so this means the thinner part of the motor sits in my 2mm recess when it should be the larger section that should sit there, and the result is the whole motor being approximatively 1mm too high,

with the 3D model cutout it looks like this:
TR_mistake02.jpg


I'm so sorry for this mistake, believe me, I really am, i feel so bad... I work so hard on my projects, I tried to push the second batch as far as i could and then I make that mistake... damnit!

The rest of the box is absolutely great! I'm sure you'll love them! but then there is that mistake...
Those being international orders, it's a bit difficult to fix for me, I think there are 3 solutions you can go about for fixing this issue.
- accept the motor is sitting a bit high and maybe glue it in place as is.
- It shouldn't be too difficult to enlarge the hole slightly from the bottom of the box, using a half round metal file. Just make sure you don't touch the larger recess inside the box, just file straight on the lower part of the hole until it's large enough to accomodate the top end of the motor. Seen from the inside, when the motor is deep enough, it will be invisible as the recess is already correct. And from the bottom, even if your filing job is not perfect, that is under the box and will be hidden by the bottom acrylic plate.
- third solution I'm not sure, mostly because I don't have a motor in hand, maybe you can file a bit the top of the motor, make a bevel or something that will allow it to go deeper into that hole.
(Of course, if you have a milling machine, you can just put the box upside down in your vice and enlarge that hole until it's 1" and it will work perfectly.)

Again, i'm so sorry for this. It's rare that I make a mistake, especially one that is discovered after the parts are shipped, but I don't know if this just was meant to happen anyways or if it's just because I'm tired with my health issues this past couple months (it has now been determined it's my Thyroid that is acting up but I still have an ultrasound test to do on the 23rd...), but this time something happened. I am so sorry! feel free to contact me if you need to discuss or need help.
I really hope this won't ruin the experience, especially for the new customers that are not used to my usual work. I hope that you'll see from the rest of the box that I really put a lot of work and care into this prop and I hope you'll still be happy.

Alright, for those that haven't received yet, please monitor your tracking and don't miss your box, those will be there soon from what I can see on the tracking :)

cheers all and happy holidays :)
 
I have had luck using a honing tool to bore engine block cylinders. I’ve even used this on steel tubing to make a tolerance fit around rear axle tubes. rather then throwing it in my lathe

This would chew through that aluminum quick!
 
Back
Top