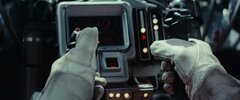
OMG! It has been staring us in the face! Look just below Jansen's main Snowspeeder display. Its the same object as the glove commlink. I have a feeling it may be a piece of a car interior turned upside-down, like the carbonate control panels. It has a toggle switch shape to it. Anyway, definitely the same part that they used on the controls of the Snowspeeder.
You are using an out of date browser. It may not display this or other websites correctly.
You should upgrade or use an alternative browser.
You should upgrade or use an alternative browser.
The Ultimate X-Wing Pilot Thread
- Thread starter Jimbo890
- Start date
the.rebel.agent
Sr Member

Interesting to see how many ways it was used in ESB. I wonder if its worth looking at the same vehicle they used for the Carbonite panel? Perhaps they parted it out? I believe it was a 1979-1981 Volvo 343. I have a feeling we'll find it in the dashboard or somewhere nearby. It seems like it could be the backside harness of a toggle/rocker switch like this in the photo.
Attachments

Last edited:
the.rebel.agent
Sr Member
As a matter of fact, in SW Costumes Original Trilogy one guy stated they used junk and watch parts to create some glove and rebel insignias greeblies. But, that part...could not be just a piece of junk.
the.rebel.agent
Sr Member
Tada! Final model. Any question or feedback will be welcome. Printing a test model right now...


more photos here:

 www.instagram.com
more photos here:
The Rebel Agent on Instagram: "Luke Skywalker's Wrist Mounted Comlink from The Empire Strikes Back Esta es mi versión del comunicador utilizado por Luke Skywalker, Han Solo y varios oficiales Rebeldes en el planeta Hoth. Modelados en @adskfusion360
40 likes, 0 comments - therebelagent on August 24, 2022: "Luke Skywalker's Wrist Mounted Comlink from The Empire Strikes Back Esta es mi versión del comunicador utilizado por Luke Skywalker, H...".
www.instagram.com
That is looking BEAUTIFUL!
AtomicToybox
New Member
Fantastic modeling and detective work! I've been casually researching this part for a while to double up on an X/Y-Wing/Snowspeeder pilot build to join the Legion. Great to see someone with more resources and skills than me doing this detail justice.
One question about the model and the Hoth version in particular: it looks like you've modeled the "button" (silver cylinder) perpendicular to the face it sits on - thus slightly at an angle relative to the base plate/horizontal. I had the impression, which could well be mistaken, that the cylinder was actually aligned vertically (ergo at a slight bias to the face it attaches to). This is partly how I've read some admittedly not great photos over time, but I don't see any angle on the button top in the high-res photo posted recently.
I also thought it would make engineering sense to have a fastener screw in from above at that spot. I was hypothesizing a second fastener diagonally opposite the button, which would be covered by the perf board. A single fastener below would be susceptible to spinning, but two would ensure the part stayed in place.
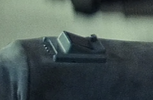
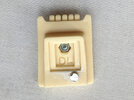
Hello AtomicToybox, It does seem that the button/knob is supposed to sit perpendicular to the face it sits on. Here is s screen grab from when Luke enters the Snowspeeder. You can see the placement pretty well in this image.
Attachments
the.rebel.agent
Sr Member
I did model the button with a hole at the base, a small interlock part from the body will let you virtually turn the button. Nerveless, Luke clicks at the front like 3 times to speak with Han. He didn't use button ")
the.rebel.agent
Sr Member
Darth Lars
Master Member
The flats on the sides left and right of the box don't feel wide enough to me.
I think you should reduce the size of the slanted box just a little bit, and make its edges a little less rounded. If you did that, then the width of the sides around it would be wider and I think there would be what I feel is the correct amount of border around the stripboard.
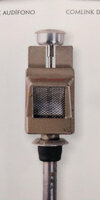
I found a good, but maybe screen-inaccurate way to mount a comm pad to a gauntlet cuff: Place a piece of plastic card the same shape as the comm pad's base on the inside of the cuff and bolt it together. You'd need only one bolt — and no glue.
This is what I used for my comm pads, that I cast in resin and sold some ten+ years ago. It held up well. I hid a nut behind the speaker grille, to avoid casting one inside the resin.
I think you should reduce the size of the slanted box just a little bit, and make its edges a little less rounded. If you did that, then the width of the sides around it would be wider and I think there would be what I feel is the correct amount of border around the stripboard.
I found a good, but maybe screen-inaccurate way to mount a comm pad to a gauntlet cuff: Place a piece of plastic card the same shape as the comm pad's base on the inside of the cuff and bolt it together. You'd need only one bolt — and no glue.
This is what I used for my comm pads, that I cast in resin and sold some ten+ years ago. It held up well. I hid a nut behind the speaker grille, to avoid casting one inside the resin.
the.rebel.agent
Sr Member
I believe angle and light could be deceiving again. check the images I am uploading here. I extrapolated both to create a template for the model. I think I could be 1mm less or more around the correct size, cause I am estimating some measurements from 2 or 3 different images.The flats on the sides left and right of the box don't feel wide enough to me.
I think you should reduce the size of the slanted box just a little bit, and make its edges a little less rounded. If you did that, then the width of the sides around it would be wider and I think there would be what I feel is the correct amount of border around the stripboard.
About the one you mention you did in the past...do you have any photo?
***UPDATE:
I am revisiting that part due Darth Lars observation.
Attachments
Last edited:
the.rebel.agent
Sr Member
Final model printed:


More photos here:

 www.instagram.com
Any question or feedback will be welcome.
More photos here:
The Rebel Agent on Instagram: "Luke Skywalker's Wrist Mounted Comlink from The Empire Strikes Back Esta es mi versión impresa del comunicador utilizado por Luke Skywalker, Han Solo y varios oficiales Rebeldes en el planeta Hoth. Modelados en @adskfu
The Rebel Agent shared a post on Instagram: "Luke Skywalker's Wrist Mounted Comlink from The Empire Strikes Back Esta es mi versión impresa del comunicador utilizado por Luke Skywalker, Han Solo y varios oficiales Rebeldes en el planeta Hoth. Modelados en @adskfusion360 basándome en material...
www.instagram.com
Any question or feedback will be welcome.
Well done the.rebel.agent ! Finally, an accurate ESB commlink is available. Thank you for putting the effort into making this.
the.rebel.agent
Sr Member
Quick assembly guide:

Darth Lars
Master Member
My costume with a painted comm pad is in storage now, but I did have a (bad) cast with nut and bolt laying around in my box of moulds. (I had "cold-cast" the buttons by brushing metal powder into the mould, and the button got an air bubble, which is why it looks so weird)About the one you mention you did in the past...do you have any photo?
A card of styrene the same size as the comm pad was supposed to go on the inside of the gauntlet cuff, so that tightening the bolt was enough to avoid any gaps between the pad and cuff. And because the bolt is in the centre, you'd only need one bolt.
Then the speaker grille could be glued on.
It is inaccurate mostly in that the face the button sits on is not angled, and the "teeth" are shaped like corn kernels. There hadn't been good enough reference pics back in 2009 when I had sculpted it. I think I got the scale about right though: a 8×8 hole piece of stripboard fits there.
I stopped casting and gave away moulds to a couple people for them to cast as much as they wanted from. One person did modify it to have two nuts cast into the resin, but my comm pad with only one centre bolt never failed me personally.
Attachments
Rawktrooper
Well-Known Member
that is pretty slick! great work!
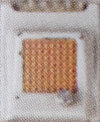
I was having a good look at the weekend at all the different chest boxes on the OT costumes. I stumbled across this image which has a really clear shot of a Snowspeeder/ESB chest box. Looks like they just stuck red and green vinyl over the blue squares to make it different. Go figure!
Attachments
division 6
Master Member
That's Janson's.
Zev's you can see glue through the red and green.


Zev's you can see glue through the red and green.
That's Janson's.
Zev's you can see glue through the red and green. View attachment 1633787View attachment 1633788
Thanks for sharing this! These boxes are very interesting. No consistency from box to box
Similar threads
- Replies
- 8
- Views
- 436
- Replies
- 16
- Views
- 873
- Replies
- 3
- Views
- 231
- Replies
- 5
- Views
- 1,067
- Replies
- 4
- Views
- 965