WIP: Halo 3 Marines (D-con or bust!)

***BUMP***

Vrogy - Did you finish the armor? What progress have you made or road blocks have you hit. Any chance someone could get a copy of those pep files? Hope to see and hear more from you soon.
 
Oh, man. Totally forgot this thread.. heh.
I missed DCON last year, but this year I work at a TechShop.. so it's much easier to get my hands on the tools I need to use for this.

I've started to do it via vacuum-forming, turned all my pepakura models into smoothed models and I've been CNCing them out on a ShopBot machine. From there I sand them a bit, throw them on the vacuum-forming table- built with tk560's plans- and pull the end plates. Using 1/8" styrene now, might have to switch to thinner stuff for the detail on other pieces, though.


Last edited:
nice work man, sorry i'm not able to work on your other project, to hectic. i'm gonna upload my unfinished progress this evening and email it to ya.
 
Still getting stuff done. Working on underarmor between CNCing out the rest of the hard armor bucks now.


Probably going to cut this into even smaller sections and laser it out for speed.


Here's the first rough shoulder pull too. I've since added details and smoothed out the bucks a bit. Also trimmed it better. Additionally, this is 1/8" HIPS. Probably going to try some 1/16" acrylic or .08" HIPS for the final set.
 
Last edited:
All molds done
marinearmor_molds1.jpg

marinearmor_molds2.jpg


all plates pulled
marinearmor_plates.jpg


One week left; it is, in fact, go time.
 
Joe still has Charlie's concept marine mold and Adam's mold is still good as far as I know if you need a marine helm in a pinch.

Other than that, looks like vacforming worked out for ya pretty good.
 
Pics! from link4044.
h3marines_dcon09_1.jpg

h3marines_dcon09_2.jpg

h3marines_dcon09_3.jpg

h3marines_dcon09_4.jpg

h3marines_dcon09_5.jpg


major inaccurcies:
-wrong camo pattern
-missing drop leg platforms
-paint is still off a tad
-missing elbows
-bootplates crack in half and at edges, due to foot flexure.
 
Last edited:
Here's a few more pictures of the kit, bit by bit.


First on is the duds. Save the hat for last, though.


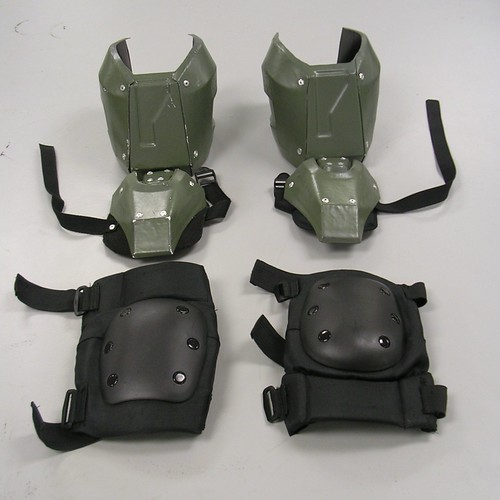
The kneepads go on slightly below the knee, and do most of the work keeping the greaves up. The greaves slip over them and the kneeplate straps go about the crook of the joint.


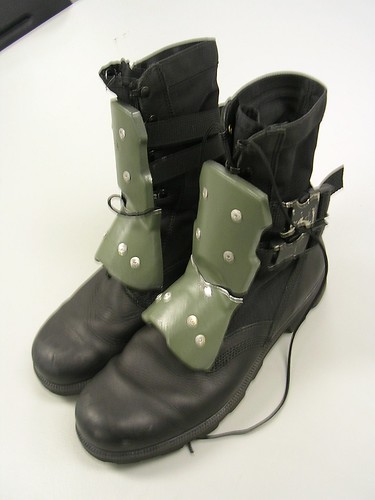
Next, blouse your BDU pants and slip on the boots. Make sure your laces are properly tied, marine- ends looped upon themselves so they can't come back through eyelets, and once around the top of the boot for security.


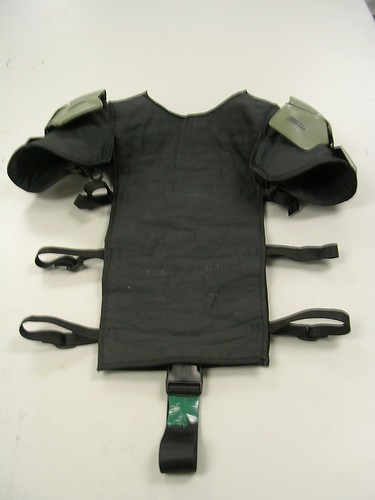
Next on is the gambeson/underarmor. I'd like to think they have a less medieval name for it in the 2550s.. Crawl in, strap it on, cinch it up. Shoulder armor is riveted and glued directly to the undersuit, which helps in getting it on speedily, and keeps the 8 shoulder plates evenly spaced.


Lastly, use the side-snaps to hinge open the chestplate and strap it on.

Some quick and pretty accurate weapon props are the Jasmin laser tag weapons, or a cheap cast M6G pistol.


On those improvements- I'm going to try some black ABS plastic and maybe a true O.D. paint job. When I do I'll take my time and write up the particulars on how to add straps, rivets, etc. I've recieved notice as well that the proper camo pattern BDU trousers and UBACS top *are* in the mail; I just wasn't home to catch a delivery before dragoncon : /

I'll probably get on making a vacuum-formed helmet soon, too- got to round out the kit, after all.
 
This thread is more than 14 years old.

Your message may be considered spam for the following reasons:

  1. This thread hasn't been active in some time. A new post in this thread might not contribute constructively to this discussion after so long.
If you wish to reply despite these issues, check the box below before replying.
Be aware that malicious compliance may result in more severe penalties.
Back
Top