Another (late) Fallout NCR Vet Ranger

Skorp

New Member
With Fallout 4 impending, I've begun a late attempt at an NCR Veteran from NEW Vegas. This costume has been built plenty of times, but I'm showing my work for two reasons: 1) Every ranger build I've ever read has been different, and I've learned something new in each of them; hopefully, I return the favor by letting others learn from my mistakes and successes. 2) I'm pretty bad at finishing what I start, so this thread, in combination with the release date for number 4, will hopefully be enough to motivate me. Also, I will be at a small con on that weekend in November; if I can get this done, it would be my first cosplay at a convention.

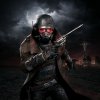
Now on with it. The primary inspiration for the build is the cover/startup art:
steamworkshop_webupload_previewfile_250007048_preview.jpg

There are lots of discrepancies between this high-res art and the in-game model, and I hope to stick to this image when possible.

I'm using the pep files for helmet and mask by NeXxT; they've been around for years, and I have liked the results I've seen. I used posterboard instead of card stock for a heavier build; as expected, it turned out looking like a hot mess:

IMG_3516_zpsjtwvpm9z.jpg

For the mask, I went with the relatively stupid idea of using an ever thicker material for the pep build: a 1mm plastic sign. Had to buy aircraft (tin) snips to cut it, as a hobby knife would have taken forever. It did quite well.

IMG_3518_zpsnbbjqhlf.jpg

Due to the thickness of the plastic, I figured keeping the tabs on each piece would be a mistake, so I cut them all off. The cut pieces are just the visible surface structure of the mask.

IMG_3523_zpspczhg7u4.jpg

And then, the superglue began to flow. Gluing this stuff together without the tabs was an exercise in patience and precision. The scoring on the folds was done with an regular x-acto and metal-edged ruler. I was constantly checking Pep Viewer for the angles at which each piece met the other. Even so, I was off the angle in most joints by a significant margin...

IMG_3526_zps5c0wpt59.jpg

Here's where I'm at after 10ish hours of work, and the imprecision is starting to show. The side already connected to the front plate is way too angled toward the back, and the unattached side is warped, preventing easy gluing-on of additional pieces. There will be cuts and re-glues in the near future.

IMG_3530_zpsdqmwsiqu.jpg

Less than two months to finish goal... hoo boy.
 
Made marginal progress over the weekend. The costume duster coat came in the mail. This thing is pretty horrendous with its 100% polyester and hokey print pattern, and will need some changes. I went with it because it's cheap, I've seen it used in another Ranger build, and making one from scratch would take more time and money than I have.

IMG_3534_zpsednlevjc.jpg

Changing the sleeves was the first task. I am removing these strap things on the ends, cutting off the stringy stuff, and fastening them to the very end of the sleeve. This will both get it closer to the look of the real coat, and make the sleeves fit better on my freakishly long arms. Here's a pic of one sleeve (left) unaltered, and the other (right) in its final altered position. No, I do not know how to sow. Yes, I am going to go as far as I can with fabric glue.

IMG_3537_zpsdjzjmqd3.jpg

And work continues on the mask. Had to take a dremel cutting wheel to one side to make subsequent pieces fit semi-properly. You can see a cut gap from this on the right side.

IMG_3538_zpsju7ly2kh.jpg
 
Slow progress continues on the mask. In the meantime, I am drafting blueprints for the 12.7mm submachine gun from New Vegas, with full Gun Runner mods. It's one of my favorites, and appears to be composed of relatively simple forms, making it easier/quicker to build than most others. I've never seen a prop built of it, but found a 3-D print file on thingiverse. No 3-D printer though, so it'll be done the old-fashioned way.


12.jpg
 
Looks like you are off to a good start! This was one of my first costumes for comic con, so I understand the pressure. Keep at it though, and if you get bogged down with details, move on to another part that you know you can finish.

Best of luck!
 
Nice start so far, hope i'll see soon the progress of the duster since i need to remake one too, any link you can provide for the duster? :)
 
More done on the 12.7mm smg schematics. They are NOT 100% accurate, nor completed yet (front view still to come, details to be corrected). One of the things I learned from using in-game screenshots to study this thing is that there is a definite size discrepancy for weapons, between first-person view and third-person view. When my character is actually holding the weapon, its size is proportionately accurate; however, when I set the weapon down to study it in game, the weapon will shrink by nearly half. I realized this after laying it down next to a pencil and a cue ball in-game, both of which I'll assume are real-world sizes; the gun became way too small relative to these objects. Weird.

View attachment 12A.jpg

Escher: Thanks, I will take your advice and start tampering with the chest armor. The mask is driving me nuts.

GilliGen: Here's the link to the one I bought. It's actually marked down a few bucks from when I got it. It's pretty thin and 100% polyester, which may prove a problem for some of the things I want to try with it, like applying fabric spray paint to change the color. But it's inexpensive. http://www.amazon.com/gp/product/B0...ult Costume&qid=1444069680&ref_=sr_1_1&sr=8-1
 
Just promise you will put the neck guard behind the rest of the chest armor!!! I see way too many ncr riot armor builds where the neck guard is ontop of the chest armor when it should be a little bit above/behind it.

Also, I might be able to help you out with the mask, sent you a pm.
 
More done on the 12.7mm smg schematics. They are NOT 100% accurate, nor completed yet (front view still to come, details to be corrected). One of the things I learned from using in-game screenshots to study this thing is that there is a definite size discrepancy for weapons, between first-person view and third-person view. When my character is actually holding the weapon, its size is proportionately accurate; however, when I set the weapon down to study it in game, the weapon will shrink by nearly half. I realized this after laying it down next to a pencil and a cue ball in-game, both of which I'll assume are real-world sizes; the gun became way too small relative to these objects. Weird.


Yup, you are totally right. The sizes are different between 1st person and 3rd person, or at least they appear to be. Also note that the textures for the 1st person weapon is in higher resolution than the 3rd person texture. There are some details that are harder to pick out on the 3rd person textures.

The correct size, however, is the 3rd person model. As you said, you can lay them down next to a regular object to get a decent idea of the size. Let me know if you need help with scaling, as I've worked with dozens of the original 3d models. The sizes for my printed props come out very realistic.

But remember one thing..............sometimes the actual proportions of the weapon are just not ergonomic. The Alien Blaster, for instance, is a lot smaller than most people seem to think, and the proportions of it make the trigger guard smaller than most could get their finger in. Not sure if this is the case with the 12.7mm SMG (my 12.7mm pistol model sized up fantastically) but it's something to watch out for.


Anyhow, looking forward to your results. Like I said, give me a holler if you need help with the gun. Fallout guns are what I do. :)
 
Went ahead and sized this up. According to my formula, the length as shown of the 12.7mm SMG should be 340mm. The silencer is 158mm in length.


12.7mm sizing.png


With this formula, the 12.7mm pistol model I made is comparable to my actual Sig P220 handgun. So the sizing is pretty much as "real" as it's gonna get.

Hope this helps!
 
WAIT UP!

My scale for the SMG was faulty. I compared it to the scale of my 12.7mm pistol, but................I didn't use my formula to scale my 12.7mm pistol model! I had actually forgotten that fact, and looking over my notes just realized that.

Using my formula, the 12.7mm pistol was waaaay bigger than a comparable handgun, and so I sized it down a little, sizing it to match my real Sig handgun.

The length I'm coming up with is 585 millimeters for the smg with the suppressor attached.

My bad. It's been a while since I modeled these things, luckily I keep notes on this stuff.
 
I have roughed out the main shapes for the smg. Thanks to GhostMinion's 3-D rendering expertise, it was determined the total length of this gun with suppressor attached should be 585mm, or just over 23 inches. Some of the components in my build of it will not be quite to scale; the suppressor, made of 1.5-in PVC, actually needs to be another 6mm or so in diameter. However, I am swiftly biting off more than I can chew, with less than a month to completion time.

IMG_3635.JPG

I dug out the remains of a AEP-7 build that I started so long ago, I'm embarrassed to say when I started. But since it's already started, I figured I would take a shot at finishing. Instead of a stock laser pistol, this will be the unique version from New Vegas, called Pew Pew. This will be the sidearm for a buddy going with me, who will be a Vault 101/111 wanderer.

IMG_3637.JPG

Aaaaaand the mask. The freakin mask. It hates me. I hate it. It is pretty badly warped, and there are ugly gaps everywhere. Undaunted, I continue, feeling like I'm beating a dead and very ugly horse. Escher has offered aid with this, for which I'm very grateful; his experience with building multiple versions of this mask is helpful.

IMG_3638.JPG

EL wire for the mask is ordered. Also, I have many odds and ends like straps and webbing and leather.
 
I'm really interested in seeing how this ends up, especially the coat. I've been planning on making this costume for the longest time, but how to make the coat look good without spending a load of money has been stumping me.
 
The mask looks fine, honestly. Gaps and warped areas can be fixed during the filler stage, don't let it get you down. Keep it up, it's looking good here! :thumbsup
 
I have roughed out the main shapes for the smg. Thanks to GhostMinion's 3-D rendering expertise, it was determined the total length of this gun with suppressor attached should be 585mm, or just over 23 inches. Some of the components in my build of it will not be quite to scale; the suppressor, made of 1.5-in PVC, actually needs to be another 6mm or so in diameter. However, I am swiftly biting off more than I can chew, with less than a month to completion time.

View attachment 542450

I dug out the remains of a AEP-7 build that I started so long ago, I'm embarrassed to say when I started. But since it's already started, I figured I would take a shot at finishing. Instead of a stock laser pistol, this will be the unique version from New Vegas, called Pew Pew. This will be the sidearm for a buddy going with me, who will be a Vault 101/111 wanderer.

View attachment 542451

Aaaaaand the mask. The freakin mask. It hates me. I hate it. It is pretty badly warped, and there are ugly gaps everywhere. Undaunted, I continue, feeling like I'm beating a dead and very ugly horse. Escher has offered aid with this, for which I'm very grateful; his experience with building multiple versions of this mask is helpful.

View attachment 542452

EL wire for the mask is ordered. Also, I have many odds and ends like straps and webbing and leather.
Dude, i know the stress with thise gaps, but keep it in mind that you will fill them later with bondo

Sent from my LG D-405 using Tapatalk
 
After another few hours of work, the smg is starting to look the way it should. Some of my lines are not straight, or not where they should be, but fortunately this is a sort of forgiving build, as the whole thing is supposed to look old and beat-up. I have added measurements to the blueprints as I take them, and will upload the blueprints when the build is complete.

IMG_3678.JPGIMG_3683.JPGIMG_3689.JPG
 
Getting the wonky shape of the magazine on top is taking time... too much time. Lots of little details, and lots of sanding and filling and filing. Being the noob I am, this is only the second or third time I've used bondo, and I love the stuff, although I forgot how bad it smells.

IMG_3710.JPGIMG_3716.JPGIMG_3718.JPGIMG_3711.JPGIMG_3720.JPGIMG_3721.JPG
 
This has become a laser-pistol-and-smg build, more than a NCR Ranger build. I am in panic mode with 12 days to con, and have been focused almost exclusively for the last two weeks on these guns.

The 12.7mm SMG is in good shape and will be completed soon. There are some notable inaccuracies, including diameter of suppressor, length of front grip (too short) and shape of top magazine (not quite right), but on the whole it is going to be somewhere between "passable" and "pretty good" unless I find a way to mess it up. I am satisfied with the turnout so far on my first scratch build.

IMG_3734.JPGIMG_3767.JPGIMG_3783.JPGIMG_3796.JPG

Pew Pew is taking shape. The paint job on this one will most likely be the real challenge.

IMG_3759.JPGIMG_3760.JPGIMG_3777.JPGIMG_3800.JPG

I have outlined and cut templates for the riot armor, but nothing else. Helmet remains unresined. I am going 6+ hours a night every evening, and will probably do more than that for the next 12 days. I am truly learning how little sleep I can function with. The results make it worth it to me... I just hope I can have the costume done in time.
 
Dude..........that SMG looks FANTASTIC. For your first scratch build, I'd say you landed success. That thing looks awesome.
 
Dude..........that SMG looks FANTASTIC. For your first scratch build, I'd say you landed success. That thing looks awesome.

Thanks! For the record, I think 585mm length is right on the money for this thing, it feels balanced and proportionate.
 
Con is here, and I am not finished. I'm a little discouraged to not have the finished product up and running, considering the time I've been devoting to this build. I also have a newfound appreciation for the hard work that goes into making something like this. There's really no way to know the kind of effort that others have been exerting on their projects, until you build a project of your own and start to realize what it takes.

This Ranger build will continue at a slightly less hectic pace; I dare not give up now. Foam shapes for armor are cut and heat-formed, but for convention weekend all I have to show is the 12.7mm SMG. It's 95% done right now; all detail pieces are attached. All it needs is a few weathering blackwashes and clearcoat.

I sprayed the whole thing with several coats of metallic silver, then taped it off for the green coat. Forward grip was hand-painted gray and black, and top magazine was sprayed with a black layer, then scuffed and sanded for the metallic-under-black weathered look.

IMG_3831.JPGIMG_3854.JPG

Surface gaps (like the casing ejector) were blacked out, and appropriate screws attached. The larger screws were actually too long to safely sink into the gun, so I used bolt cutters to snap the heads off and epoxied them on. Rear switch and safety (I think the forward bolt is the safety, anyway) were also painted and epoxied on. The final black washes will help hide some of the imperfections with the paint job, as well as tone down the silver glare. Comments and criticism are welcome.

IMG_3868.JPGIMG_3871.JPGIMG_3870.JPG
 
Back
Top