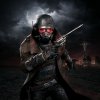
With Fallout 4 impending, I've begun a late attempt at an NCR Veteran from NEW Vegas. This costume has been built plenty of times, but I'm showing my work for two reasons: 1) Every ranger build I've ever read has been different, and I've learned something new in each of them; hopefully, I return the favor by letting others learn from my mistakes and successes. 2) I'm pretty bad at finishing what I start, so this thread, in combination with the release date for number 4, will hopefully be enough to motivate me. Also, I will be at a small con on that weekend in November; if I can get this done, it would be my first cosplay at a convention.
Now on with it. The primary inspiration for the build is the cover/startup art:

There are lots of discrepancies between this high-res art and the in-game model, and I hope to stick to this image when possible.
I'm using the pep files for helmet and mask by NeXxT; they've been around for years, and I have liked the results I've seen. I used posterboard instead of card stock for a heavier build; as expected, it turned out looking like a hot mess:

For the mask, I went with the relatively stupid idea of using an ever thicker material for the pep build: a 1mm plastic sign. Had to buy aircraft (tin) snips to cut it, as a hobby knife would have taken forever. It did quite well.

Due to the thickness of the plastic, I figured keeping the tabs on each piece would be a mistake, so I cut them all off. The cut pieces are just the visible surface structure of the mask.

And then, the superglue began to flow. Gluing this stuff together without the tabs was an exercise in patience and precision. The scoring on the folds was done with an regular x-acto and metal-edged ruler. I was constantly checking Pep Viewer for the angles at which each piece met the other. Even so, I was off the angle in most joints by a significant margin...

Here's where I'm at after 10ish hours of work, and the imprecision is starting to show. The side already connected to the front plate is way too angled toward the back, and the unattached side is warped, preventing easy gluing-on of additional pieces. There will be cuts and re-glues in the near future.

Less than two months to finish goal... hoo boy.
Now on with it. The primary inspiration for the build is the cover/startup art:

There are lots of discrepancies between this high-res art and the in-game model, and I hope to stick to this image when possible.
I'm using the pep files for helmet and mask by NeXxT; they've been around for years, and I have liked the results I've seen. I used posterboard instead of card stock for a heavier build; as expected, it turned out looking like a hot mess:

For the mask, I went with the relatively stupid idea of using an ever thicker material for the pep build: a 1mm plastic sign. Had to buy aircraft (tin) snips to cut it, as a hobby knife would have taken forever. It did quite well.

Due to the thickness of the plastic, I figured keeping the tabs on each piece would be a mistake, so I cut them all off. The cut pieces are just the visible surface structure of the mask.

And then, the superglue began to flow. Gluing this stuff together without the tabs was an exercise in patience and precision. The scoring on the folds was done with an regular x-acto and metal-edged ruler. I was constantly checking Pep Viewer for the angles at which each piece met the other. Even so, I was off the angle in most joints by a significant margin...

Here's where I'm at after 10ish hours of work, and the imprecision is starting to show. The side already connected to the front plate is way too angled toward the back, and the unattached side is warped, preventing easy gluing-on of additional pieces. There will be cuts and re-glues in the near future.

Less than two months to finish goal... hoo boy.


