Build: Luke Macrobinoculars (ANH Hero)

ok, all good, I figured it out.
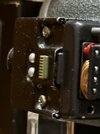
too bad, as often with those old cameras, it is destructive as you need to remove the vinil cover. also, as usual the last screw just won't un thread, so even more destructive.
I didn't manage to remove the thing on the bottom left, but removing the 3 screws was enough to make the threaded ring inside slide off.
IMG_20220612_110905.jpg
 
The one screw not coming out after the others unscrewed easily kept happening to me as well. Perhaps they always glued one in place???? It was odd.
 
Thank you. Is there any way to remove the front plate in a non destructive way? I'm not finding screws.
Cheers
There may be with special tools, but I’ve never been able to not destroy it. I think the push button threads on, try taking that off.
 
As some of you know, I am starting to tinker with my build after decades of collecting parts, really since each of the found parts were originally discovered. Many of you also know as an engineer, I am a picky MF'er (my wife says anal). Anyway, this seems to be the 'official' macro thread now, so thought suitable to post this here.

I recently found my Seagull items and have completely taken my large Seagull knob apart to look at assembly techniques using the Bell and Howell parts. Sorry to say but based on my visual analysis, I don't see how the BH 'cross bar' was used. It sets the little Seagull wavy plate too far into the assembly as compared to the all too familiar screen captures of the macros prior to the tusken fight. Photos below are just a quick demo (I realize the angle and orientation isn't 100% correct) but I think you can see in the screen capture that the wavy plate is rather shallow relative to the outer edge of the knob. .

IMG_E5469[1].JPG Screenshot 2022-06-23 110222.jpg

To me it looks like a small square rod of some sort, not the BH knob. I plan to do some mockups but wanted to see if anyone else came to the same conclusion. And sorry in advance if this has already been covered, or if I'm opening old wounds. :) Thank you all in advance for the feedback guys!
 
As some of you know, I am starting to tinker with my build after decades of collecting parts, really since each of the found parts were originally discovered. Many of you also know as an engineer, I am a picky MF'er (my wife says anal). Anyway, this seems to be the 'official' macro thread now, so thought suitable to post this here.

I recently found my Seagull items and have completely taken my large Seagull knob apart to look at assembly techniques using the Bell and Howell parts. Sorry to say but based on my visual analysis, I don't see how the BH 'cross bar' was used. It sets the little Seagull wavy plate too far into the assembly as compared to the all too familiar screen captures of the macros prior to the tusken fight. Photos below are just a quick demo (I realize the angle and orientation isn't 100% correct) but I think you can see in the screen capture that the wavy plate is rather shallow relative to the outer edge of the knob. .

View attachment 1590607 View attachment 1590608

To me it looks like a small square rod of some sort, not the BH knob. I plan to do some mockups but wanted to see if anyone else came to the same conclusion. And sorry in advance if this has already been covered, or if I'm opening old wounds. :) Thank you all in advance for the feedback guys!
I put them together in this order
 

Attachments

  • Screenshot_20220625-225855_Photos.jpg
    Screenshot_20220625-225855_Photos.jpg
    1.4 MB · Views: 103
I did the same but without the clear piece. Again, the use of the B&H knob sets the wavy plate too far into the Seagull knob compared to the prop. The only way it can be correct is if the screen capture is somehow distorted and that is not the wavy plate that we can see. I just don’t think that is the case.
 
Yes we agree there…the wavy plate is under ‘something’. What I am trying to say is the BH grey knob is too ‘tall’ to allow the wavy plate to be in the correct depth position inside the Seagull knob, so I do not think the BH knob is on this prop.
 
Figured I'd post this here, as this reference was just posted by eethan over on my thread in the junkyard. It appears to show the more rounded profile phillips head screws (painted black) on the mystery box, as opposed to the lower profile flat head screws that come on many of the green tab plugs. What's the consensus here? I've had flat heads on my build since sourcing my green tab, but after seeing this crisp reference I'm likely swapping them back out for the phillips heads found on the metal tab plugs. It also seems that the two silver rivets on the plug are painted black?
 

Attachments

  • Macros_BEST.jpeg
    Macros_BEST.jpeg
    550.1 KB · Views: 74
Figured I'd post this here, as this reference was just posted by eethan over on my thread in the junkyard. It appears to show the more rounded profile phillips head screws (painted black) on the mystery box, as opposed to the lower profile flat head screws that come on many of the green tab plugs. What's the consensus here? I've had flat heads on my build since sourcing my green tab, but after seeing this crisp reference I'm likely swapping them back out for the phillips heads found on the metal tab plugs. It also seems that the two silver rivets on the plug are painted black?
Just want to make it clear again, Teecrooz posted that photo before, in that very thread I think.

I'm personaly in the Phillips head camp for this, I know the ref is still not completely clear, but I think a slotted head screw would look quite different on that pic :)

Agreeing with you on all the black painted details :)
 
Figured I'd post this here, as this reference was just posted by eethan over on my thread in the junkyard. It appears to show the more rounded profile phillips head screws (painted black) on the mystery box, as opposed to the lower profile flat head screws that come on many of the green tab plugs. What's the consensus here? I've had flat heads on my build since sourcing my green tab, but after seeing this crisp reference I'm likely swapping them back out for the phillips heads found on the metal tab plugs. It also seems that the two silver rivets on the plug are painted black?
I’m in the Phillips head camp. Also believe they are the standard screws that came with the unit. Here is a photo of mine ( unpainted ) but the profile looks the same to me.
 

Attachments

  • IMG_5253.jpeg
    IMG_5253.jpeg
    910.3 KB · Views: 80
So, slowly been gathering parts for a macro build, and found amother source of green tab connectors. Some sort of audio/video junction box made by Matsushita. ( also known as Panasonic). Looks like a single plug hardwired to the box. A quick search couldn’t find more but maybe someone here can take this info and run with it, who knows there could be a pile of them out there.
 

Attachments

  • EB93CD27-BD71-41A7-A9EE-AE707404C026.jpeg
    EB93CD27-BD71-41A7-A9EE-AE707404C026.jpeg
    314.6 KB · Views: 87
  • 4521C0D7-5806-49FF-B7AB-4E2F41A9D574.jpeg
    4521C0D7-5806-49FF-B7AB-4E2F41A9D574.jpeg
    257.5 KB · Views: 90
I’ve been very fortunate finding parts over last few months, whether it’s just luck or interest in this prop seemingly dropping over a cliff. Well today my build took a giant leap forward with a complete Kalimar 660. I’ve also got a piece of equipment on the way with the accurate female connector piece for the “mystery box”. With these, I’m very close to having all the known vintage parts.

IMG_5695.jpeg
 
Wow, nice job. I still look but what I find has prices that are just too high. Even then the prices for lenses almost doesn’t matter as I never even see them.
 
A green tab variant I found. They have a glossy finish, phillips head screws and obviously the cable comes out the side rather than the back.
 

Attachments

  • IMG_3325.jpeg
    IMG_3325.jpeg
    1.5 MB · Views: 39

Your message may be considered spam for the following reasons:

If you wish to reply despite these issues, check the box below before replying.
Be aware that malicious compliance may result in more severe penalties.
Back
Top