Enough already ...
In January after almost a year I
almost had mine completed but I had got so tired of it that I put it in a box and did other projects for a while. I got it out of the box again this November, and even though a couple bolts are still missing I think I should post it while it is still November 2019
")
... and before it darkens so much around here that I can't get any natural light at all to take pictures in natural light.
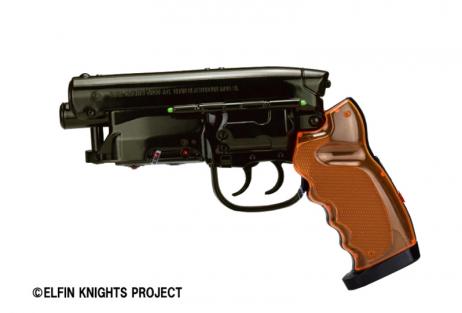
View attachment 1087270 View attachment 1087272 View attachment 1087284
The big features on my build/mod are a working rear trigger (pivoting, which clicks), pivoting front trigger (which doesn't do anything), working safety which blocks the trigger and (because I'm a lunatic with too much time...) a working bolt. The rear trigger presses a vertical rod (black plastic) behind the cylinder upwards, which compresses a coiled spring and a clicking key switch. The safety lever slides to block the rod. The bolt also acts as a safety when it is open by being keyed to let the rod through only when closed.
It is actually a very simple mechanism but required a lot of tinkering.
The bolt was made from PVC pipe and sits in a channel made from pieces of PVC pipe glued into the upper receiver. I used another piece of the smaller pipe with sandpaper to straighten the channel. The bolt was painted and inserted from the front before the barrel tip was glued in.
The pieces protruding without undercuts have been remade. I cut off the left and right cylinder covers and built fake cylinder parts inside behind them to be seen through the gaps.
The left part is 1/2 cylinder and glued inside a well inside a built-up
revolver frame. I scratchbuilt the laser-sight from narrow pipe covered with Milliput and imprinted the dimples and checkering into the soft Milliput.
The cylinder cover with laser-sight sits on the cylinder with double-sided tape.
Part of the right cylinder was built and glued inside the right cover. The horizontal thumbscrew only needed the back filled.
I had built up the grip frame by stacking 2mm styrene. and gluing it into the water-gun's frame.
The magazine's bottom had been cut out, and the mag-well lined with styrene. New mag walls were built into that and glued to the magazine bottom. It fits in the mag-well with friction.
Area behind the front post was modded. Front post from a plastic rod I drilled through.
I can't remember all other small mods: I just kept piling them on whenever I noticed something that I could do.
I tried to recreate the original prop when possible and did mod the water-gun's shape in a couple of places. The thin plastic of the Water-Gun is thickened almost everywhere: there shouldn't be any empty space left except inside the mag well.
I had several big screw-ups: most of them because I had been set on using only plastic and solvent-based adhesive and I sometimes got things too wet... I had to fill the upper receiver on the outside to adjust for warping, and resculpt the bolt cap almost from scratch.
The paint-job was made to resemble the prop in its WorldCon state, with its rust patterns. I used "The Salt Method" after having seen it in the
Nerf Gun Props? Yes! thread: Dupli-Color rust-red primer + dry-brushed Citadel Corrosion as rust. I used a humidifier's output to dampen the surface before sprinkling salt. Steel was painted with Tamiya spray paints: Dark Gunmetal on the Steyr receiver and Light Gunmetal on other "steel" parts. I also rubbed Pewter Rub'n Buff on some parts such as the barrel and the front half of the bolt. I used Vallejo Natural Steel and Gunmetal Grey for touch-ups and Molotow Liquid Chrome on some edges, especially worn edges on "aluminium" parts. Dry-brushed Citadel Corrosion for rust.
Separate parts were largely painted before being glued into the main gun, and then touched up.
The butt-plate was painted with an "aluminium" paint, wear-pattern masked with Molotow Liquid Mask and spray-painted. The rest of the butt plate and parts of the grip frame were covered with aluminium tape.
Some parts of the paint job needs to be redone or touched up: there is too much rust on the lever and the upper receiver is a bit patchy.
The grips are from an artisan that had cast them in what I thought was the correct yellow hue but unfortunately he had only B-stock left when I ordered and I couldn't sand down all the bubbles on the inside. The white on the grips is indeed residue from polishing... like in the WorldCon images.
I am leaning towards not adding any electronics. The trigger just clicks. The hammer is visible but immovable — and that could be explained by the hammer spring missing.