DL-44 Denix C96 - Still services to make them more accurate?

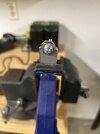
The blaster is completely disassembled now. I spent some time filing the grips so that they sit better on the handle. Then moved on to stripping the upper. I am making faster progress compared to working on the small parts. Perhaps because it’s larger and has more open area to work or maybe I am getting better at this. I am using the file sparingly. Mostly to remove the mold circles and on larger defects. I posted a pic of one side that shows how porous the denix surface is. That was sanded with 400. I switched over to 220 which removes the finish and smoothes the metal surface. Then 400 over that to remove the larger scratching. Still lots to do but going well so far.
 
I spoke too soon. It was not difficult to get the finish off the denix. But the devil is always in the details. I’ve spent way more time reshaping sections and sharpening the lines on the upper. Every part of it is twisted or slanted or has low spots. Still work to do on the other side of it.
 
……wow, talk about smooth…
I need to research more about how the finish should be before using aluminum black. But that is how smooth it is after 400 grit sandpaper. I was able to use long strokes and it came out with a nice brushed looking finish.

The more I work on it l, the more excited I get about the potential. Which also makes me think about doing more to it! The weak spot for me is under the hammer. So while I am sanding away, I am thinking about alternatives for the lower.
 
For the couple folks that are interested in the denix build…
I’ve had nothing but time since the winter has been so cold. I have all the chemicals to finish this but can’t do so safely. Instead I have been just refining it more.
 

Attachments

  • IMG_2297.jpeg
    IMG_2297.jpeg
    2.6 MB · Views: 87
  • IMG_2298.jpeg
    IMG_2298.jpeg
    2.3 MB · Views: 80
  • IMG_2300.jpeg
    IMG_2300.jpeg
    1.7 MB · Views: 79
  • IMG_2302.jpeg
    IMG_2302.jpeg
    2.7 MB · Views: 75
  • IMG_2305.jpeg
    IMG_2305.jpeg
    2.7 MB · Views: 79
  • IMG_2307.jpeg
    IMG_2307.jpeg
    1.4 MB · Views: 88
Wow….. that is a intense amount of work
Thank you. It has been challenging doing this with basically files, drill bits, and sand paper. I’ve given up on the dremel except for the cutting wheel for bolts/pins. I have not seen one where the release mechanism is drilled out in the back (other than the one where the whole back is cut out). It wasn’t that bad. The location is perfect being just above where the denix is solid metal for the grips.
 
For the couple folks that are interested in the denix build…
I’ve had nothing but time since the winter has been so cold. I have all the chemicals to finish this but can’t do so safely. Instead I have been just refining it more.
How did you get the magazine plate outline so uniform on the bottom?
 
How did you get the magazine plate outline so uniform on the bottom?
I cut the mag plate cover off and made one from aluminum sheet. I used a 5/8” forstner bit to cut a circle into the bottom where the button is. Then drilled out as much material as I could from the rest of the plate. Filed the rest down to erase the original mag plate line. For the new plate cover, I cut a hole in a piece of 3mm aluminum. Bolted a 5/8” washer to it. Then filed around it. I didn’t make the T shaped part in the front of the real one. With the primitive tools I have, it was a messy and long job. Turned out nice though.
 

Attachments

  • IMG_2283.jpeg
    IMG_2283.jpeg
    1.8 MB · Views: 33
  • IMG_2273.jpeg
    IMG_2273.jpeg
    810.3 KB · Views: 31
  • IMG_2272.jpeg
    IMG_2272.jpeg
    1.3 MB · Views: 32
I cut the mag plate cover off and made one from aluminum sheet. I used a 5/8” forstner bit to cut a circle into the bottom where the button is. Then drilled out as much material as I could from the rest of the plate. Filed the rest down to erase the original mag plate line. For the new plate cover, I cut a hole in a piece of 3mm aluminum. Bolted a 5/8” washer to it. Then filed around it. I didn’t make the T shaped part in the front of the real one. With the primitive tools I have, it was a messy and long job. Turned out nice though.
Amazing. Looks so good.
 
Amazing. Looks so good.
Thank you. I tested using a countersink for the button hole, but it cut through the aluminum completely with zero pressure applied. So the angle around the button was all done with needle files. Ugh. The button is made from different size aluminum tube and rod from K&S. Used JB weld to assemble it all.
 
The temperature was warm enough to break out the chemicals today. I did ok with the super blue on the steel parts. They currently look like they are factory new and shiny. Have to build up the courage to use the 0000 steel wool on them.

I did a test part with the aluminum black. I started with the aluminum bull barrel sleeve. I have done and stripped it 3 times. It gets very black and scaly. I’ve watch videos where people do the 0000 right after and it blends it out. That’s not working for me. The 0000 cuts right through the black and I have to strip it all off. The metal is etched at this point. Not sure what I am doing wrong. Try again tomorrow hopefully.
 

Attachments

  • IMG_2345.jpeg
    IMG_2345.jpeg
    2.6 MB · Views: 13
Last edited:
PVmodels excellent work my man! Love what you are doing with the lock frame as well. The denix is still a great base for all the OT DL-44’s and even better when you consider the price. Of course it can be improved and you are off to a wonderful start. Size wise it’s almost identical to an MGC and a little bigger is parts compared to a real c96 but it certainly fits the bill. I stoped a while ago excepting commission work on these myself as I’ve moved fulling into creating acurate FDM versions but hopefully something within this video may guide, help or inspire you with your own progress. This is as far as I got in recreating the Denix to be more accurate to a c96 and the filming prop itself. Keep up the great work and I look forward to see it finished! :)

 
PVmodels excellent work my man! Love what you are doing with the lock frame as well. The denix is still a great base for all the OT DL-44’s and even better when you consider the price. Of course it can be improved and you are off to a wonderful start. Size wise it’s almost identical to an MGC and a little bigger is parts compared to a real c96 but it certainly fits the bill. I stoped a while ago excepting commission work on these myself as I’ve moved fulling into creating acurate FDM versions but hopefully something within this video may guide, help or inspire you with your own progress. This is as far as I got in recreating the Denix to be more accurate to a c96 and the filming prop itself. Keep up the great work and I look forward to see it finished! :)

Thank you. I have read many of your posts and have followed your incredible work. This is literally my first prop. Luckily, the rest of you have paved the way and I can follow along. That said…I still have no experience doing ANY of this. So it’s stressful and much trial and error.
 
I’m not a fan of aluminum black. Still need to use it on the bull barrel sleeve. But I moved on to the upper. Decided to use super blue for that. Challenging work but I like the result. Not sure what I’ll do with the receiver. The mag plate cover I made is aluminum. So I’ll either use aluminum black or spray paint.
 

Attachments

  • IMG_2348.jpeg
    IMG_2348.jpeg
    2.8 MB · Views: 16
Last edited:
Thanks man. Many people before me paved this road we all walk along. So many great artists and references to draw from. Ur doing an outstanding job for ur 1st attempt that’s for sure! It’s all trial error.. that part never ends ;)

After using aluminum black polish it with “steel wool 0000” if ur not already. Thats the secret imho. Just go back and forth between the two until u get the darkness and shine u desire. But steel wool is the secret ingredient to make AB work as it should. Otherwise it just looks blotchy..
 
Back
Top