You are using an out of date browser. It may not display this or other websites correctly.
You should upgrade or use an alternative browser.
You should upgrade or use an alternative browser.
EP VII Millennium Falcon
- Thread starter SteveStarkiller
- Start date
mikeyscience2
New Member
Well that's pretty awesome. Do you have any tutorial links or list of plug ins you used for modeling the falcon or just learning to model in general?mikeyscience, not sure exactly what I'll be doing with this once it's done, but the theory is that it will be available as a reference for folks who want to make a practical model, or modify existing kits to match the new Falcon.
SteveStarkiller
Sr Member
the best thing I could suggest would be to download sketchup, find some blueprints of something, and try to build them up. Then do that for the length of a collage degree, figuring out what works as you go... anyway that's how I did it. I started with blueprints of the Falcon's cockpit, on this forum, in 2010... and now here we are.
SteveStarkiller
Sr Member
SteveStarkiller
Sr Member
SteveStarkiller
Sr Member
SteveStarkiller
Sr Member

Beautiful. If you don't mind my asking, how did you figure out solving the perspective and distortion problems to use 2d photos for reference for your meshes correctly? I've tinkered in photoshop and such to correct images for orthographic reference, but to be honest I've not gotten much of anywhere. Any suggestions to learn this? I saw you mentioned Andre and his 'ortho photogrammetric' help, maybe that's what it's called that I'm trying to figure out? I haven't found any reasonable tutorials for image correction, and it's driving me crazy. I don't even know if I should be concentrating on making my render settings to mimic the properties of the photo reference image, or vice versa, and it's driving me up the walls. :confused
SteveStarkiller
Sr Member
these are done using sketchup's native "Photomatch" function. You import a 2D image, and use the tool to match the 3D axis of the model space to the image using the apparent perspective lines and vanishing points visible in the image. Works best on rectangular buildings, but if you've taken some drawing classes and have the spatial reasoning skills necessary, you can make it work on just about anything. With the notable exception that there can't be too much distortion on the images caused by the lens used to take the photo. If the perspective lines are visibly curved at all, like with a fisheye lens, it pretty much just won't work.
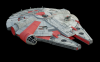
For these, I used a model of the falcon's body I'd already built from completely orthographic drawings used for ESB's production. Having the basic shape established let me find the perspective lines a lot more easily. I took the model, more or less matched the angle to the photo reference I was using, and then applied the photomatch tool, then manually adjusting the perspective lines until the 3d model lined up reasonably with what I could see in the photo. After that, I can build into the model using the photomatch's overlay of the photo as a guide.
Also you can use multiple photos of the same object. Sketchup will save two views with different perspective matches. You know you're getting close to accurate if you can get the model you're working on to "agree" with both photos in terms of shape, dimensions, proportions, locations of details, etc.
Andre's photogrammetry is a whole different animal. What he was doing was taking a series of photos of the actual model and using a program to automatically stitch them all together into a 3D model, using telluric currents, spells, hexes, and potions (as far as I can tell...)
SteveStarkiller
Sr Member
I've actually had some success correcting for lens distortion and then using the results for a photomatch, so your skills there will help you out (depending on your reference).
other programs, like 3ds Max for instance, also have photomatching functions. I just happen to know sketchup inside and out, so I use it for everything. Good luck! glad I could help.
other programs, like 3ds Max for instance, also have photomatching functions. I just happen to know sketchup inside and out, so I use it for everything. Good luck! glad I could help.
Vacformedhero
Sr Member
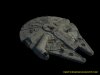
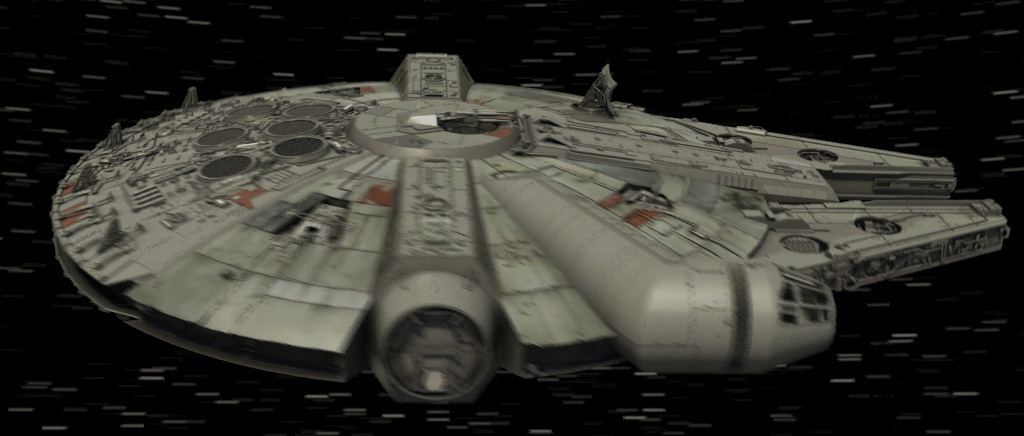
your work is amazing, I think you've nailed ithaven't done one of these overlay comparisons for a while.
pretty pleased with these results, if I do say so. They may be off here and there, but whatcha gonna do? (start over again one day, knowing me... damn it.)
http://www.therpf.com/attachment.php?attachmentid=458016&stc=1
http://www.therpf.com/attachment.php?attachmentid=458017&stc=1
SteveStarkiller
Sr Member
Thanks!
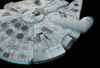
I've got just 7 sticky-notes left to knock out, and the top of this bird is cooked! Then we wait for more reference...
in the meantime, I have a few ideas for animations I could make with this model. No great ideas though, so if you folks have any thoughts, I'm all ears.
I've got just 7 sticky-notes left to knock out, and the top of this bird is cooked! Then we wait for more reference...
in the meantime, I have a few ideas for animations I could make with this model. No great ideas though, so if you folks have any thoughts, I'm all ears.
Vacformedhero
Sr Member
I cannot send j.j.abrahms a millennium falcon shot request so here goes.......Thanks!
I've got just 7 sticky-notes left to knock out, and the top of this bird is cooked! Then we wait for more reference...
in the meantime, I have a few ideas for animations I could make with this model. No great ideas though, so if you folks have any thoughts, I'm all ears.
i have always wanted to see the falcon in a panning type shot we always see single seat fighters in but instead of the falcon doing the acrobatics have the camera locked off looking down from port side , and all around the falcon have enemy fighters spiralling around the falcons flight path with the quad guns rotating and tracking the bad guys ......can I hear a yeeeee haaaaaaww
DARKSIDE72
Sr Member
I always wanted to see her touch down onto snow...Not Hoth, but a snow covered environment. Landing lights on, snow being kicked up etc.
BTW awesome job!
BTW awesome job!
Avanaut
Sr Member
I like this thread very much. Looking forward to seeing new vids too, loved the Dyxtraflex replica test earlier.
Would that be perhaps something like this? Maybe a bit darker so that the landing lights would show.

I always wanted to see her touch down onto snow...Not Hoth, but a snow covered environment. Landing lights on, snow being kicked up etc.
BTW awesome job!
Would that be perhaps something like this? Maybe a bit darker so that the landing lights would show.
SteveStarkiller
Sr Member
tried out some animations of the turret in action, looks pretty cool motion wise, but the shaders, ugh, don't really have much to show for it. Plus I'll have to figure out special effects for the laser blasts. Still, not a bad idea, I'll keep working on it.
Can't really beat those still images... those are great.
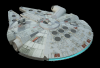
in the meantime, testing out some different passes, including ambient occlusion. Wish this was a practical model, and I could just photograph the damned thing.
Can't really beat those still images... those are great.
in the meantime, testing out some different passes, including ambient occlusion. Wish this was a practical model, and I could just photograph the damned thing.
Attachments
Similar threads
- Replies
- 3
- Views
- 375