You are using an out of date browser. It may not display this or other websites correctly.
You should upgrade or use an alternative browser.
You should upgrade or use an alternative browser.
Hand stitched Kermit the Frog puppet replica!! (Early builds/old patterns)
- Thread starter ecl
- Start date
ecl
Sr Member
Re: Custom Kermit the Frog puppet replica!!
yes the very original Kermit I believe was made from his mothers coat! But later versions of Kermit utilized the Antron fleece. Pretty fascinating history indeed!
Got home late tonight , but I'll post the patterns tomorrow!
Didn't Henson originally say that he made Kermit from an old sweater or something like that?
To think the sum of its parts are now such an endeavor. :eek
yes the very original Kermit I believe was made from his mothers coat! But later versions of Kermit utilized the Antron fleece. Pretty fascinating history indeed!
Got home late tonight , but I'll post the patterns tomorrow!
Re: Custom Kermit the Frog puppet replica!!
This is really awesome, thank you very much!
I'd say it's definitely worth a shot! The only references that I really used were the photos I'd gathered from all around the internet. For sizing, I pretty much estimated by using the eyes as reference, since the original apparently started with 40mm ping pong balls. After finding some good references that served as a size guide, I printed out an approximate 1:1 scale of kermit so that I had something to compare to. But the most important thing is to get the proportions right, so even if the size isn't 100% the same as the original, he'll just look just fine. Regardless, it appears the real Kermit has undergone some major variations and changes over the decades anyways!
When I get back home tonight, I will post the patterns I used on mine. I could also write down a few "tips" that I learned during the process. I don't mind sharing them (unlike the people over on the muppet central forum, which I can't even post in despite having an account!) I'd just recommend practicing the stitch on some scrap pieces of fabric. I also don't have much stitching experience, but luckily the Henson stitch with the "antron" fabric is very forgiving! I just went slowly and tried to be patient with it.
I'm in Seattle, so luckily there's currently a Jim Henson exhibit at the MoPop museum. There's a Kermit on display there, but I'm pretty sure it's a "photo puppet" as it's surprisingly small. Also, I saw no evidence of a hole on the bottom for performing the puppet. But still, I was able to spot some really important details (some pics of it in the album below). A lot of the puppets had some roughness to them as well, either from aging or just the way they were put together! So I wouldn't worry about "perfecting" the stitch either.
If anyone uses Google Photos, below is a link to an album of saved photo references that I've collected from all over the internet.
https://goo.gl/photos/8vbo3D8FqkruKP579
This is really awesome, thank you very much!
davidnagel
Sr Member
Re: Custom Kermit the Frog puppet replica!!
Fabulous work. Always impresses me the quality of fan builds of the Muppets. Their look is very hard to capture, including when the magic triangle face arrangement isn't done right.
Look forward to any more you have planned
Fabulous work. Always impresses me the quality of fan builds of the Muppets. Their look is very hard to capture, including when the magic triangle face arrangement isn't done right.
Look forward to any more you have planned
Re: Custom Kermit the Frog puppet replica!!
His mothers old coat and ping pong balls.
The orginal kermit looked rough and was not even called a frog at the time
His mothers old coat and ping pong balls.
The orginal kermit looked rough and was not even called a frog at the time
Didn't Henson originally say that he made Kermit from an old sweater or something like that?
To think the sum of its parts are now such an endeavor. :eek
SankaraRaider
Well-Known Member
Re: Custom Kermit the Frog puppet replica!!
Wauw, amazing work..just amazing!
Wauw, amazing work..just amazing!
ecl
Sr Member
Re: Custom Kermit the Frog puppet replica!!
Thanks again for the comments!
UPDATE:
Sorry about the late update, been busy as of late. But I did pretty much finish up the second Kermit! I made a few small modifications to this one. The torso is slightly taller and the shoulder areas more flat like as seen on the originals. Also made the feet just slightly bigger. I preferred the head from the first one so I transplanted it onto the new one, because the new head I had made turned out to have a slightly thinner neck. The new collar is also a slightly different color (more greenish yellow)
Below are pics of the two side by side. They are nearly identical with only small differences.


I'll repeat and add a few things here:
Materials:
-"Muppet" antron fleece. I purchased my fabric from a seller on etsy (Dewey Street) that I think worked out well enough. I has that nice sparkly look under certain light like the antron fleece. They have a "Frog" color, but apparently they sell out of it often but will dye more.
-Ultrasuede. Red for the mouth and pink/magenta for the tongue. I painted the line on his tongue with artists acrylics.
-"velvet" adhesive. Black colored, for the throat and pupils.
-Ping pong balls for the eyes. I cut one in half and painted it with gloss white spray paint. I think the paint makes it look a lot better.
-light yellow/green felt: for the bottoms of the feet and the collar. Ebay has a bunch of 12x12 inch sheets which are a good size.
Patterns:
These were originally from an older thread on the RPF (Kermit research thread), which I felt was a great starting point. Hopefully, it's okay for me to have made the modifications and to repost them here, but they were originally made public for the members in that thread. I made changes to them (mainly sizing) to make them look a bit closer to what I could see in the photo references, as some of the patterns were derived from the MR photo puppet replica. The head pattern takes some fidgeting, as even though I had cut it out using the pattern below, I still had to do some considerable trimming and tweaking around the mouth to get the fit to look right to me, but it's a great starting point. You'll find making the slightly changes to the pattern can really affect the overall look. Personally, I think as the pattern currently is, looks somewhat too loose around the mouth, which is why I ended up doing some trimming. I'd redraw, but I made the changes directly to the fabric so am not really sure how to edit the paper pattern to reflect that. Just play around with it and see what works.
Just keep in mind that none of these are set in stone, as we don't have access to the actual patterns used on the originals. Even the real Kermit/s over the years vary quite a lot!
Head:
https://i.imgur.com/CQND9t7.jpg
Arm
https://i.imgur.com/fUTCsKE.jpg
Leg (can be used for both the left and right legs, just flip the pattern while tracing)
https://i.imgur.com/xzTbluZ.jpg
Feet (The red is for the cardboard feet bottoms sandwiched between the bottom felt and fleece parts.
https://i.imgur.com/eOk5QIt.jpg
Mouth, Tongue, and Throat:
https://i.imgur.com/TJab9jL.jpg
Hand: (Mostly used as a size guide. Hand is composed of metal armature wiring epoxied to the piece of cardboard which then is covered with the fleece. At least that's the technique I used. See pics in first post.)
https://i.imgur.com/llAw5vh.jpg
Collar (same as from the other thread):
https://i.imgur.com/hfSMDUZ.jpg
Eyes:
https://i.imgur.com/fIk2qHO.jpg
Some bits of info:
Body: Kermit's body is typically a "teardrop" shape, thinner at the top, getting wider closer to the bottom. His fullness though varies thoughout the years, so the measurements I came up with are approximate. The body seems to be around 7.5" tall from what I could extrapolate from references. I didn't use patterns for the body as it was made from gluing foam together and then involved a lot of trimming.
I'll update with some approximate measurements later! Although the patterns should be already sized to print.
Thanks again for the comments!
UPDATE:
Sorry about the late update, been busy as of late. But I did pretty much finish up the second Kermit! I made a few small modifications to this one. The torso is slightly taller and the shoulder areas more flat like as seen on the originals. Also made the feet just slightly bigger. I preferred the head from the first one so I transplanted it onto the new one, because the new head I had made turned out to have a slightly thinner neck. The new collar is also a slightly different color (more greenish yellow)
Below are pics of the two side by side. They are nearly identical with only small differences.
I'll repeat and add a few things here:
Materials:
-"Muppet" antron fleece. I purchased my fabric from a seller on etsy (Dewey Street) that I think worked out well enough. I has that nice sparkly look under certain light like the antron fleece. They have a "Frog" color, but apparently they sell out of it often but will dye more.
-Ultrasuede. Red for the mouth and pink/magenta for the tongue. I painted the line on his tongue with artists acrylics.
-"velvet" adhesive. Black colored, for the throat and pupils.
-Ping pong balls for the eyes. I cut one in half and painted it with gloss white spray paint. I think the paint makes it look a lot better.
-light yellow/green felt: for the bottoms of the feet and the collar. Ebay has a bunch of 12x12 inch sheets which are a good size.
Patterns:
These were originally from an older thread on the RPF (Kermit research thread), which I felt was a great starting point. Hopefully, it's okay for me to have made the modifications and to repost them here, but they were originally made public for the members in that thread. I made changes to them (mainly sizing) to make them look a bit closer to what I could see in the photo references, as some of the patterns were derived from the MR photo puppet replica. The head pattern takes some fidgeting, as even though I had cut it out using the pattern below, I still had to do some considerable trimming and tweaking around the mouth to get the fit to look right to me, but it's a great starting point. You'll find making the slightly changes to the pattern can really affect the overall look. Personally, I think as the pattern currently is, looks somewhat too loose around the mouth, which is why I ended up doing some trimming. I'd redraw, but I made the changes directly to the fabric so am not really sure how to edit the paper pattern to reflect that. Just play around with it and see what works.
Just keep in mind that none of these are set in stone, as we don't have access to the actual patterns used on the originals. Even the real Kermit/s over the years vary quite a lot!
Head:
https://i.imgur.com/CQND9t7.jpg
Arm
https://i.imgur.com/fUTCsKE.jpg
Leg (can be used for both the left and right legs, just flip the pattern while tracing)
https://i.imgur.com/xzTbluZ.jpg
Feet (The red is for the cardboard feet bottoms sandwiched between the bottom felt and fleece parts.
https://i.imgur.com/eOk5QIt.jpg
Mouth, Tongue, and Throat:
https://i.imgur.com/TJab9jL.jpg
Hand: (Mostly used as a size guide. Hand is composed of metal armature wiring epoxied to the piece of cardboard which then is covered with the fleece. At least that's the technique I used. See pics in first post.)
https://i.imgur.com/llAw5vh.jpg
Collar (same as from the other thread):
https://i.imgur.com/hfSMDUZ.jpg
Eyes:
https://i.imgur.com/fIk2qHO.jpg
Some bits of info:
Body: Kermit's body is typically a "teardrop" shape, thinner at the top, getting wider closer to the bottom. His fullness though varies thoughout the years, so the measurements I came up with are approximate. The body seems to be around 7.5" tall from what I could extrapolate from references. I didn't use patterns for the body as it was made from gluing foam together and then involved a lot of trimming.
I'll update with some approximate measurements later! Although the patterns should be already sized to print.
Last edited by a moderator:
Re: Custom Kermit the Frog puppet replica!!
This is really awesome. Thanks again.
This is really awesome. Thanks again.
Re: Custom Kermit the Frog puppet replica!!
Stellar work man!
Stellar work man!
SankaraRaider
Well-Known Member
Re: Custom Kermit the Frog puppet replica!!
Your Kermits are amazing.
..and the best replicas I've ever seen.
I've been wanting a Kermit for sooo many years.
Not just a stuffed toy, but a true replica.
I almost purchased the Master Replicas photo puppet 10 years ago.
At that time it was the ultimate thing to own. I always felt
that it would be impossible to make something like that yourself.
But you surely did, and your puppets look way more accurate.

I don't think I could do something like that.
So, if you should ever get the time and resources to do
a run, or maybe a few commisions, please let me know.
Would definitely be interested in owning one of your creations.
..and if you need ideas for future projects, I'd suggest maybe
some of the puppets that MR had planned but never got around
to make, before they closed down. I'd personally love to see
someone tackle Rizzo. Or perhaps a Gonzo with a nose made
in the correct material.
Keep up the excellent work!
Your Kermits are amazing.
..and the best replicas I've ever seen.
I've been wanting a Kermit for sooo many years.
Not just a stuffed toy, but a true replica.
I almost purchased the Master Replicas photo puppet 10 years ago.
At that time it was the ultimate thing to own. I always felt
that it would be impossible to make something like that yourself.
But you surely did, and your puppets look way more accurate.

I don't think I could do something like that.
So, if you should ever get the time and resources to do
a run, or maybe a few commisions, please let me know.
Would definitely be interested in owning one of your creations.
..and if you need ideas for future projects, I'd suggest maybe
some of the puppets that MR had planned but never got around
to make, before they closed down. I'd personally love to see
someone tackle Rizzo. Or perhaps a Gonzo with a nose made
in the correct material.
Keep up the excellent work!
Last edited:
ecl
Sr Member
Re: Custom Kermit the Frog puppet replica!!
Thanks very much! I appreciate that.
I also thought the same as well, seeing as good official replicas of the Muppets are very scarce, being only limited to the few pieces that MR made years ago. I love the MR Kermit, but always wanted a puppet version as well. It kind of feels like Disney/Jim Henson Company doesn't want to get into any more replicas of the Muppet characters.
I didn't think I'd be able to make one either, at least in the beginning. It wasn't until I'd decided to practice the henson stitch that I realized it would be possible to do; with a lot of research and practice. Unfortunately though, it just takes too long for me to make one, so I wouldn't think of doing a run of these. However, I may end up selling the first one I made on here in the Junkyard, seeing as I really only need one!
Rizzo or Gonzo would indeed be excellent choices to make! I was also considering Beaker as well as a possible future project.
Your Kermits are amazing.
..and the best replicas I've ever seen.
I've been wanting a Kermit for sooo many years.
Not just a stuffed toy, but a true replica.
I almost purchased the Master Replicas photo puppet 10 years ago.
At that time it was the ultimate thing to own. I always felt
that it would be impossible to make something like that yourself.
But you surely did, and your puppets look way more accurate.
View attachment 758277
I don't think I could do something like that.
So, if you should ever get the time and resources to do
a run, or maybe a few commisions, please let me know.
Would definitely be interested in owning one of your creations.
..and if you need ideas for future projects, I'd suggest maybe
some of the puppets that MR had planned but never got around
to make, before they closed down. I'd personally love to see
someone tackle Rizzo. Or perhaps a Gonzo with a nose made
in the correct material.
Keep up the excellent work!
Thanks very much! I appreciate that.
I also thought the same as well, seeing as good official replicas of the Muppets are very scarce, being only limited to the few pieces that MR made years ago. I love the MR Kermit, but always wanted a puppet version as well. It kind of feels like Disney/Jim Henson Company doesn't want to get into any more replicas of the Muppet characters.
I didn't think I'd be able to make one either, at least in the beginning. It wasn't until I'd decided to practice the henson stitch that I realized it would be possible to do; with a lot of research and practice. Unfortunately though, it just takes too long for me to make one, so I wouldn't think of doing a run of these. However, I may end up selling the first one I made on here in the Junkyard, seeing as I really only need one!
Rizzo or Gonzo would indeed be excellent choices to make! I was also considering Beaker as well as a possible future project.
Re: Custom Kermit the Frog puppet replica!!
Hi, I just saw this and what a great kermit you got there! I been try make one for myself and I understand how pattern work but, most the trouble I have is sew lip to felt mouth.
Here pic I made few years ago and hope you understand the problem. The problem is I whipstitch felt mouth to head and once I glue on the mouthplate and turn inside out. The stitch is shown hang on lip as shown in pic (the brown stitch). Do you have any advice the best way clean sew lip to mouth? Again hope you understand.
View attachment 759550
ecl
Sr Member
Re: Custom Kermit the Frog puppet replica!!
Hi! I can't seem to see the photo you uploaded. Can you try to post it again? For the mouth plate on my Kermit, I used a somewhat flexible cardboard, and the fleece is just glued onto it approximately 1/4" around (I guess you could say part of his lips) with contact cement. Basically, the fleece around the outer edge of his mouth attaches to the mouth plate with the glue.
I went ahead and took some better photos of the second Kermit. I still need to permanently attach his eyes though, but I will be making the interior armature stand for it first before doing so. He does like getting his picture taken haha!


Hi, I just saw this and what a great kermit you got there! I been try make one for myself and I understand how pattern work but, most the trouble I have is sew lip to felt mouth.
Here pic I made few years ago and hope you understand the problem. The problem is I whipstitch felt mouth to head and once I glue on the mouth plate and turn inside out. The stitch is shown hang on lip as shown in pic (the brown stitch). Do you have any advice the best way clean sew lip to mouth? Again hope you understand.
View attachment 759550
Hi! I can't seem to see the photo you uploaded. Can you try to post it again? For the mouth plate on my Kermit, I used a somewhat flexible cardboard, and the fleece is just glued onto it approximately 1/4" around (I guess you could say part of his lips) with contact cement. Basically, the fleece around the outer edge of his mouth attaches to the mouth plate with the glue.
I went ahead and took some better photos of the second Kermit. I still need to permanently attach his eyes though, but I will be making the interior armature stand for it first before doing so. He does like getting his picture taken haha!


ecl
Sr Member
Re: Custom Kermit the Frog puppet replica!!
I’ve been getting inquiries regarding how I made my kermit, so I ended up drawing a few tutorials of my process. Maybe they can help illustrate what I did. CLICK to see full size pics.
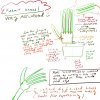
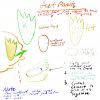
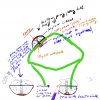
MATERIALS:
1 inch sheet foam- For the structure of the body. I simply bought a square of “chair” foam from Joanns fabrics. It’s soft, but rigid enough to hold its shape pretty well.
Ping pong balls—I cut a ping pong ball in half, and then refined the edge by running it along a sheet of sandpaper. I also decided to spray paint them white for a better looking finish (ping pongs have a weird ultra matte finish that I didn’t like)
Antron Fleece—Looks like fleece but with a kind of sparkly appearance under certain lighting conditions. I bought mine from Dewey Street (Frog color) on etsy.
Felt—For the collar and bottoms of the feet.
Armature wire—for the posable fingers. I got mine from the jewelry section from Hobby Lobby.
Black Adhesive velvet—for the eyes and ‘throat’ graphic. It’s a kind of fuzzy sticker. They are sold in sheets, and can be found on ebay.
Ultrasuede—I used this for the mouth (red) and his tongue (magenta/pinkish). I painted the middle line of his tongue with some artists acrylic paint.
Contact Cement—very durable and flexible glue. Stinks like hell when you’re using it (ventilate well). The most convenient way to use it is to lightly cover both sides you want to glue. Let dry for a few minutes, and then carefully stick the parts together (seems counter intuitive, but it works well). The bond is very durable and strong. I used the glue to assemble the feet, fingers, and also glue the foam pieces of his body together.
Nylon nut, screw, washer, styrene sheet (for cutting out circle with the same diameter as the ping pong)—for the eye assembly. I’m sure there are many ways to attach the eyes, but I found this to be a very secure way to do it. The nylon screw, washer, and nut can be found at Lowes hardware store. I used the 10-24 size screw. The nut fastens against the styrene plate, which pushes against bottom of the ping pong ball through the fleece, creating a nice tight fit.


I’ve been getting inquiries regarding how I made my kermit, so I ended up drawing a few tutorials of my process. Maybe they can help illustrate what I did. CLICK to see full size pics.


MATERIALS:
1 inch sheet foam- For the structure of the body. I simply bought a square of “chair” foam from Joanns fabrics. It’s soft, but rigid enough to hold its shape pretty well.
Ping pong balls—I cut a ping pong ball in half, and then refined the edge by running it along a sheet of sandpaper. I also decided to spray paint them white for a better looking finish (ping pongs have a weird ultra matte finish that I didn’t like)
Antron Fleece—Looks like fleece but with a kind of sparkly appearance under certain lighting conditions. I bought mine from Dewey Street (Frog color) on etsy.
Felt—For the collar and bottoms of the feet.
Armature wire—for the posable fingers. I got mine from the jewelry section from Hobby Lobby.
Black Adhesive velvet—for the eyes and ‘throat’ graphic. It’s a kind of fuzzy sticker. They are sold in sheets, and can be found on ebay.
Ultrasuede—I used this for the mouth (red) and his tongue (magenta/pinkish). I painted the middle line of his tongue with some artists acrylic paint.
Contact Cement—very durable and flexible glue. Stinks like hell when you’re using it (ventilate well). The most convenient way to use it is to lightly cover both sides you want to glue. Let dry for a few minutes, and then carefully stick the parts together (seems counter intuitive, but it works well). The bond is very durable and strong. I used the glue to assemble the feet, fingers, and also glue the foam pieces of his body together.
Nylon nut, screw, washer, styrene sheet (for cutting out circle with the same diameter as the ping pong)—for the eye assembly. I’m sure there are many ways to attach the eyes, but I found this to be a very secure way to do it. The nylon screw, washer, and nut can be found at Lowes hardware store. I used the 10-24 size screw. The nut fastens against the styrene plate, which pushes against bottom of the ping pong ball through the fleece, creating a nice tight fit.
Last edited by a moderator:
ecl
Sr Member
Re: Custom Kermit the Frog puppet replica!!
Thanks!
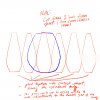
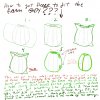
For the foam body, I basically cut out a bunch of pieces based on the design below. As for how many pieces you’ll need, I forgot exactly how many I used, but it was around 6? But what i did was just glue them until they started to form a cylinder. Best way to do this is add contact cement (a conservative amount; you won’t need much), then wait a few minutes for the two sides to dry, and then attach them together—then repeat the process. You can adjust how wide you cut the last few pieces, in order to finalize the how round you want his body to look. Some of the original Kermits looked “fatter” than others, so it’s really a personal preference. But regardless, his torso tends to have a tear drop shape.
One thing to note is when I cut them out, I purposefully cut the edges at an inward angle, which means if you look at each piece from the top and bottom ends, you’ll see that the sides taper inward. The reason for this is so that when the pieces are glued together, they will better form the oval shape of body.
Once the pieces were all glued together, I then used a pair of fabric scissors (you’ll need a very shape pair) and refined the overall shape. It’s tedious work, but worth it! I think if someone used a foam that is thinner than 1”, less trimming would be needed. But I liked the rigidity of the 1” foam, so went with that.
Full size: http://i.imgur.com/Pw6I1L4.jpg

Really amazing job on Kermit. How would you suggest starting out when crafting his body, and do you have any sort of pattern you could upload to start with?
Thanks!
For the foam body, I basically cut out a bunch of pieces based on the design below. As for how many pieces you’ll need, I forgot exactly how many I used, but it was around 6? But what i did was just glue them until they started to form a cylinder. Best way to do this is add contact cement (a conservative amount; you won’t need much), then wait a few minutes for the two sides to dry, and then attach them together—then repeat the process. You can adjust how wide you cut the last few pieces, in order to finalize the how round you want his body to look. Some of the original Kermits looked “fatter” than others, so it’s really a personal preference. But regardless, his torso tends to have a tear drop shape.
One thing to note is when I cut them out, I purposefully cut the edges at an inward angle, which means if you look at each piece from the top and bottom ends, you’ll see that the sides taper inward. The reason for this is so that when the pieces are glued together, they will better form the oval shape of body.
Once the pieces were all glued together, I then used a pair of fabric scissors (you’ll need a very shape pair) and refined the overall shape. It’s tedious work, but worth it! I think if someone used a foam that is thinner than 1”, less trimming would be needed. But I liked the rigidity of the 1” foam, so went with that.
Full size: http://i.imgur.com/Pw6I1L4.jpg
Similar threads
- Replies
- 84
- Views
- 16,852
- Replies
- 0
- Views
- 1,445
- Replies
- 0
- Views
- 244
