KPAX10's 2014 Halloween Costume Contest Entry: Twisty the Clown from AHS

KPAX10

Member
Good Afternoon everyone! Well, here is my very first entry to the RPF, and technically, my first "build", so I guess this will be for the "New member (less than a year on the site as of Oct 1, 2014) in costume" category.
"Guess who's back... back again,
Twisty's back, tell a friend...
Guess who's back, guess who's back,
Guess who's back. Guess who's back?
I created a monster, cuz ev'body wants to...
See Kyle's no more they want Twisty
I'm chopped liver
Well if you want Twisty, then this is what I'll give ya..."
1-IMG_8906.JPG


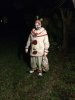
Halloween was fast approaching and I was still up in the air about what to do or to be. We typically go out to to go out to Downtown Orlando's Halloween Celebration. One of my coworkers, Jose, suggested the other week that I should do Twisty the Clown from American Horror Story. I looked at him funny, as there was only 2 weeks until Halloween!! Also, since the show's season had just started, there wasn't an awful lot of reference material out there. However, I'm a BIG fan of the show and a fan of the Character Twisty and the actor John Carroll Lynch, so my interest was peaked.

Challenges? Well, TIME was the biggest one as I only had less than two weeks to pull this together. Plenty of time you say? When you factor in that I put in 40-50 hours per week at my full-time job as an architect, that doesn't leave much free time. Sigh. The other big one was getting the prerequisite materials needed to 'do this right'. I told my coworker that IF I'm going to do this, I'm going to do it right.

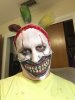
As right as I could.... I don't have much background in sculpting or foam crafting, and I don't have a life-cast of my head, so I had to take a slightly different route to accomplish the look. I didn't want to do just a face paint - those are nice, but this demanded something a little more in my eyes. And I'm somewhat bald... so I had that going for me.

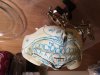
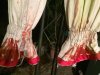
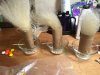
Here are some of my reference photos:

AHSFreakShow_Twisty.jpgclown-ahs-after-american-horror-story-freakshow-the-scariest-movie-clowns-ever.jpegTwisty.jpgtumblr_nd72exuHMc1ruf3vao1_500.gif

Here is the list of the items I would need to make or obtain.
(Hope this helps others!)

Costume/Outfit:
  • Top w/ ruffled cuffs
  • Pants w/ ruffled cuffs
  • Collar, two-tier, ruffled
  • Fingerless gloves
  • Clown Shoes
  • 2 red pompoms,1 yellow fuzzy pompom
  • Red ribbon trim
  • Rose

Bag:

  • Bag Body
  • Red chord
  • Red ribbon trim

Head:

  • Head Scalp
  • 3 hair peices - red, green, yellow
  • Facepaint / Foundation

Mask:

  • Underpeice/support
  • Teeth
  • Gums
  • Bungee chord

Accessories/Extras:

  • Scissors
  • Juggling Pins
  • Robot
  • Flowers
  • Facepaint
  • Blood
  • Latex


Enjoy!
-Kyle

PS...I will place my progress photos after this initial post, and also make my post in the Contest page.

AHSFreakShow_Twisty.jpg


clown-ahs-after-american-horror-story-freakshow-the-scariest-movie-clowns-ever.jpeg


Twisty.jpg


tumblr_nd72exuHMc1ruf3vao1_500.gif


1-IMG_8906.JPG
 
Last edited by a moderator:
The Build:
Every part of the costume adds to the overall feel, but to me, the most important part of the costume is the Mask that Twisty wears. As I couldn't sculpt or foam build, how was I going to create this portion. I tossed around ideas of face-painting and a direct application to my face, but neither of those would accomplish what in my head, THE iconic portion of him - The Ever-Grin. So I needed something that could be removable and act as a base to my build-up.
IMG_8515.JPG
While this would do, ultimately I decided not to use this one, as it didn't have the 'structure' or the side coverage that I was looking for.)

(can anyone tell me why this photo is rotated? It is NOT rotated on my computer!! - UGH this is really going to irk me.....)

I ended up running across this mask (by accident) and said... 'Why not'?!! a V is for Vendetta mask - C is for Clown, my friend!
Using a marking pen, I laid out the overall forms and where elements would be placed, and where I will eventually cut away the extra.
Since I decided to use a Latex build-up, one thing that is important is to treat the slick surface of the mask by sanding it to make it rougher.

IMG_8521.JPGIMG_8523.JPGIMG_8524.JPG

After placing it on my face, I noticed that the cheeks were a little too high on mine, pulling away from my face.
This definitely does not match how Twisty's mask lays on his face.
IMG_8525.JPGIMG_8528.JPG


One of my most helpful tools on this build was a "Helping Hand" tool I had picked up on Amazon.. Having both hands free was SO... Helpful!
I used this to hold the mask while I laid out additional areas and while I would be placing my build up areas.

IMG_8535.JPG(why.. oh WHY is this photo upside down...??? Again, it's NOT SUPPOSED TO BE !!!)

First layer of latex build-up. This is done using precut peices of round cotton swabs (found at any drugstore or superstore).
IMG_8541.JPG

For the Teeth, I'm using acrylic nails (slightly rounded tips). There are 10 teeth per row/5 teeth per side / 20 total on the Mask. The different sizes of nails helps a lot with choosing the proper size for the mask. (Building this up out of latex just wouldn't do!) One thing I did first was to fill the back of the nails with latex - in this case a 'Natural Latex' which has more of a flesh/yellow tinge to it, as opposed to a white color. This will make attachment much easier - and as a bonus, helps with the color (which you'll see later).
Also - note the strategic use of Wax Paper on the work surface. When working with Latex, this helps tremendously!!
IMG_8530.JPG

Once the "Teeth" were dry, I attached them with Latex to the mask in their proper location.
The tops of the teeth needed to be closed off - One of my 'bonus finds' was some thin tissue paper I found in a shoe box of mine. Once cut, this was perfect for lining the 'gums'. I laid it in latex, then spread it over the edge of the teeth. Multiple layers were used to build-up the gums. I waited a little for the Latex to firm up, then using a wood shaping stick, pushed it back up into the gum line. The ends of the mouth were 'closed' using a couple of cut pieces of round cotton swabs coated in Latex.
IMG_8601.JPGIMG_8603.JPGIMG_8602.JPGIMG_8652.JPGIMG_8605.JPG

To build up the 'lip-line', I used white cording that was first soaked in Latex, I let this dry a little before placing on the mask.
Additional, multiple layers of the white tissue paper was used to create a hard edge on the interior of the lip, and a more even edge on the face side.
I had to let this dry overnight and then added yet more layers to provide a harder, more durable surface. The yellow tissue paper is slightly thicker and was used at the chin area to help build it up.
IMG_8653.JPGIMG_8654.JPGIMG_8676.JPG

MORE TO COME.......
 

Attachments

  • IMG_8535.JPG
    IMG_8535.JPG
    1.4 MB · Views: 231
Clown Costume and Hair:

While the initial Mask build is drying, I decided to work on the Outfit and the Hair. In my research I could find NOTHING that was even close to the style of clown costume that appears to be used in the show. After a little more research, I've come to the conclusion that this is a Pagliacci style clown outfit. Of course there are NO patterns anywhere. Except one that is from 1974 on Amazon... and wouldn't get here in time. UGH. Time to improvise....

I ended up combining two different patterns - one for a clown outfit and the other for... pajamas! The clown patterns today are more like a jumpsuit and doesn't match Twisty's two piece - but they DO have the correct collar type! As my time was a bit limited and constrained to the Mask work, I enlisted the help of my girlfriend to help me sew these together.
IMG_8962.JPGIMG_8964.jpg


I also had to get the proper fabric - which was more difficult than first imagined. The reference photos that I have, and have seen around all vary due to either the lighting or filters that are used on the cameras. I can anticipate that his probably was originally white, perhaps even silk or silk-ish. but that just isn't going to do. I decided to go with an already off-white cotton fabric that could be weathered well later on.
IMG_8339.JPGIMG_8640.JPGo-TWISTY-facebook.jpgIMG_8832.JPG

I was able to score with finding some off-white cotton fabric at a local fabric store in the discount section for $2.00/yd! Are you kidding me? SOLD!
Of course I found the Grosgrain ribbon and rope on sale too!! Pompoms and the yarn & acrylics were obtained at a local big-box store.
(Disregard the bath scrunchie.. we needed a new one anyway...) (WHY are the pics rotated ?!?!?)
IMG_8504.JPGIMG_8503.JPG

The initial sew job went rather well with only a few minor adjustments due to my body measurements. The good thing about this costume build is that it is rather forgiving and it's a 'tight-see-every-buldge-or-muscle' outfit. (these sideways pics are NOT my fault)
IMG_8532.JPGIMG_8597.JPGIMG_8598.JPG
IMG_8774.JPGIMG_8777.JPG

Twisty maybe looked like this when he first dressed up, but that was oh-so-long ago. Time to do some weathering! Although I do live in Florida, I cannot go and live in a dilapidated bus for a few years, so I will have to speed this up. I ended up using some tea-staining to first build-in some color. Then some rolling around the ground in conjunction with some spray paint and bottled blood.
IMG_8704.JPG
IMG_8775.JPGIMG_8776.JPGIMG_8778.JPGIMG_8772.JPG


The Hair:
Twisty has three top-knots on his head. OK, technically, it's not his head! Luck would again be in my favor (oh wait.. that's a different movie), as in looking for hair options, I ran across a wig in the discount section at our local Halloween costume store. Bonus!
IMG_8378.JPGoh wait.. that's yet another costume build.... lol
The idea, however, was to use this hair to build the top knots. I'm not using a bald-cap (as I'm already bald), I need to be able to somehow attach the hair in a vertical orientation and have it stick to me all night without falling off. Whaaaaaaat?

I needed a contraption to hold the hair while I set it within a layer of Latex. Once dry, I would then use Spirit Gum glue to attach the latex portion to my scalp. This is what I came up with: Hair is fed through the paper tube with toothpics holding the tube at the proper level. Latex is at the bottom of a glass ramekin/bowl.
IMG_8649.JPGIMG_8651.JPGaIMG_8656.JPG

MORE TO COME...
 

Attachments

  • IMG_8776.JPG
    IMG_8776.JPG
    1.1 MB · Views: 189
  • IMG_8747.JPG
    IMG_8747.JPG
    2 MB · Views: 206
Hair Continued:
The hair was allowed to dry overnight, and came out with some gaps in the Latex bottom. Good news is that can be filled in with more Latex - and dried with a hairdryer.
IMG_8839.JPGIMG_8840.JPGIMG_8841.JPG

Coloring of the hair was achieved using both Ultra-hold Hairspray and Halloween color hairspray. Black was used to dirty up the hair. Trimmed using scissors, of course.
IMG_8844.JPGIMG_8369.JPG


Accessories:
Twisty has a few accessories that he carries around in his bag and on his person. The first is the Rose on his collar. This is an interesting artifact as it shows up in the first episode, but appears to have come off somewhere in later ones. I'll have to re-watch to see if I can see when. I like his outfit with it on, so I've chosen to include it. Weathering was accomplished using Almond spraypaint (with a light touch).
IMG_8370.JPGIMG_8705.JPGIMG_8739.JPG

Pompoms were weathered the same way. I could not find a yellow fuzzy to save my life, but I did find a white one... and had to get some yellow fabric spray to color it. The 'magic flowers' were also weathered using the same technique.
IMG_8834.JPGIMG_8833.JPGIMG_8741.JPGIMG_8835.JPG


One of the more iconic pieces of Twisty's is his juggling clubs. I found some antique ones on ebay.... NOT going to get them. ($$) and it wouldn't be smart to carry those around during Halloween. I managed to find these plastic ones online, but they are SO not the right color. I sanded the plastic to give it more texture and to allow the paint to adhere better. They're colored using the Almond spray paint, allowed to dry overnight so i could paint the green accent stripes and caps.
Weathering and blood spatttering were added to give 'atmosphere'...
IMG_8703.JPGIMG_8706.JPGIMG_8707.JPGIMG_8708.JPGIMG_8842.JPG

In addition to these, I obtained a plastic pair of 'clown-scissors', clown shoes and his finger-less gloves. The shoes were uber shiny, so I used the washable black and white hairspray to dull these, with a low-air spray of the red hairspray to give blood spatter effect.
IMG_8648.JPGIMG_8917.JPG

MORE TO COME...
 
The Mask...

And now for something completely different. OK, just kidding.
Now the mask gets painted. For this, I'm using straight acrylic paints on the dried Latex mask. As his mask is plastic formed, I had the desire to coat this with satin polyurethane, but decided to not do that step due to time constraints.
IMG_8737.JPGIMG_8729.JPGIMG_8730.JPG

After the base coats dried, then I weathered the mask, added blood and went to color the teeth. Oh, the teeth.
Believe it or not, I was able to accomplish this by a thin dry-brush technique, then followed up after slightly dry by using the back of the brush handle to scratch the marks in the teeth. The 'yellowing' of the teeth is from the natural latex i used to fill in the nails earlier. (you'll notice a 'tester-tooth' in the one photo. I hate making mistakes, so having something to do 'testing' on always helps!!
IMG_8732.JPGIMG_8733.JPGIMG_8734.JPG


After looking at a few other reference photos, there were some additional scratches and blood marks that I went back to add to the lower lip and center upper lip.
I was going to use the skinny cord that came with the white masks, but they were too thin and small. I ended up using a black & white striped bungee cord to attach this to my head.
IMG_8736.JPGIMG_8735.JPGIMG_8738.JPGIMG_8845.JPG

MORE TO COME...
 
The Head Makeup:

Twisty wears someone else's scalp as a hat. As I had mentioned earlier, I didn't have time to sculpt a head piece (my first desired option),and I thought a bald-cap was redundant and I didn't want creases or folds. So I decided to fall back to using a Latex build-up over my already bald head. The plan was to use the white cord to build the edge of the scalp, feather it back with latex and use the color to differentiate the two areas.

(Again. WHY are these pics coming in Sideways??? REALLY???)

The cord was pre-soaked in Latex and allowed to semi-dry to stick to my head easier. Thin strips of toilet paper were also pre-cut to allow for quick attachment. Little foam sponge wedges were used to add latex to skin first, the the strips were added, then more latex added to the top. Do NOT soak the TP in the latex as it turns into a gummy mess.
IMG_8853.JPGIMG_8854.JPGIMG_8855.JPGIMG_8857.JPGIMG_8859.JPG


The hair pieces were attached using Spirit Gum to my scalp (those spots were pre-shaved to avoid complications). The scalp behind the edge was covered with foundation to appear as flesh. (UGH- i noticed I 'double chinned'... I need a diet.)
FYI: the hair stayed on for over 10 hours!!!!
IMG_8862.JPGIMG_8863.JPG

Simple White Cream theatrical facepaint was used over my face and neck area.
Some places were gone over twice, some rubbed out to assist with the weathering.
IMG_8864.JPGIMG_8933.JPGIMG_8927.JPG


{MIRACLE OCCURS HERE}


Sorry I don't have 'progress' shots of each step, but here is the final face.
Red facepaint was used for the thin triangles at each eye, then outlined with black liquid eyeliner.
MAC eyeshadow and other makeup was used for the shadowing around the eyes and at the nose creases, wrinkles and weathering.
The red gel blood was used along the edge of the scalp, then feathered with a paintbrush and sponge.
(interestingly enough, the gel blood dripped due to my sweating during the night, adding to the effect!)

IMG_8865.JPG

I was going to do the cut mouth under the mask - a double mask, if you will, but ran out of time.

MORE TO COME...

- - - Updated - - -

The requested Proof Photo...


IMG_8948.JPG
 

Attachments

  • IMG_8865.JPG
    IMG_8865.JPG
    181.2 KB · Views: 199
UPDATE:

I will have to say that I underestimated this character's popularity. From the minute I hit the sidewalk in Downtown Orlando, I was inundated with requests to stop and get photographs!! What a trip! (I think I may have a slight window into how some of the popular cosplayers feel when they go to Cons...)

I attribute this not to my costume, but to the strength of the Character that American Horror Story created for the show. I was honored to be, for a moment, a part of that.
This is Jose, the clown who talked me into this build. This is my Sweety.. and some of my friends....
DSC01840.JPGDSC01842.JPGIMG_8882.JPGIMG_8937.JPGIMG_8939.JPG


and some of the fun Instagram posts.....
IMG_8955.PNGIMG_8953.PNGIMG_8952.PNGIMG_8951.PNGIMG_8949.PNGIMG_8961.PNGIMG_8943.PNGIMG_8944.PNG

Thanks everyone for looking at my Build. I look forward to your comments.
 
Last edited:
Great work! Building my own now. Can we talk Pom-poms a minute?

The middle yellow one was sewed on by Twisty when he lost the red one. It looks like it has some random light blue parts. Any thoughts on what is going on there?

ImageUploadedByTapatalk1415568609.827022.jpg

Looks like fun fur rather than a yarn pom-pom like the red ones, also.
 
It's actually a bit of green, with white in the middle. I almost thought it was a feather, but looking close, it's just longer fur. I think.

twisty-pompom.png
 
Thanks for the great photo and advice. Now that I see that photo, I wonder if it is some sort of (now, unrecognizable) toy he has stuck on there?


Sent from my iPhone using Tapatalk
 
Sorry ahoudini,
I had replied the other week and didn't notice that it 'didn't take'.... Yeah, the original photo was tinted blue, which is incorrect. I actually have a photo of the Actor when he tweeted from the dressing room showing it - I'll try and find and upload it for you. To me it actually appears that it was once a yellow fuzzy pom (of course), but over time has become worn and weathered. I agree that it is the white 'stuffing' from inside the Pom sticking out - perhaps it got caught on something (scissors?). And of course 'weathering' over time. I found it extremely difficult to find one approximating the size and color - ended up getting a white one and some fabric dye. I covered this (I believe) in the build. Good luck - let me know if you found a good source!
 
Back
Top