MK38 Igor build (04/29> Painting and detailing)

Re: MK38 Igor build

that's looking great man! i've always wanted to try out a suit with a small video screen just so i don't bump into every wall and corner.
 
Re: MK38 Igor build

Can't wait to see the finished suit :)

Gesendet von meinem GT-I9305 mit Tapatalk

Looking fantastic. Keep the updates coming!

that's looking great man! i've always wanted to try out a suit with a small video screen just so i don't bump into every wall and corner.

Thanks, guys!

I'll post more on the finished monitor setup when it is properly rigged and installed, just have a bit more reinforcement work to do in the upper torso. The camera system is good for a little over 4 hours of continuous use off of the li-ion pack, and all the hardware comes out at about a pound and a half (decided at the start that weight is the enemy).

FYI the camera system will not be the only means to see out of the finished suit. Nobody wants to get trapped blind in a giant robot-suit when the cam decides to fail :facepalm

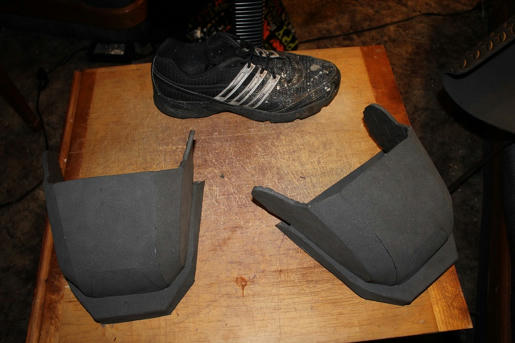
***added** almost forgot, got a couple of toes built for the boots, with one of my size 12 1/2s for reference. Sweet.
 
Last edited:
Re: MK38 Igor build

You sure do work quickly. It looks like such an overwhelming job due to the size,
 
Re: MK38 Igor build

Thanks for the encouragement everybody!

Jackal, The funny thing is, the size of this doesn't bother me much at all. It's pretty comparable to a Warhammer suit. That hard part is all of the stupid engineering that I'm going through to make Igor do what I want him to do. I've built a few 'giant' costumes (7 feet+) and seen a lot, and my biggest complaint has always been that the size and proportion of the costume almost always gets MURDERED just to make it wearable. Legs get shortened, the arms end up unusable, there's a big porthole added to the chest area just to see, the wearer can't barely walk, etc. etc..... I want to look at a giant costume and automatically wonder how there can possibly be a normal person inside.

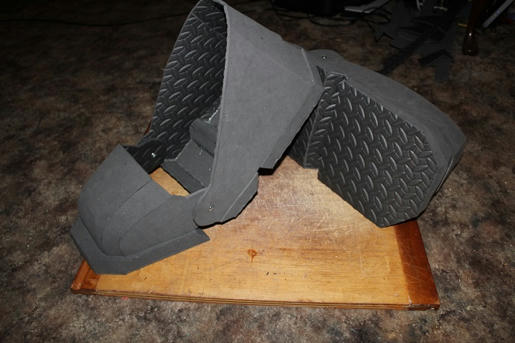
A bit more progress on the boots this evening, I'm hoping to get the lifts fitted tomorrow so I can install spats and start detailing. The wearer's shoes will sit about 5" above the boot bottom (see pic), with the uppers hidden under the shin-skirts:

kk3xmigv2amcz0g4g.jpg


Assuming the lifts install the way I want them to and are stable, I'm hoping to keep the boot's hinged toe section so it articulates when walking. It should make walking a little less 'Frankenstein', but honestly I'm just doing it because I think it'll look cool. Thanks for looking!
 

Attachments

  • kk3xmigv2amcz0g4g.jpg
    kk3xmigv2amcz0g4g.jpg
    58.5 KB · Views: 93
  • kk3xmigv2amcz0g4g.jpg
    kk3xmigv2amcz0g4g.jpg
    58.5 KB · Views: 86
Last edited by a moderator:
Re: MK38 Igor build

Which foam are you using, eva, evazote, pe or rubber foam?

Gesendet von meinem GT-I9305 mit Tapatalk
 
Re: MK38 Igor build

Everything built so far is in EVA (which I just ran out of and need to order more). Once everything is fitting together properly, I'll also be using a combination of 3mm EVA foamies and 1/4" XLPE for the detail work. Both the foamies and XLPE are smooth on both sides, so they cut and stack very clean, just overall easier to work with.

Testing the hinge-point in the boots before I get any farther on them:
 
Re: MK38 Igor build

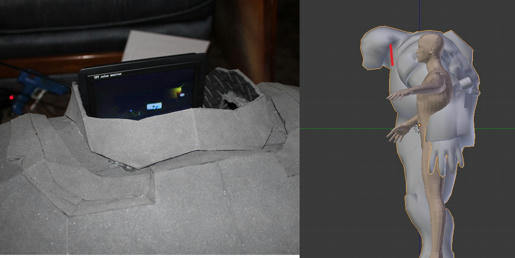
So I managed to get the LCD display test-fit into it's eventual mounting point in the neck-mount. Unfortunately the battery pack needs charging, so a picture of the wearer's point of view will have to wait until tomorrow. The LCD screen sits about 8-10 inches from your face when you're wearing the suit; in the attached pic, the red line in the proportion model represents the LCD's current location:


INFO ON GETTING A CAMERA SYSTEM:


I was getting some questions about the camera and monitor setup, so I'll quickly go over the important stuff in choosing a good combination.

1) MAKE SURE YOU HAVE A PLAN TO POWER YOUR SYSTEM

You'll need to figure out how you intend to power your setup, and this will likely affect what you purchase. A lot of the systems out there were originally designed for use in vehicles, so they're looking for a 12v power source. Other systems may require only 9 volts, and some expect 125+ volts as they plug into wall outlets. Typically your camera and monitor will each need to be powered individually, so it makes things easier to make sure they have the same power requirements. In Igor, I'm using a camera and monitor that each require about 12 volts to operate, so they can be run directly off of the same 12 volt power source.

After you've got your voltage requirements squared away, you'll also need to figure out the AMPERAGE these will need to operate, or in other words how much current they eat up when they running. According to the spec sheets, my monitor uses about 350 milliamperes per hour (350 mAh), and the camera uses about 50 mAh, for a total of 400 mAh of consumption. Simply put, when this stuff is turned on, it's going to use roughly 400 milliAmps of current every hour from my battery pack. The 12 volt Litepower pack pictured below only has a 800 mAh capacity, so I could only run my camera system for about two hours on a full charge (400 mAh X 2 hours of use = 800 mAh).
LP-BAT-NIMH-12V-AAA-800-2.jpg

I'm simplifying a lot of the details here, but long story short the bigger the battery capacity, the longer you can power your camera and screen. Using rechargeable batteries or battery packs is practically a given so you don't go broke buying replacements all the time, but also keep track of the weight. Batteries can get heavy depending on the type and capacity. A lithium Ion battery is much lighter than a comparable Lead Acid battery, but it also costs quite a bit more money. Also, as with anything, you get what you pay for. The majority of Chinese-made battery packs I've purchased have not produced even HALF of their advertised mAh capacity. LAME.

2) CHOOSING A CAMERA

You can go to Ebay and Amazon and find a ton of different 12 volt automotive backup cameras for fairly cheap. Most all will be color, and resolution will vary as well. I don't sweat those details too much; a lot can be determined by reading buyer reviews and also looking at images captured by the actual camera. I would make sure that the output for the video is a standard RCA plug, to make connecting things up easier later. There are a few other things to consider as well:

1) FIELD OF VISION
You can get cameras that have a field of vision of under a 100 degrees, or nearly 180 degrees if you want. The greater the field of vision, the more the lens will give you a fish-eye effect on the monitor. I chose a 170 degree FOV, namely because I want the wearer to see what's going on more to his left and right since Igor is so big. You can find youtube videos comparing different fields of vision on cameras if you'd like to see more.

2) LOW LIGHT/ NIGHTVISION
If you plan on being out at night or in dark areas, this can obviously be a big deal. I go to at least one Halloween costume contest in a poorly-lit bar venue every year, and a camera w/o nightvision would leave me blind. Some cameras have actual LED lights, Infrared, or special low-lux setups to help you see in darker environments. Once again, I recommend looking at reviews. The camera I'm using has IR LEDs to help with nightvsion, but I question how much they really help after about 10 feet.

3) DOES THE CAMERA PROJECT A REVERSE IMAGE AND/OR DISTANCE LINES?
A lot of backup cameras automatically reverse the image they send, so the image you see is mirrored. This reversed image will then show up on your dash monitor just like the image you see in your rear-view, which is great if you're using it to back up. Unfortunately, if you have that camera facing forward (in a helmet for instance), that image will be opposite of what you are really seeing; A guy standing to your left will appear to your right, signs will appear reversed, etc.... Make sure that your camera is not a reverse/mirrored image if you are making a front-view system, otherwise it won't work properly. The exception is that some monitors will allow you to reverse the image again, correcting the picture for a front view. I avoided these problems and found a camera that could be set for regular or reversed views, like this one: Pyle - PLCM38FRV*-*Mobile Video / Navigations*-*Back up Camera & Rear View Mirrors w/ Monitors

Also, a lot of reverse cameras come with distance lines to help you determine how far you need to back up. They usually look like this:
CAM016G%20looking%20back.JPG


On most cameras, these lines cannot be removed. If lines like these bother you, you'll want to find a camera that doesn't have them, or has a feature where they can be turned off. If you search for 'front view backup camera' that's a good start.


3) CHOOSING A MONITOR


Figure out what size monitor you would like, depending on the space you have to use. A 4 inch monitor works well in a lot of applications, and looks (to me) pretty similar to watching the screen of a youtube video. Igor's size and claustrophobia-inducing design made me choose to go with a larger screen to prevent tunnel vision in the suit. When you look at monitors, be sure to look at their video connections as well. The easiest is the standard yellow RCA video plug which should plug right into your camera's video output.

Once again, take a look at reviews of the product before buying. A lot of these monitors have videos showing their displays online, so you've got an idea of image quality. Some are not backlit very well, and some will be impossible to see in direct sunlight. Also, take a look at the actual size. A 7" display may actually sit in a 10" housing, making it not fit in your application. Lastly, if you did get a reversed-image-only camera, make sure your monitor can flip it back.
I purchased a 7" TFT LCD screen, and have been very satisfied with it so far. It has an optional secondary input jack, an IR remote, and other stuff Igor doesn't need, but it can also be made removable and used for other stuff outside of the suit.


SOOOOOOOO,

There's a quick overview to get into one kind of camera/monitor system. If you get into a project like this, I recommend ordering all of your components at once and testing them IMMEDIATELY. That way, you can return or exchange anything that isn't working properly or doing what you need it to before any return cutoff dates pass. I have always had to return or exchange at least one component with these systems before getting it working right.

As always, I'm likely forgetting a lot of stuff, so if you've got a question feel free to ask. With any luck I'll actually have some decent pictures of the Igor monitor charged and in use tomorrow. :)

Thanks for looking :thumbsup
 
Last edited:
Re: MK38 Igor build

what are you using to use as a reference for the pieces? jut the way the 3d model looks or did you do something like make it into a pep file?
 
Re: MK38 Igor build

The Igor model I started with is from the Iron Man 3 mobile game. I've been using that 3d model as a guide for the proportion and fit of the large pieces, adding details from the accompanying texture as I go. The original model's pieces are pretty well split up already, but I added some reinforcing flanges and changed the geometry somewhat as well before carrying the model pieces over to pepakura to make my templates. A lot of components will still need to be significantly modified (bicep-torso union for one) to make this more wearable.

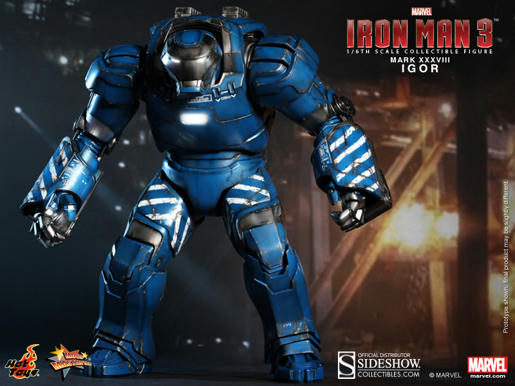
Once I've got the main joints working together (hopefully the first part of this next week), I'll then start using the Sideshow MK 38 more as a a reference..... I want to make sure the suit's main components are going to work together before I start going overboard detailing and cleaning up seams. The final paint should be pretty close to this one, including some light weathering to show the detailing and seam better. Hopefully I answered your question?

 
Re: MK38 Igor build

Man that's going to be really sweet, any spots going to light up ?

Of course! I've already got the LED assemblies built for the helmet 'eyes', chest arc reactor, and the glove repulsors. I'm hoping to start test fitting the LEDs into the armor towards the end of the week. :thumbsup
 
Re: MK38 Igor build

Right on, what led's are you using for the eyes? Xpg's ? Have you thought about using an XML2 4volts at 3 amps (1000 lumens) for the reactor or blasters ?
 
Re: MK38 Igor build

Right on, what led's are you using for the eyes? Xpg's ? Have you thought about using an XML2 4volts at 3 amps (1000 lumens) for the reactor or blasters ?

Nothing nearly that bright at this point. Once I get the gear installed I'll be testing and see if I need to upgrade. The ampere draw on these more powerful LEDs would require a lot more juice (and battery capacity) than I want to be carried around in the suit. At this point I count every ounce to make the final suit as comfortable as possible to wear for extended periods. I'll post up the lighting specs when I test them later this week.
 
Re: MK38 Igor build

Yeah, I see your point. I didn't think about weight, I go a little crazy when it comes to led's. Even when using lithium batteries, it'd add up fast if you wanted more than 2 hours runtime
 
Re: MK38 Igor build

The Igor model I started with is from the Iron Man 3 mobile game. I've been using that 3d model as a guide for the proportion and fit of the large pieces, adding details from the accompanying texture as I go. The original model's pieces are pretty well split up already, but I added some reinforcing flanges and changed the geometry somewhat as well before carrying the model pieces over to pepakura to make my templates. A lot of components will still need to be significantly modified (bicep-torso union for one) to make this more wearable.

Once I've got the main joints working together (hopefully the first part of this next week), I'll then start using the Sideshow MK 38 more as a a reference..... I want to make sure the suit's main components are going to work together before I start going overboard detailing and cleaning up seams. The final paint should be pretty close to this one, including some light weathering to show the detailing and seam better. Hopefully I answered your question?

https://www.mediafire.com/convkey/d3c9/pkhgbhzgqhdoxol4g.jpg

yes you did. I just wasnt sure if you had done some printing (pep) or you were just building it by looking at the images as they were

also the idea you had with the camera and the monitor is almost exactly what i was thinking of doing with just a normal helmet. I was thinking on putting 2 cameras(one on each eye) on and attaching them to a few small monitors on the face plate so that when it opens and closes the monitors would turn on and off and give you almost a full digital effect like in the movies.
 
Re: MK38 Igor build

Very cool concept. I've gotten to use I-theater video glasses before in a helmet with a single cam, and it was pretty amazing. It incorporated audio as well, although it was hard to get the sound working well in louder areas (probably because of the camera's cheap add-on mike). Heck, I would enjoy just dialing in and calibrating a dual-camera stereovision setup in a helmet; I doubt it will ever happen though, extra funds on my personal builds usually go for stuff on the 'Looks cooler to everyone else' list wayyy before the 'looks cooler for just me' list.... :lol

The updated camera pics will have to wait another day or so, while more adhesive and expanding foam cures. Got a start on igor's fingers at least...
 
Back
Top