Moebius Battlestar Galactica. The old one!

I have not picked up any of the Moebius Vipers, Despite the raised panel lines, I think the Revell/Monogram ones are more accurate shape wise in most areas apart from the cockpit canopy. Although I have seen builds where they combined the best of both and it turned out very nice.

So far I have built one of the old school Monogram Vipers and used a cockpit detail set to replace the solid grey canopy and lack of interior as well as the 30th Anniversary one which switched to a clear canopy with interior and pilot. I also have the 30th anniversary Cylon Raider which is something like half scale of the 1/32 Vipers at 1/64.

I need a better display as the one is literally just sitting on the shelf

View attachment 1675364

more pics here

Great work on the Vipers.

Do you think the 30th anniversary Viper is worth the cash?
 
Great work on the Vipers.

Do you think the 30th anniversary Viper is worth the cash?

Yes

I has an actual cockpit interior with a pilot figure as well as a clear canopy. The original version is a solid grey canopy and no interior since you wouldn't see it any with a solid canopy meaning you have to shell out extra money for the upgrade set from MMI, or print/scratch build your own

It also has clear parts engineered specifically for lighting the engines as well as better quality decals. I could be wrong but the 30th anniversary option gives you decals for Pegasus or Galactica squadrons in addition

Same thing for the Cylon Raider, you get more accurate and clear engine parts for lighting
 
Turns out I already have a 30th anniversary Viper in the stash. Along with an aftermarket cockpit.

The 30th does have both Galactica and Pegasus squadron markings, along with pilot names, which is more of a nu-show thang.
 
Turns out I already have a 30th anniversary Viper in the stash. Along with an aftermarket cockpit.

The 30th does have both Galactica and Pegasus squadron markings, along with pilot names, which is more of a nu-show thang.

Sounds like we need to hear more about this "stash" than any other "thang" and I would imagine there's some kinda new fangled cream for whatever that thang is. See, I am giving credit to modern technology, so when you said I didn't earlier you feel pretty bad about that now don't you.

I may have one tucked away myself and if memory serves, I may a Basestar too, although I'm sure mine may be older than the 30th ones. I got several of the Moebius Vipers.

A couple of these here too.
Call me names if y'all wanna, but I do like me some of this kinda stuff.
DSCN0165.jpg

DSCN0206.jpg
DSCN0205.jpg

DSCN0204.jpg


See, them's my real fangers.

Rob.
 
Just checked. 2-Revell Raiders, 2-Revell Vipers and for some reason, 1-Revell Basestar where there should be two, but the inventory doesn't reflect that. I coulda missed it. I know there were 2 Battlestars at one time, but the price for those got real high awhile back and I let 'em slip through the old grip.

Now, this means I could do us a side by side review of the Raider and Viper if'n y'all was to want that?

Show of hands.
 
Last edited:
Any y'all ever seen a side by side comparison of these kits? We need that.
I have ones of them finished side by side, but not of the unbuilt kit. Might be useful to show the differences before hacking things up like I did

I do have the original Basestar and Galactica as well. The 30th Anniversary Base Star if I recall has additional detail parts for the "apple core" where the original had no details

They never did a 30th Anniversary Galactica though. Been considering making mine into the Pegasus

And I love that Egg Plane Viper!
 
Analyzer

really nice work from the Viper....

Since I'm building one too, can you tell me what base color you used? Or the other colors you used?

Thanks very much

It was not very accurate to matching the studio model and I was going more for the on screen look...

On the first one (the Revell 30th Anniversary mode) I used white primer, but I did several filters and washes to kind of grey it up a bit. It was a lot of work,
I did not have an airbrush and I had done zero research beyond looking at a few pictures so I just went with straight White Army Painter primer as the base
but it was also one of the first models I painted after re-entering the hobby and I learned a lot

The next one (the original Revell/Monogram with MMI cockpit upgrade and pilot) I decided I wanted a greyer white, so I went with Tamiya AS-16, again a spray can color (although I think they have released a version of it in the their laquer bottle paint line.

I painting the orange markings by hand with a paint brush using a mix of red and yellow P3 gaming miniature paints to get a reddiish orange. I could not use the kit decals as they were too old and had gone bad. They immediately just started cracking after dipping in water

Engine areas were painted with a Gun Metal color and heavily washed with black and brown oils

Since I used the Starbuck markings on the 30th Aniniversary kit, I had the Appollo ones left over and wound up using them on this kit

For me the Tamiya AS-16 gave a nice white/gray that seemed to capture that screen look I was going for

This is a crappy photoshop background crop with star created in MSPaint, but it was good enough to show me I got the look I wanted

44501655130_fd9a2831f1_o.jpg


I have heard of suggesting Light Gull Grey FS16440 (gloss) or FS36440 (matte) is the good color. The Tamiya AS-16 is pretty close to that color, but not quite as warm.
If using Tamiya bottle paints a mix of xf-20 and a bit of white (XF-2) should get you there
or if your prefer something with less "tan" then X-19 with just a touch of white

Hope that helps
 
Hey y'all! Another apology for the length in the reply, but this really is the soonest I could post it and it's STILL just sorta tacked in place so I could make a small update. This one, I believe, has improved the look. It mainly consists of fixing up those trenches and adding some detail on those pieces along the sides just below those trenches. As I asked before, and the consensus was the gap was just about right, so I didn't widen any. I thought it may need a little more gap, but as I got going, it seemed fine, so y'all was right!

Again, here's what it is straight outta the box:
DSCN0522.jpg


Here, again, is what we went with:
DSCN0527a.jpg


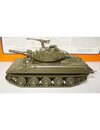
All of those tanks on the upper and lower sections of those trenches are ROCO Sheridans #254 (on the real deal) and they are cut in half, right down the center.
s-l1600.jpg

s-l1600 (1).jpg


As thus:
half.jpg


The tank tread we see glimpses of in a couple pictures. I think, come from the same little ROCO #215 plastered all over the sides of the engine of the Galactica. In this next picture you can also see the Sheridan's cut in half:

265.jpg


Now, on to my feeble attempts to create some of this and what I was able to do. I took the stock pieces for the Sheridan and sliced 'em. Sliced 'em good. I added some detail to those and had to make those tracks completely from scratch. With all these 1/144 kits I showed earlier, I was able to use the tracks... TWO TRACKS... cut in half length wise and wrapped that all the way around all these tracks you'll see next.

DSCN0533.jpg


Y'all with the kit will know, we still mighty small here and this took me a couple days. ALL this has been practically constant work since that last update. Evenings, mainly, but every day.

Next, I decided to add a little bit to the interior of those gaps, which we can see into now, which means I had to create a wall inside there which got cut away on the stock kit when I cut the tanks in half. I took a bit of liberty here and added a couple scribe lines and a few detail pieces to add some lumps and bumps in there. Now, there are also a couple ladder/vent/teeth looking pieces on the original, so I added those too, sorta seen here:
Battlestar_Original_Miniature_060a.jpg


Here's how all that came out:

DSCN0534.jpg

DSCN0535.jpg


You can also see those new walls I had to make. This "wall" also serves to align the top and bottom now and keep the alignment in place. I'll want to be able to open this model up later if I ever have to work on it, so I started that mod with this mod.

Some may have noticed, in those last pictures, that I have detailed the outer sides of the engine just a bit too. To me, one of the biggest improvements with this latest one was the dressing up of those pieces just under those drop tanks/fuel tanks along the sides. This mod was an ABSOLUTE pain in my diminished glute, but makes a very nice show, to me anyway. They are the crane section of ROCO #257.

Those pieces, along with the angled sections at the forward of the engine (the blade at the front of the ROCO), are from the same ROCO tanks also all along the sides of the original engine section, ROCO #257:

roco257.jpg


On the crane pieces along the sides, I sanded the originals off the kit piece and using that crane outline I was left with, I had to scratch each and every crane. I also had to keep the size consistent. The body of the 257 is what's on the engine section too, so I used the body on the kit piece to keep the size right as I was making them:

DSCN0532a.jpg


Ok, after writing all that, here's what I've ended up with.. Like I say, not completely permanent yet, but I think this one turned out OK.

DSCN0536.jpg

DSCN0537.jpg


Makes a difference this time I think.

Critique, criticism, comments, complaints and suggestions, as I've shown already, are 100% welcome and encouraged here.

Rob.
 

Attachments

  • roco-minitanks-sheridan-spaehpanzer-m551.jpg
    roco-minitanks-sheridan-spaehpanzer-m551.jpg
    135.7 KB · Views: 40
Last edited:
It amazes me that you can scratch build stuff that small and still make it look detailed like the actual parts

Thank you Mr. Analyzer! That makes both of us! I'm tellin' ya', I got at least 3 magnifying things I'm looking through at the same time at this stuff. Plus, I got fat fingers. Plus, I drink gallons of coffee. Plus, I got a bad eye. Plus, I'm an old fella.

All that PROOVES anybody can do this.

Very cool. Gap looks a little wide to me.

lisa simpson gap GIF

Mr. edge... Agreed. I didn't add any more from the original pictures, but trimming those inner gap tanks may have done it? Everything is tightened up in there too, so that may have widened it some? Y'all know how this goes and I can't really tell that kind of thing until it's all tacked together fairly tight.

Like this:

gaps.jpg


That shows me that the gap is a little wide and it's because of that top row of half Shermans. Now, even this kind of comparison is speculative at best, but I think it does a fair job? This kind of comparison does show what we need to check, but it's something I can't do along the way and have to wait until it's all together.

I'll have to check now and see if I can tighten it all up some, but I'm not sure what will happen until we get there because, of course, all that stuff is stuck in there pretty good.

I don't think it's horrible, but it is there Mr. edge.

At this point, I hope it ain't something y'all talk about behind my back because that may be the end result.
 
It's way better than any model I have ever built. It is just the impression I got, looking at the pictures.

Great job on the photo comparison, btw.
 
It's way better than any model I have ever built. It is just the impression I got, looking at the pictures.

Great job on the photo comparison, btw.

No sir, Thank you for the head's up! It's the kind of interaction I want and need and ANYONE visiting looking at anything I'm doing can say whatever they want about it. I can't fix it if I don't know to. Just because I know doesn't mean I can fix it then, by any means either. I have said from the start here, it's just a matter of time before something goes horribly wrong. I'll do one of those comparisons when it does so you can see just how bad. I doubt we'll need one though, it'll be obvious.

I don't want to hear that "any model" line. You can. You know you can. It's plastic that I'm going way overboard with, that's all.

Rob.
 

Your message may be considered spam for the following reasons:

If you wish to reply despite these issues, check the box below before replying.
Be aware that malicious compliance may result in more severe penalties.
Back
Top