Jeebee25
Active Member
Hey all! This is a build I thought I would share (that's outside of my Proton Pack and Ghostbusters props wheelhouse) so it was a fun experience. I just moved to the Seattle area and am an improviser from Chicago, so I was thinking of how I could produce a show that would not be a fixture in every theater but might make use of my improv AND building skills. While watching Elmo with my girls it occurred to me that an improvised puppet show might be cool. So I quickly found this video -
Using this as my starting point and cruising the muppet central forum (which still has not approved me to post? Very odd...) I found enough info to get started. If this puppet came out good, then I decided I would build four more. I wanted the standard "Any Muppet" monster.
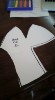
I followed the video and ripped apart an old baseball cap to get the pattern for this -

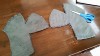
From there I used my arm as a gauge and wrapped some foam around it, I then folded over the bottom to get a beveled edge for comfort.

**Bless the Maker and His water. Bless the coming and going of Him.May His passage cleanse the world**
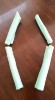
Arms and hands -


Sewing.. I'm not that good at it...


The fur isn't as vibrant a color as I wanted, but it was $5 a yard and I didn't want to blow a bunch of money if I could not make this work.
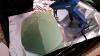
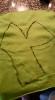
Made a patten for the head -


Later I took a pin and rubbed the edge across the seams to coax out the fur. I studied the "Henson Stitch" and decided to try that later.
**WORM SIGN! A BIG ONE!** Making the pattern for the body.

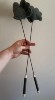
And finishing the arm rods. The next one I will attach one arm to the bod and just use one rod.

Arms, hands and body attached!

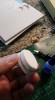
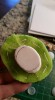
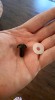
Used some EVA foam from his nose -


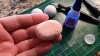
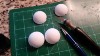
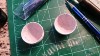
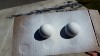
Ping Pong balls for eyes, but I backed them in Loctite two part putty so they are hard and won't dent.


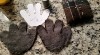
Added fleece and EVA eyelashes.

Positioning the eyes

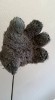
AND! DONE!!!

My girls decided his name is "Tacoroni" and I like it.
Using this as my starting point and cruising the muppet central forum (which still has not approved me to post? Very odd...) I found enough info to get started. If this puppet came out good, then I decided I would build four more. I wanted the standard "Any Muppet" monster.
I followed the video and ripped apart an old baseball cap to get the pattern for this -
From there I used my arm as a gauge and wrapped some foam around it, I then folded over the bottom to get a beveled edge for comfort.
**Bless the Maker and His water. Bless the coming and going of Him.May His passage cleanse the world**
Arms and hands -
Sewing.. I'm not that good at it...
The fur isn't as vibrant a color as I wanted, but it was $5 a yard and I didn't want to blow a bunch of money if I could not make this work.
Made a patten for the head -
Later I took a pin and rubbed the edge across the seams to coax out the fur. I studied the "Henson Stitch" and decided to try that later.
**WORM SIGN! A BIG ONE!** Making the pattern for the body.
And finishing the arm rods. The next one I will attach one arm to the bod and just use one rod.
Arms, hands and body attached!
Used some EVA foam from his nose -
Ping Pong balls for eyes, but I backed them in Loctite two part putty so they are hard and won't dent.
Added fleece and EVA eyelashes.
Positioning the eyes
AND! DONE!!!
My girls decided his name is "Tacoroni" and I like it.
Attachments
-
 oJGfoMj.jpg24.8 KB · Views: 119
 -
 NHjrvIe.jpg50.9 KB · Views: 124
 -
 RawZSQ4.jpg48 KB · Views: 133
 -
 dJj2clo.jpg59.2 KB · Views: 123
 -
 rCiUm5M.jpg57.9 KB · Views: 88
 -
 B8U6CKP.jpg113.1 KB · Views: 128
 -
 POOZsUC.jpg65.5 KB · Views: 135
 -
 p24YxlJ.jpg60.3 KB · Views: 130
 -
 rVX7zE4.jpg73.2 KB · Views: 134
 -
 QyruxZx.jpg77.8 KB · Views: 123
 -
 H8yyRMi.jpg46.3 KB · Views: 128
 -
 RfdQafJ.jpg65.3 KB · Views: 137
 -
 wlf8uPh.jpg79 KB · Views: 124
 -
 MVA7REd.jpg49.9 KB · Views: 148
 -
 5d3xpAn.jpg89.4 KB · Views: 125
 -
 5lDRFlk.jpg67.4 KB · Views: 114
 -
 Of3tEBQ.jpg79.2 KB · Views: 101
 -
 Z8f2Cwu.jpg59.4 KB · Views: 111
 -
 KPj79BE.jpg77.6 KB · Views: 122
 -
 3ZI5IdL.jpg58.1 KB · Views: 140
 -
 bEuBtXO.jpg63.8 KB · Views: 132
 -
 QXp425i.jpg65 KB · Views: 118
 -
 9pr0DAb.jpg91.7 KB · Views: 124
 -
 R5P9S6I.jpg96 KB · Views: 122
 -
 pzc2AsW.jpg49.4 KB · Views: 124
 -
 wGjDvYf.jpg37.2 KB · Views: 113
 -
 BO8GVq1.jpg49.1 KB · Views: 133
 -
 eQZUveM.jpg81.9 KB · Views: 123
 -
 Le26P4h.jpg49.6 KB · Views: 116
 -
 msaj2mQ.jpg61.5 KB · Views: 133
 -
 scPJTxQ.jpg99.2 KB · Views: 137
Last edited by a moderator:
")