New 10th Doctor Sonic Screwdriver Universal Remote

Checking back in post initial battery charging.

Having no issues so far and this is definitely the longest I've ever consistently used my sonic since the first time I bought it. Hope this information helps someone out there having the same issues as me.
 
Glad you got yours working ok again! I never use mine anymore in the remote mode, so I am somewhat curious if mine would behave the same way yours did. Either way, if mine ever needs a new battery again, I will consider this newer battery with the higher capacity, and making the alterations you mentioned. Thanks for the info!
 
I need to replace the battery in mine but am afraid to screw it up. I don't really have the tools to modify the case, and it's been decades since I've done any soldering. Any suggestions where to get this taken care of?
 
Hello guys. I'm pretty frustrated. I've wanted this thing for over a decade and after nabbing one drom ebay I got all the encessary tools and the replacement battery needed to get mine working again.

I've been repairing electronics for about 7 years now, including some incredibly finnicky bits, but I'm sat here after 4 hours of trying with nothing to show for it except injuries. I cut myself on the ifixit prying tool I got trying to open the top to no avail (i wasn't expecting such a relatively blunt tool to be sharp enough to cut me. nevertheless it's about 3 times as thick as the virtually non-existent gap between the collar and the body of my sonic) And I've torn a chunk of skin off trying to unscrew the bottom of the sonic (this was after hours of trying, including after heating it for a while in the hopes of making any glue within more malleable). I've not been able to shift anything. The best I've managed was to get a boxcutter between the collar and the body, but it is still a looong way from "popping off" as some have described it.

I'm reaching my wit's end as for how to get this thing open, does anyone have any advice? i've already scuffed the rim of the collar piece despite my best efforts, but I'm trying my hardest not to scratch it to hell. If anyone has a clue what I can do here I'd be wicked grateful.
Did you follow the correct tutorial?:

http://www.alexkung1.com/scale/sonic/Sonic02.htm
 
Greetings timelords,

I come bearing good news from Galifrey's Sonic repair department with an fix and update.

so depending on the battery you utilize it's going to have a specific battery management system. I can't speak to the ones you've personally used but the 50mah one i've been using has some sort of programming that causes the sonic to immediately drain it's battery when in remote mode (since it's likely failing to manage the higher amperage/power it needs).

Here's the solution i've found that works for me.


Issue 1: Battery Drain in Remote Mode

Solution: Replace the battery with a 130mAh battery, which works perfectly in remote mode.
• Tested for 7+ hours of intermittent use (e.g., watching TV, controlling remote switches) and battery still has plenty of draw.
• Currently charging with the stock USB cable and not seeing any issues yet if any*


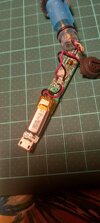
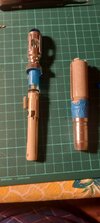
Issue 2: Fitting the Larger Battery

Solution: Modify the internal casing:
Measurements: The 130mAh battery is about 2mm Wider and Longer than the original.
Steps:
1. Slightly cut and widen the plastic shaft to create enough room.
2. Ensure the new battery fits snugly but uniformly with the shaft.
3. Reassemble; the casing should open and close without issues.

Sharing this information for anyone to try on their own. I'm not keen on working on anyon else's sonic but happy to provide pics of mine below along with the model battery I used. It's currently available at Amazon as well but i'm sure can be found cheaper elsewhere.

The Battery:
View attachment 1895267

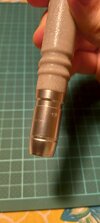
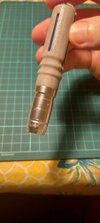
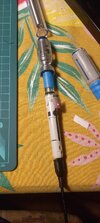
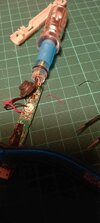
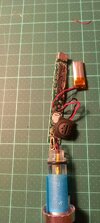
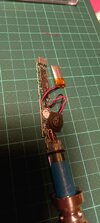
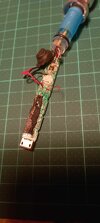
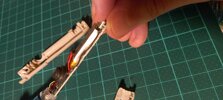
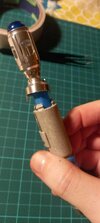
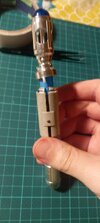
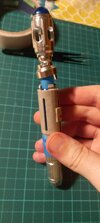
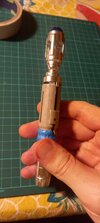
My sonic modifications:
View attachment 1895268 View attachment 1895269View attachment 1895270
And then use this as an addendum to that tutorial.
 
And then use this as an addendum to that tutorial.
Yes, I followed both of those to no avail. Only way I can explain it is that mine got a bigger dollop of glue in there than anyone else who's tried opening theirs. It's really not coming off. I've emailed TWC hoping for some pointers.
 
It's just steps 1-12. Don't worry about the lower section of the tutorial with regards to "Sonic 2". You don't need to take the top part off, and there is no glue on the bottom part of the Sonic that I recall.
 
It's just steps 1-12. Don't worry about the lower section of the tutorial with regards to "Sonic 2". You don't need to take the top part off, and there is no glue on the bottom part of the Sonic that I recall.
Either way, neither end of the sonic is coming off at all. I've tried heat, I've tried gripping the end cap with tongs for more purchase, it will not unscrew.
 
OK. Maybe someone repaired it once already, and glued it back together.
I don't think this is the case. I've read people online state that their end cap was glued as well as screwed fresh from the factory, and I can say with 100% certainty that the one I have has never been opened.
 
I had the same issue on mine. It appears as when the factory made their first release, they glued them on.

All releases after that they no longer glue them on. They only screw them on.

I had one of the first ones, and I too could never get that bugger off. I wound up just giving up on it. I sold it later with the extra battery.
 
OK. Yeah, I know some people have some glue there, but don't remember it being such a problem. If you already tried heat to try to loosen the glue, not sure how to help. Except more heat and longer..... Mine unthreaded without much effort at all.
 
I had the same issue on mine. It appears as when the factory made their first release, they glued them on.

All releases after that they no longer glue them on. They only screw them on.

I had one of the first ones, and I too could never get that bugger off. I wound up just giving up on it. I sold it later with the extra battery.
Damn, I see. Thanks for the heads up. I've emailed TWC, I am praying that there's something they can do for me. if not I'm screwed. It's so frustrating that they say in the instructions for the thing that if there are programming errors one should swap out the battery, whilst they glued the things shut making them seemingly impossible to open. I'm glad they make things a bit more end-user repairable nowadays. :/
 
I remember my bottom metal piece was glued on and didn't simply unscrew easily. I had to wrap it in a latex glove and use a plier to gently force it to unscrew very carefully. after that I just had to scrape off all that gross yellow/brown glue off the threads and plastic and it's since screwed on/off with no issues.
 
I remember my bottom metal piece was glued on and didn't simply unscrew easily. I had to wrap it in a latex glove and use a plier to gently force it to unscrew very carefully. after that I just had to scrape off all that gross yellow/brown glue off the threads and plastic and it's since screwed on/off with no issues.
I tried that, left teeth marks from the pliers in the metal. Be very careful and slow.
 
I should provide an update:

I was finally able to open up and replace the battery after getting some support from the wand company's Chris Barnardo, who I think has also helped people in this thread. He told me that with the first generation of this sonic remote most of the end caps were glued on by varying amounts, and after I told him how much trouble I was having he cautioned against opening the bottom and instead recommended I pry off the top collar. Even trying agliarept's latex glove and plier trick didn't work, it just scuffed up the metal without moving anything.

I was able to pry off the top, sadly this too created quite a few dents and scratches. at this point I felt pretty cack-handed but despite having some experience with delicate electronics I just wasn't able to do what I did without causing damage; even using bespoke tools for this kind of thing by ifixit I was unable to avoid injury to myself and superficial damage to the sonic.

After I popped the top off the rest was relatively simple. one of the speaker wires had come off the board after I opened the housing of the electronics, so I had to do a bit of extra soldering, but after that was done I closed it all up again and it started charging. putting that housing back together with the button assembly and emitter tube connection in place is very fiddly work, but doable.Now the sonic is reassembled and works. weirdly, and I've opened it again to double check what's up with little success, but now the slide which was perfectly smooth before is now very stiff and requires a fair bit more force to fully extend and retract. I saw someone else with this issue, I forget what the fix was in their case. I figured with the battery might be causing the housing of the electronics to bulge, despite it being smaller than the old one. because of this I tried sanding both the inside of the sonic's housing as well as the outside of the electronics housing to see if that might help; sadly, no difference. it's still very tricky to extend and retract, and I have no idea what is causing the added friction even after opening it up and inspecting it a few times.

In the interest of providing as much info as I can for others who may be in the same situation as I was, here are some photos of my process. they also show the damage that occured, using the thinnest metal tools I had to try and pry the top off this is all I could muster. likewise, the pliers did a real number on my end cap. Chris has advised that I try removing the scratches with a very fine wet and dry emery paper, if I try that I will post pics.

Also, sorry to make this post so utterly long, but I thought it might be helpful to share the pre-prepared instructions Chris sent to me verbatim. please bare in mind what I said about the end cap, if you have an older model of these it may not be possible to take it off, so if it doesn't seem to budge try to go for the collar before you damage the end cap! Also message the wand company, their customer service is stellar and they are might be able to provide replacement parts or 3D files for printing if you're lucky.

>>>>>>>>

With regards to disassembling the Sonic, it can be hard to do but is not impossible. The aluminium cylinder on the end of the Sonic can be unscrewed. On some Tenth Sonics, it is glued in place and will need some effort to remove. We have done this on the more difficult ones by gripping the aluminium piece in the mouth of a pair of plumbers' mole grips with two halves of a plastic eraser held in the jaws to cushion them and prevent the jaws of the mole grips from marking the soft aluminium collar, which they might easily otherwise do. Other rings have just been easy to unscrew because either they are not glued or the glue is weak and easily broken.

The front end can be a little more tricky (depending of course on how difficult the back of the sonic was to remove). At the front, you have the top aluminium collar which is snap-fitted onto the plastic body by some rather strong clips which latch into a groove on the inside of the aluminium top collar. If you put the tip of a pair of long-nosed pliers, or the edge of a strong, flat-blade screwdriver into the slider slot and exert a firm pressure on the collar you can start to lever it off. Be careful not to scuff or scratch the clear tube. However, if you do, once it is apart, you can always polish the clear tube to remove any small scratches. Also, try not to damage the PCB box inside the slot. Don't worry, it won't damage easily.

Once the collar starts to move a bit, then using the tip of a dinner knife or something similar that's strong thin and blunt, work around the top collar in the gap you are making between the body and the top collar and carefully pry it off. Once the top collar comes off, the body should just slide back from the top collar and it is free. As you slide the body off, be careful to keep track of the blue strip insert (noting that on some versions of the Sonic there might be another similar one hidden inside that gives those Sonic Screwdrivers their open position detent). Not all Sonics have this extra piece as it was added after the first manufacturing run, but if yours does, this will need to go back in when you reassemble the Sonic.

The PCB box can now be separated quite easily. However, be very careful not to lose the clear button as this will drop out once the two halves of the PCB box are separated. Getting this little button back in when you put the PCB box back together is not easy and you have to be careful not to damage the small tact switch on the circuit board.

The battery is stuck to the PCB by a layer of sticky foam. It is easy to slice through this was the blade of a scalpel or Xacto knife. The battery will also need to be desoldered from the PCB. Make a note of the polarity, so that the replacement battery is put back the right way around. Ideally, take photos of each part of the disassembly so that you can refer to them for the reassembly process. Specifically of the battery polarity, as connecting it the wrong way round will damage it and the circuit beyond repair.

If you have damaged the snap latch of the annular snap fit clip on the plastic body when removing the collar, then when you are ready to reassemble, a drop of super glue on the plastic part with some super glue accelerator on the inside of the Aluminium top collar should keep everything neatly in place. However be careful not to use too much so that it drips down inside and sticks the main housing to the PCB box, or blobs out on the the visible face of the main housing.
 

Attachments

  • 476150809_9380458211991625_3345233282740968388_n.jpg
    476150809_9380458211991625_3345233282740968388_n.jpg
    76.3 KB · Views: 11
  • 476150809_1009271887732172_787799188097104088_n.jpg
    476150809_1009271887732172_787799188097104088_n.jpg
    71.3 KB · Views: 9
  • 477009924_647717807595877_3388250365067813910_n.jpg
    477009924_647717807595877_3388250365067813910_n.jpg
    228.5 KB · Views: 8
  • 476055882_649576641096153_7238388772762540512_n.jpg
    476055882_649576641096153_7238388772762540512_n.jpg
    94.3 KB · Views: 8
  • 476205670_1308309467049004_3041151146767101792_n.jpg
    476205670_1308309467049004_3041151146767101792_n.jpg
    115.6 KB · Views: 9
  • 476764942_1585825578769232_5867119959157890372_n.jpg
    476764942_1585825578769232_5867119959157890372_n.jpg
    95.2 KB · Views: 11
  • 476099899_632581749277978_5982243790593378262_n.jpg
    476099899_632581749277978_5982243790593378262_n.jpg
    117.6 KB · Views: 7
  • 476321092_2101662630284275_2650916967036933406_n.jpg
    476321092_2101662630284275_2650916967036933406_n.jpg
    109.9 KB · Views: 8
  • 475969168_1687686895437010_1933499557875013052_n.jpg
    475969168_1687686895437010_1933499557875013052_n.jpg
    96.2 KB · Views: 7
  • 476600221_1162988465263017_5809698697058293198_n.jpg
    476600221_1162988465263017_5809698697058293198_n.jpg
    94 KB · Views: 8
  • 476150809_604678972416098_7402358064584660998_n.jpg
    476150809_604678972416098_7402358064584660998_n.jpg
    85.5 KB · Views: 7
  • 476799718_981458666651328_3192297796585225591_n.jpg
    476799718_981458666651328_3192297796585225591_n.jpg
    112.9 KB · Views: 7
  • 475931427_596293746570910_9047863351596220723_n.jpg
    475931427_596293746570910_9047863351596220723_n.jpg
    101.2 KB · Views: 6
  • 476910222_1677097322909011_7093094396310271265_n.jpg
    476910222_1677097322909011_7093094396310271265_n.jpg
    70.8 KB · Views: 8
  • 476735111_1778120016368322_4143113463273008742_n.jpg
    476735111_1778120016368322_4143113463273008742_n.jpg
    76.7 KB · Views: 10
  • 476432625_667821038934465_2873091102565788082_n.jpg
    476432625_667821038934465_2873091102565788082_n.jpg
    78.6 KB · Views: 9
  • 476426517_2825634140931173_7414964179439952410_n.jpg
    476426517_2825634140931173_7414964179439952410_n.jpg
    83.4 KB · Views: 10
Back
Top