Double post. Sorry
You are using an out of date browser. It may not display this or other websites correctly.
You should upgrade or use an alternative browser.
You should upgrade or use an alternative browser.
Official Show off your model collection thread!
- Thread starter wolverine solo
- Start date
SirSandalot
Active Member
Congratulations on those models they're all great, and that naboo starfighter is hands down the best I've seen. Both the metal and the yellow are great. What kit is it? Looks big!One of the only personal upsides to the Covid lockdown of 2020 was being able to log a lot of hours at my workbench...
I still have an AMT/ERTL (or whatever it was around 1999) kit to build. Mind sharing what paints you used? Cause I'd want exactly that result...
Carson Dyle
Sr Member
Thanks for the kind remarks. I'm not sure who produced the kit, but I purchased it back in 2003 from Monsters in Motion. I think the original digital file originated at ILM.Congratulations on those models they're all great, and that naboo starfighter is hands down the best I've seen. Both the metal and the yellow are great. What kit is it? Looks big!
I still have an AMT/ERTL (or whatever it was around 1999) kit to build. Mind sharing what paints you used? Cause I'd want exactly that result...
The yellow hull is Tamiya Chrome Yellow synthetic lacquer straight out of the rattle-can, accented with Tamiya Canary Yellow, Tamiya Camel Yellow, and Tamiya Bright Orange. The accent shades were applied via airbrush. I know it sounds like a lot of different yellows and oranges, but I took care to carefully blend the accent colors to create depth without overdoing the contrast between shades. The silver areas are just Alclad Chrome applied sparingly with an airbrush over a smooth, highly-polished gloss-black lacquer surface. I then accented some of the silver panels with Alclad Airframe Silver -- mostly along the panel lines -- to provide a little dull silver variation to the shiny chrome. Exhaust streaks, battle damage, and random weathering are mostly oils, although (if memory serves) I also airbrushed a few light streaks of brownish-grey grime in the recessed areas. Hope that helps.
Last edited:
SirSandalot
Active Member
It does sound like a lot of yellows and oranges (and thus expensive) but the depth is well worth the time and the money. I think the reason why I haven't painted mine yet is because it's too small to paint it in just one shade of yellow and I wasn't very fond of the results I saw online. Yellow is too bright for such a small model and it tends to look like a toy. But I'll try to replicate your recipe sometime in the future and hopefully I'll end up with a yellow as deep as yours.Thanks for the kind remarks. I'm not sure who produced the kit, but I purchased it back in 2003 from Monsters in Motion. I think the original digital file originated at ILM.
The yellow hull is Tamiya Chrome Yellow synthetic lacquer straight out of the rattle-can, accented with Tamiya Canary Yellow, Tamiya Camel Yellow, and Tamiya Bright Orange. The accent shades were applied via airbrush. I know it sounds like a lot of different yellows and oranges, but I took care to carefully blend the accent colors to create depth without overdoing the contrast between shades. The silver areas are just Alclad Chrome applied sparingly with an airbrush over a smooth gloss-black lacquer surface. I then accented some of the silver panels with Alclad Airframe Silver -- mostly along the panel lines -- to provide a little dull silver variation to the shiny chrome. Exhaust streaks, battle damage, and random weathering are mostly oils, although (if memory serves) I also airbrushed a few light streaks of brownish-grey grime in the recessed areas. Hope that helps.
Thank you very much!
Real Scooby
Well-Known Member
I thought I'd share THIS "Blast from MY Past"
Digged up a old photo taken in my room at my parents place in 93. It shows my then proud collection of MPC ERTL Star Wars ( and a few other ) kits

ShuttleTydirium
Star Destroyer, big X-Wing, TIE Interceptor, Cutaway Falcon
Vader, HALCYON Power Loader and Alien Warrior, AT-AT, Snowspeeder, Slave I, Speederbike
A-Wing, X-Wing, B-Wing, Y-Wing, Vaders TIE, HALCYON Facehugger
ERTL Romulan Warbird, KENNER Skiff and AT-ST, ERTL Klingon Warbird
and hidden below the Klingon are ERTL BTTF Delorean, Keaton Batmobile and Robocop 2 Ford Taunus Police Car.
Back in the old days I already looked into how to keep the dust away, and my dad came up with a few custom made acryl cases
Unfortunatly non of the shown items survived my "later youth" or the move from my parents place to my first own appartment
Thank god, I discovered BANDAI decades later
Digged up a old photo taken in my room at my parents place in 93. It shows my then proud collection of MPC ERTL Star Wars ( and a few other ) kits
ShuttleTydirium
Star Destroyer, big X-Wing, TIE Interceptor, Cutaway Falcon
Vader, HALCYON Power Loader and Alien Warrior, AT-AT, Snowspeeder, Slave I, Speederbike
A-Wing, X-Wing, B-Wing, Y-Wing, Vaders TIE, HALCYON Facehugger
ERTL Romulan Warbird, KENNER Skiff and AT-ST, ERTL Klingon Warbird
and hidden below the Klingon are ERTL BTTF Delorean, Keaton Batmobile and Robocop 2 Ford Taunus Police Car.
Back in the old days I already looked into how to keep the dust away, and my dad came up with a few custom made acryl cases
Unfortunatly non of the shown items survived my "later youth" or the move from my parents place to my first own appartment
Thank god, I discovered BANDAI decades later
This 1/350 scale refit E was but for me by the incomparable Paul Taylor. He built it to my extremely specific / whiny specifications, thus ensuring that it represented the ship that has inhabited my dreams since 1979.
View attachment 1479482View attachment 1479483View attachment 1479481View attachment 1479484
Sorry for the late post, but that simply is the BEST look of the Enterprise IMO. A gorgeous design and fabulous model!
Hi all! Thought I'd join in the fun here and post some of my past builds.
Hope you enjoy and always happy to hear your feedback or answer any questions.
First up is the first kit I built as an adult modeler when I got back into the hobby around 15 years ago.
This is the 1/72 Slave 1 from Fine Molds.
This was an OOB build so no lighting or scratch built details (I'd do so much more to it now!!!).
Painted in Tamiya Acrylics using a canned air powered £12 airbrush.
Chipped paint was done by layering up colours masked with liquid latex artist masking fluid.
Weathering is artist acrylics watered down and brushed into details.
Last edited:
Here is another of my completed builds.
I'd just finished a 1/32 Tamiya Spitfire which as you can tell, heavily influenced my chosen livery.
This is the 1/20 Pkf.85 Falke Antigravity Armoured Raider by Hasegawa.
I love the visual style of the Maschinen Krieger (Ma.K.) universe created by Kow Yokoyama. Well worth checking out if you've not come across it before.
This was built mostly out of the box with a few wires and greeblies added from the spare option parts of my Spitfire. I also added some nylon mesh to the vents at the rear. Markings were an after market Spitfire Decal set and the stencils from the kit.
Painted in Tamiya Acrylics and Alclad metallic laquers.
Weathering is artist acrylics watered down and brushed into details with brush painted chips and scratches.
Last edited:
gt350pony66
Master Member
Most excellent!Hi all! Thought I'd join in the fun here and post some of my past builds.
Hope you enjoy and always happy to hear your feedback or answer any questions.
First up is the first kit I built as an adult modeler when I got back into the hobby around 15 years ago.
This is the 1/72 Slave 1 from Fine Molds.
This was an OOB build so no lighting or scratch built details (I'd do so much more to it now!!!).
Painted in Tamiya Acrylics using a canned air powered £12 airbrush.
Chipped paint was done by layering up colours masked with liquid latex artist masking fluid.
Weathering is artist acrylics watered down and brushed into details.
View attachment 1587204View attachment 1587205View attachment 1587207
View attachment 1587213
View attachment 1587210
View attachment 1587211
View attachment 1587212
Next up is one of my all time favourite subjects! I spent a lot of time running around the woods as a kid pretending to be on one of these. Narrowly missing trees and making those whooping noises!
This is the 1/12 Speeder Bike and Scout Trooper from Bandai.
The Speeder
This was painted in Tamiya Acrylics. Weathered with watered down acrylic and dry brushed Tamiya colours. Plus a completely accidental but worked out great technique of brushing the tiniest amount of isopropyl alcohol onto the surface. It kind of faded and blended the paint into the base layer which looked really good to my eye.
I replaced the cables on the control columns and the pipes on the underside with expansion springs. The sort you get as upgrade parts for Gundam and car modelling.
Small wire hinges were made to allow the rear engine flaps to move (they're fixed in the kit).
I replaced the pack behind the seat. I made this using a piece of thin textured vinyl material cut from an old toiletries travel bag.
It was folded, creased and rolled a bit at a time and glued down with CA as I went. Looks way better than the clunky kit part.
The Trooper
One of my favourite SW costume designs. I painted this guy in acrylics, a mix of Vallejo and Tamiya.
Extra details were added to the back of the belt. I used black nitrile glove fingers cut into 'sleeves'; then stuffed with foam to fill the big gaps in the shoulder area. This worked great after a few attempts and still allows for full articulation.
I also mushroomed the end of a bit of fibre optic cable with a flame to make a lens for the pistol sight.
The Base
Still a work in progress. I plan to add fern leaves and moss at some point.
Last edited:
Endor wouldn't be the same without my next model.
This is the 1/48 AT-ST by Bandai.
This is all Tamiya acrylics with watered down artist acrylics for weathering. I still have a bit more of that to do on the legs.
The following modifications were made to the stock kit:


This is the 1/48 AT-ST by Bandai.
This is all Tamiya acrylics with watered down artist acrylics for weathering. I still have a bit more of that to do on the legs.
The following modifications were made to the stock kit:
- Replaced all the pipes with tubes and wires from my stash.
- The grab rail on the roof was replaced with thin wire and styrene brackets.
- I reshaped the fins that hang down from the chin gun.
- Thinned and made support rods for the viewport covers.
- Replaced the strip braces on the backs of the leg with steel strip.
- Remodelled the crew figures, changed their head angles, repositioned arms and gave them better hands reaching for controls.
- Added lighting and an onboard power supply to the cockpit.
Last edited:
Next up is the AT-ST's big bro!
This is the 1/144 AT-AT from Bandai.
Again, this is all Tamiya acrylics with watered down artist acrylics for weathering. There's a bit of artist's pastels dusted on for blast marks as well.
The weathering is still underway with this guy. I pick him up every now and again and add a bit. The legs haven't been touched yet.
The following modifications were made to the stock kit:
- Remade or thinned down the shield plates on the rump and the cheek guns so they looked more in scale.
- Added a few little wires hanging from the underside.
- Replaced the red clear part in the view port with a piece of clear acrylic.
- Added a red LED in the cockpit with a switch accessible from the underside.
- Hollowed out the upper hull and shaved down its snap fit pins so it could be easily removed to access the battery.
Last edited:
One last one for today in the form of the one and only Golden Rod!
This is the 1/12 C-3P0 model kit from Bandai.
Not much painting was needed on this guy as the chrome plating is really good.
I wanted a grubby 3PO so he had a wash of acrylic browns and blacks. The only other painting is a bit of Tamiya gold on the black palm parts.
I didn't like the way the waist wires were done in the kit so I filed this all off. Scratched in a ribbed texture and painted it black. Then selected some suitable looking wires from my stash. On some I put little brass tube collars. Kept going till it looked right. It restricts his movement a bit but he's a pretty rigid old bugger anyway.
Last edited:
rastanz
New Member
1:144 Revel Apollo 11 Saturn V... I did a huge amount of detailing on this model and scratch built the tiny towers on the base.


Non-scale Imai Super Oversized Thunderbird 2... Did a lot of work on this, scratch built the interior for the main cabin and the Thunderbird 4 pod, installed lighting in the cockpit, lower observation deck and the pod which each run on separate 9v batteries.

Another Gerry Anderson model, my modified 1:72 AMT Eagle Transporter, hollowed out the cages and scratch built their inner details, added piping to the fuel tanks and rear rocket boosters


1:72 scale Thunderbirds mole, also modified, added details to the inner carriage (more 3D looking rather than a flattened piece of inner wall).
![mole-gallery].jpg mole-gallery].jpg](https://www.therpf.com/forums/attachments/mole-gallery-jpg.1630118/)
1:144 scale Bandai Millennium Falcon, modified with Shapeways parts, cockpit, escape pods, radar dish, turret windows and cannons, lit the cockpit and added headlights / caution lights... The dish can be swapped out to either round or rectangle version, pastels and oils for weathering, no washes as I didn't want my Falcon to look like a "connect the dots" toy.


Kitbash conversion, 1:6 scale Hot Toys helmet on a Sideshows head sculpt, Hot Toys suit on a Sideshows body, custom tunic and cape

Tried my hand at painting 1:6 scale head sculpts...


Custom 1:6 scale Sideshows Anakin Skywalker using the head sculpt above on the right

Cheers.
Non-scale Imai Super Oversized Thunderbird 2... Did a lot of work on this, scratch built the interior for the main cabin and the Thunderbird 4 pod, installed lighting in the cockpit, lower observation deck and the pod which each run on separate 9v batteries.
Another Gerry Anderson model, my modified 1:72 AMT Eagle Transporter, hollowed out the cages and scratch built their inner details, added piping to the fuel tanks and rear rocket boosters
1:72 scale Thunderbirds mole, also modified, added details to the inner carriage (more 3D looking rather than a flattened piece of inner wall).
1:144 scale Bandai Millennium Falcon, modified with Shapeways parts, cockpit, escape pods, radar dish, turret windows and cannons, lit the cockpit and added headlights / caution lights... The dish can be swapped out to either round or rectangle version, pastels and oils for weathering, no washes as I didn't want my Falcon to look like a "connect the dots" toy.
Kitbash conversion, 1:6 scale Hot Toys helmet on a Sideshows head sculpt, Hot Toys suit on a Sideshows body, custom tunic and cape
Tried my hand at painting 1:6 scale head sculpts...
Custom 1:6 scale Sideshows Anakin Skywalker using the head sculpt above on the right
Cheers.
Kwc271
Active Member
Here are my models so far. The enterprise is the first built e done in 40yrs.
The Boba Fett was weathered with a silver sharpie. The others are US Navy ships (I know, not sci-fi). The aircraft carrier is the ship my dad served on. I’m rather proud of that particular one. I gotta finish the aircraft for it though (in progress)


The Boba Fett was weathered with a silver sharpie. The others are US Navy ships (I know, not sci-fi). The aircraft carrier is the ship my dad served on. I’m rather proud of that particular one. I gotta finish the aircraft for it though (in progress)
yaris
Sr Member
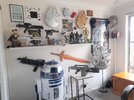
I've got about 5 big boxes of stuff in storage (Thunderbirds, WW2 models, lots of random stuff kid toy/model stuff) below this is scattered across the house we bought. Plan is to build a theme room and get everything in the one place.
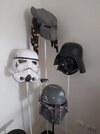
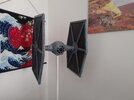
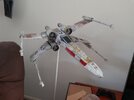
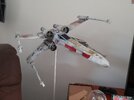
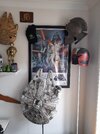
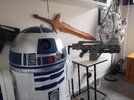
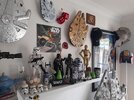
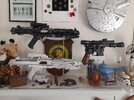
Stuff I built and/or modded:
R2D2 - 1/1 Scale Styrene
E11s and DL-44
Aliens Pulse Rifle - Converted Nerf Series
Elric wooden sword. Made his by hand when I was 12 under my Dad's guidance.
All the helmets except the SW stuff
X Wing - Converter 1/18 Scale Hasbro Hero
Tie Fighter - Black Series with converter larger wings.
Falcon - Converter Legacy with scaled cockpit.
My partner said I should grow up....so I got a new partner....


Last edited:
gt350pony66
Master Member
Awesome! And I agree with you, ya gotta be with someone who understands the things that make you happy and supports it
Similar threads
- Replies
- 6
- Views
- 561
- Replies
- 25
- Views
- 1,630
