Question: wood filler over plastic, will it make a convincing wood effect?

saint357

New Member
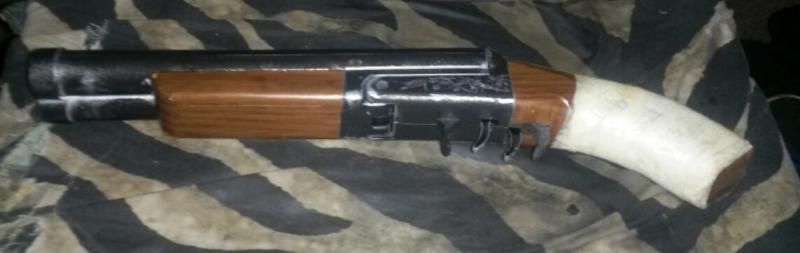
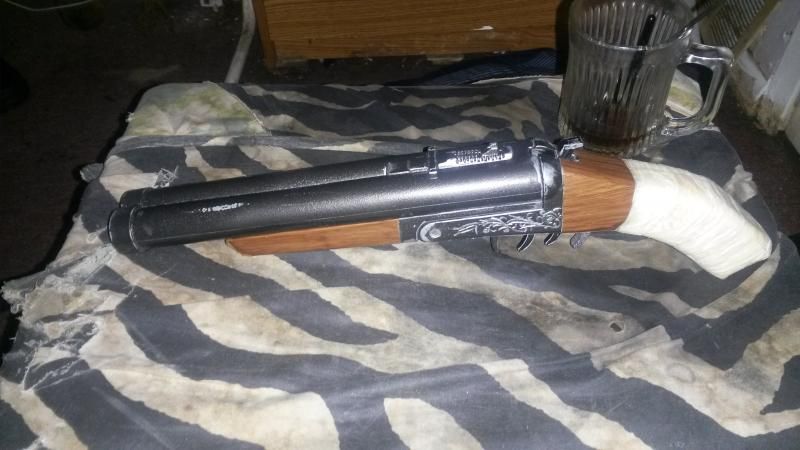
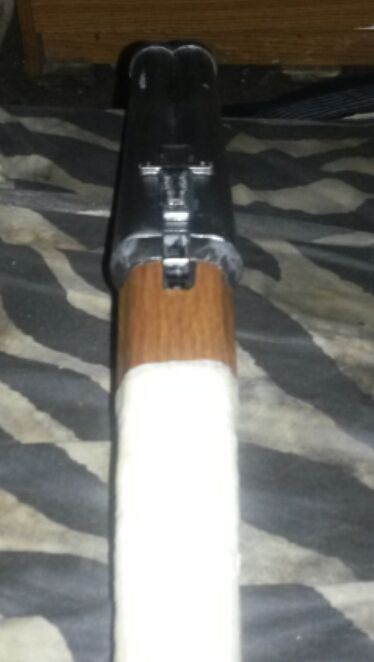
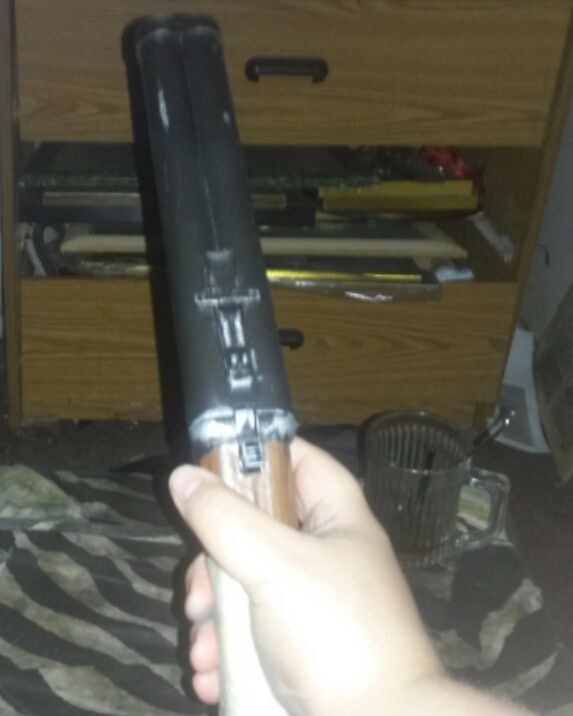
First off hello. I'm new to costuming and this is my first post here on the rpf. though i have been reading through it for a while now. any way back to the question at hand. let me clarify buy telling what this is for. i just purchased this toy gun for an original post apocalyptic costume I'm doing. It's a Rubie's Toy Sawed Off Shotgun. now i bought this particular one cause i saw some really great builds people have done with it. now my only problem is the wood stock. I've read how to do it with paints and stuff and frankly i just seams like hell to do. so i was wondering if i covered the stock with a light layer of wood filler. maybe scratch in the grains. could i then just stain it and have it look like real wood. just wondering if anyone's ever done this cause i tried looking it up but found nada. fell free to tell me it wont work or its stupid if it is cause thats how i learn just a thought i had, wondering it it would work.
518LJXOT0zL._SL1500_.jpg
 
Hey saint, welcome to the RPF! You've come to the right place for advice :D
Now back to your question: woodfiller is not going to work! I worked a lot with that stuff and I have some experience with it.
1: it won't stick well to a plastic surface. You could try and sand the plastic first to get some better grip but in the end it is still just plastic and once the woodfiller has dried it will crack an just fall of the plastic.
2: Woodfiller has some shrinkage and it will Show a lot of cracks if you spread it on a large surface.
3. Woodfiller is meant to fill some small holes and cracks on wooden surfaces but that doesn't make it "woodlike". In the end it is just some acrylic filler.

I can't think of a good alternative here. Sculpting something to make it look like Wood seems like quite a challenge. There are probably People here that can help you out with this much better than I do. I'm more the Iron type of guy ;)
 
Paint effect is the only way you're going to get that to look like wood I'm afraid. It's really not that difficult, Practice on some scrap until you get it right and then go nuts. :)

And welcome!
 
thanks everybody i had a feeling that would probably be the case, but i had one more idea. i saw this technic once on a restoration show. when they needed to fix a hole in some wood and wanted the grain to match. they took sawdust from the wood mixed it with some white or wood glue and bobs your uncle, it matched the grain perfectly. you think if i used at as paint it would work or am i just spinning my wheels here?
 
thanks everybody i had a feeling that would probably be the case, but i had one more idea. i saw this technic once on a restoration show. when they needed to fix a hole in some wood and wanted the grain to match. they took sawdust from the wood mixed it with some white or wood glue and bobs your uncle, it matched the grain perfectly. you think if i used at as paint it would work or am i just spinning my wheels here?

Great technique to fix small areas of damage in a board, but wouldn't do the trick as an overall coat I don't think. You could try it on a spare piece of plastic and see if staining it works in looking like the real deal though.
 
I agree, paint is the way to go. Since this already has a wood texture you could take advantage of that, paint it with a base color, dry brush with a lightened version and wash it with a darker color. Since it is plastic I would lightly sand it first and use a plastic fusion spay paint for the first coat.

This would be a lot less work than trying to cover it with a new texture.
 
Last edited:
i guess whats the best paint to use to get the effect, most tutorials ive read skip over the paint.
 
I'm going to tell you how to make this look amazing on a budget with no special tools. I'm cheap and I'm guessing you don't want to spend a bunch either. I would buy a can of plastic fusion spray paint (Home Depot)in the closest color you can find to what you want, Then I would go to a place like Michael's and buy a couple tubes of cheap acrylic craft paint (less than $2 each, you don't need much). One lighter than the base coat and one darker, like a dark brown or burnt sienna. While you're there grab some cheap brushes. Also if you don't have any in the house grab a bottle of acrylic floor polish and some 400 or finer sand paper.

Lightly sand the whole gun, then wash it with soap and water. Let it fully dry. then give it two light coats of the plastic fusion base. Once this is dry to the touch take a cheap brush and lightly drybrush the whole gun to pick up the raised areas. Once this s dry make a mix of one part acrylic floor polish, 3 parts water and maybe two parts your darker drown color. Mix this up thoroughly and paint the stock with it, thick enough to go in every recess and let it dry, You can repeat this as many times as you want to get the color dark enough and you can wipe up any overly dark areas with a paper towel before they set.

If you like the way this looks you can use the same methods on the "metal" parts. Dark metal spray paint, shiny silver for the highlights and black for the wash. Finish it with some light handed silver rub-n-buff highlights to make it look really real.
 
Hey saint, welcome to the RPF! You've come to the right place for advice :D
Now back to your question: woodfiller is not going to work! I worked a lot with that stuff and I have some experience with it.
1: it won't stick well to a plastic surface. You could try and sand the plastic first to get some better grip but in the end it is still just plastic and once the woodfiller has dried it will crack an just fall of the plastic.
2: Woodfiller has some shrinkage and it will Show a lot of cracks if you spread it on a large surface.
3. Woodfiller is meant to fill some small holes and cracks on wooden surfaces but that doesn't make it "woodlike". In the end it is just some acrylic filler.

I can't think of a good alternative here. Sculpting something to make it look like Wood seems like quite a challenge. There are probably People here that can help you out with this much better than I do. I'm more the Iron type of guy ;)

I have to slightly disagree here... I use wood filler to smooth out my 3D printed parts and I haven't experienced any shrinkage or cracking, or flaking off for that matter. If done correctly, you'll end up with a perfectly smooth piece with a great finish. Case in point, my Star Lord quad blaster:

Finished pieces above, freshly coated pieces below.
20140612_233541_zps19trxdjg.jpg


The trick is to spread it on lightly, then smooth it out with wet finger. Once dry, you can sand it down to a smooth finish. Repeat as necessary.

20140623_155857_zpslew5drjr.jpg


I know this isn't necessarily what the OP was asking, but I wanted to share my experience with wood filler on plastic.
 
I'm going to tell you how to make this look amazing on a budget with no special tools. I'm cheap and I'm guessing you don't want to spend a bunch either. I would buy a can of plastic fusion spray paint (Home Depot)in the closest color you can find to what you want, Then I would go to a place like Michael's and buy a couple tubes of cheap acrylic craft paint (less than $2 each, you don't need much). One lighter than the base coat and one darker, like a dark brown or burnt sienna. While you're there grab some cheap brushes. Also if you don't have any in the house grab a bottle of acrylic floor polish and some 400 or finer sand paper.

Lightly sand the whole gun, then wash it with soap and water. Let it fully dry. then give it two light coats of the plastic fusion base. Once this is dry to the touch take a cheap brush and lightly drybrush the whole gun to pick up the raised areas. Once this s dry make a mix of one part acrylic floor polish, 3 parts water and maybe two parts your darker drown color. Mix this up thoroughly and paint the stock with it, thick enough to go in every recess and let it dry, You can repeat this as many times as you want to get the color dark enough and you can wipe up any overly dark areas with a paper towel before they set.

If you like the way this looks you can use the same methods on the "metal" parts. Dark metal spray paint, shiny silver for the highlights and black for the wash. Finish it with some light handed silver rub-n-buff highlights to make it look really real.
sounds interesting i might give this a try. quick question though what do i dry brush with after the first spray painting, the lighter color craft paint? little confused there. i already got a good technique for metal though. i spray down a silver base coat first then hit it over top with some hammered black spray paint. i like this post apocalyptic stuff cause it makes the metal look pitted. for weathering i just lightly file away the black paint in places with a nail file till the silver shows through. if i go to deep i just touch it up with a silver sharpy. thats how i made his sheath for my baseball bat prop.
2014062022.44.25.jpg
 
Last edited:
If you can't get a good wood effect with paint, you could try using a vinyl wrap with a wooden decal to imitate the look of wood. You can buy many different varieties to match the wood colour that you want on your gun and their inexpensive. (as long as you don't buy a large amount)
 
Yes, dry brush the light color after the base coat. The metal on your prop looks great.
okay cool and thanks now i just need to see if i can find a Michael's near me.

- - - Updated - - -

If you can't get a good wood effect with paint, you could try using a vinyl wrap with a wooden decal to imitate the look of wood. You can buy many different varieties to match the wood colour that you want on your gun and their inexpensive. (as long as you don't buy a large amount)
you know i have used that Wood tone contact paper stuff to do the stock on another gun and it came out fine but it looks a little to reflective like plastic. that why i wasn't going to use it for this gun. anyone got an idea on how to mute the reflection.
 
yup came out pretty good. most of the handle was crap it bunched up in a lot of places. still the very front of the handle was good and i was already planning to tape it anyway. so the tape hides the sin.
 
Back
Top