Rulebreaker
Member
Tie Fighter retrofit to Tie Advanced X1
1 Scale Discussion
see here
why this scale, because its cheap, amazon lowered the price of the kit even more, down to 12, was 46
and its a good practice befor moveing to a bigger scale like 1/32 or even 1/24
2 Unboxing
see here
the Outland Tie and the Tie Fighter Parts are used and modified with some old scratch building
3 Build - Retrofit
From the Tie Fighter Build i have some inner wings left, they get cut in to the main shape of the wing, the solar things get cut out.


i'm not a flight/plane engineer, so i dont know if those are spars or ribs, so lets call em spareribs

After measureing, research, and drawing, i cnc'ed the wings out of 1mm sheet, bend it and then it gets "skined" with .25mm black styrene


Wing bending
normaly bending sheet creates a round "corner" so i milled a gap along the bending line, so it creates a sharp edge on the outside


worth mentioning, when bend in perpendicular direction of the rolling surface, the curve gets bigger but is more "strong"
so when beding in direction of rolling, the bending curve is smaller but less "strong"
i tried it, the material used is very good and doesn't bend, i bought a more expensive/stronger one
if needed, i thoughed of welding the inside corners or at least fill it up with some jb weld, but its not needed
The styrene is glued on with super glue, then all other parts can be simply glued on with regular model glue


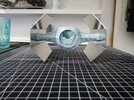
when trying to put it on the included stand, because of the weight of the wings it always drops/turns into this position
so i cut M4 thread into the hole, wich fits nicely, i ordered some M4 tubes, where they will later stand on

out of the Outland fuselage the Ion engines are cut out roughly and then cut into shape


i'm realy happy, how it turned out, for that small scale it looks very good


Noteable things
* less glue, makes less scrawled/clogged/blurred traces here and there, don't know if this will be seen after painting
* the super glue, there is only one second, the precisely cut styrene sheets, when not perfect aligned, ther will be gaps,
so for the future, rather cut them a little bigger and then after glueing remove overhang material
* plastruct and evergreen are not compatible, plastruct "H" profiles are 1.6mm, evergreen "H" profiles are 1.5mm
* did not expect that i need around 15 "H" profiles for two wings
* i'm glad that i took black styrene as base, so i have a very good contrast of what i'm doing, white on white is hard to see
* i used 1.6mm "H" profiles, the "U" ones would have been a little flatter with only 1.1mm height
to do list
* order more material - done
* i'm 90% sure i will machine the solar plates, its simplier than casting 1mm "thick" negatives
* finish wings
* make "addon armor" plates for the fuselage - the hexagon whingbox profile, needs to be "turned" 60 degree
* make hyperdrive
* find a good solution to connect hyperdrive with the fuselage
1 Scale Discussion
see here
why this scale, because its cheap, amazon lowered the price of the kit even more, down to 12, was 46
and its a good practice befor moveing to a bigger scale like 1/32 or even 1/24
2 Unboxing
see here
the Outland Tie and the Tie Fighter Parts are used and modified with some old scratch building
3 Build - Retrofit
From the Tie Fighter Build i have some inner wings left, they get cut in to the main shape of the wing, the solar things get cut out.
i'm not a flight/plane engineer, so i dont know if those are spars or ribs, so lets call em spareribs
After measureing, research, and drawing, i cnc'ed the wings out of 1mm sheet, bend it and then it gets "skined" with .25mm black styrene
Wing bending
normaly bending sheet creates a round "corner" so i milled a gap along the bending line, so it creates a sharp edge on the outside
worth mentioning, when bend in perpendicular direction of the rolling surface, the curve gets bigger but is more "strong"
so when beding in direction of rolling, the bending curve is smaller but less "strong"
i tried it, the material used is very good and doesn't bend, i bought a more expensive/stronger one
if needed, i thoughed of welding the inside corners or at least fill it up with some jb weld, but its not needed
The styrene is glued on with super glue, then all other parts can be simply glued on with regular model glue
when trying to put it on the included stand, because of the weight of the wings it always drops/turns into this position
so i cut M4 thread into the hole, wich fits nicely, i ordered some M4 tubes, where they will later stand on
out of the Outland fuselage the Ion engines are cut out roughly and then cut into shape
i'm realy happy, how it turned out, for that small scale it looks very good
Noteable things
* less glue, makes less scrawled/clogged/blurred traces here and there, don't know if this will be seen after painting
* the super glue, there is only one second, the precisely cut styrene sheets, when not perfect aligned, ther will be gaps,
so for the future, rather cut them a little bigger and then after glueing remove overhang material
* plastruct and evergreen are not compatible, plastruct "H" profiles are 1.6mm, evergreen "H" profiles are 1.5mm
* did not expect that i need around 15 "H" profiles for two wings
* i'm glad that i took black styrene as base, so i have a very good contrast of what i'm doing, white on white is hard to see
* i used 1.6mm "H" profiles, the "U" ones would have been a little flatter with only 1.1mm height
to do list
* order more material - done
* i'm 90% sure i will machine the solar plates, its simplier than casting 1mm "thick" negatives
* finish wings
* make "addon armor" plates for the fuselage - the hexagon whingbox profile, needs to be "turned" 60 degree
* make hyperdrive
* find a good solution to connect hyperdrive with the fuselage