Show your custom Lightsabers!

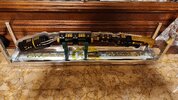
The rails are from Amazon:
The rest was 3D printed, and the individual parts are held in place with 4-40 screws/nuts. My goal was to create a display that resembled a traditional Japanese weapon wall. They did something kinda like this in Star Wars Rebels. Each bracket is positionable with the screws so it can be adjusted for different saber profiles. The maximum amount of sabers that can be accommodated is 11, but you can display as many less than that as you like.
I'd be happy to share my STL's if there is interest...
 
Last edited:
I attached the STL's in a zip file if anybody wants them.
You start by screwing the 2 rails to the wall. You'll want to anchor them. They should be 3.75" apart if you want to use the bottom insignia holder thingy. Further instructions:
Image1.jpg
Image2.jpg
Image3.jpg
Image4.jpg


Image5.jpg
Image6.jpg

Image7.jpg
 

Attachments

  • Saber Rack Parts.zip
    2 MB · Views: 42
I attached the STL's in a zip file if anybody wants them.
You start by screwing the 2 rails to the wall. You'll want to anchor them. They should be 3.75" apart if you want to use the bottom insignia holder thingy. Further instructions:
View attachment 1899098View attachment 1899099View attachment 1899100View attachment 1899101


View attachment 1899102View attachment 1899103
View attachment 1899104

Thanks man! I've been contemplating doing something different with my display and I really dig that setup! I built mine around 2000 and put halogen cabinet lights (pocket heaters...) and it's also too big. Not sure what I'm going to do, but this is an option.
 
The evolution of my lightsabers, along with the latest iteration of my KR Flagship. The shorter one in the first two photos was the basis for the longer custom design by Kennedy Custom Props. At this point, the story is that one is my Knight hilt, and the Flagship is my first Padawan one. The five inlaid brass rods represent the spires of the Jedi Temple.

IMG_1398.png
IMG_4117.JPG
IMG_0267.JPG
IMG_0269.JPG
IMG_0268.JPG
IMG_0270.JPG
IMG_0271.JPG
IMG_0272.JPG
 
Long time coming, Green Mumba The Tribut Saber to the Black Mumba.

Ever since I regretted selling my spot 10 years ago from the run on FX-Sabers I have tried finding another, BM and some where offend way to high a price.

This Green Mumba is amazing and glad I was able to find one before they all sold, and it's great it is in the same color way as the BM.

Hopefully one day I can aquire one of those Original Black Mumba Hilts.
 

Attachments

  • 20250220_221158.jpg
    20250220_221158.jpg
    4.1 MB · Views: 33
Hi everyone!

Ok, I'm gonna ask upfront that you bare with me as I try and explain haha.

I have the KR x Eco Hero ROTJ hilt. And for me it's great. The finish is almost exactly what I'm looking for. However I'd like to turn it into my "idealized" version of Luke's saber and, for me that's actual brass parts. I've read through the eBooks thread and I realize the hero was painted and the rails change from the cave scene to the Vader insert scene.

My question. Does anyone know of where to get a brass replacement neck for this hilt? I've found brass angle rails for the box on Amazon already and the last thing I would like is a fully brass neck. Happy to pay and wait for a custom piece if needs be.

Also if this isn't the right thread to post in could you direct me to a better one?

Any and all help is super appreciated.

Thanks!
 
Hey everyone, first post on the RPF.

I wanted to share with you all my lightsaber I built a few years ago with all vintage parts I found locally at junk shops (except the grip wrapping).

It is pieced together around a long centre threaded bolt, that screws into the pommel and holds the whole saber together. I know the ornate piece under the emitter came from a car headlight, the pommel is a lightbulb socket from an old lamp, and the emitter was from an old kitchen mixer but other than that the parts are mysteries to me.

My goal was to follow in the footsteps of the prop makers on the original films, and I believe the patinas and natural aging on the parts make it look and feel so authentic and complete.

I imagine the story of the lightsaber as being worn down from the prequel era heading into the original trilogy post purge. I was quite inspired by the aged appearance of Kenobi’s lightsaber prop from Episode IV.

I hope you guys enjoy! And lovely to see so many custom sabers on this site!

IMG_3988.jpeg
 

Attachments

  • IMG_3982.jpeg
    IMG_3982.jpeg
    1.7 MB · Views: 19
  • IMG_3983.jpeg
    IMG_3983.jpeg
    2.2 MB · Views: 19
  • IMG_3985.jpeg
    IMG_3985.jpeg
    1.9 MB · Views: 18
  • IMG_3984.jpeg
    IMG_3984.jpeg
    2.2 MB · Views: 22
Hey everyone, first post on the RPF.

I wanted to share with you all my lightsaber I built a few years ago with all vintage parts I found locally at junk shops (except the grip wrapping).

It is pieced together around a long centre threaded bolt, that screws into the pommel and holds the whole saber together. I know the ornate piece under the emitter came from a car headlight, the pommel is a lightbulb socket from an old lamp, and the emitter was from an old kitchen mixer but other than that the parts are mysteries to me.

My goal was to follow in the footsteps of the prop makers on the original films, and I believe the patinas and natural aging on the parts make it look and feel so authentic and complete.

I imagine the story of the lightsaber as being worn down from the prequel era heading into the original trilogy post purge. I was quite inspired by the aged appearance of Kenobi’s lightsaber prop from Episode IV.

I hope you guys enjoy! And lovely to see so many custom sabers on this site!

View attachment 1908551
Hello There ...
I like the "organic style" if you see what I mean
 
Back
Top