Slothfurnace's ANH Luke Graflex Saber chassis. PICS, Step by step.

Question : Do you have to make the humming sound yourself or is there still room for a soundboard:confused

Or could there be additional room made inside to fit a soundboard+ speakerset :confused

-Chaim

There's plenty of room inside the battery compartment for 3 AAA rechargeables, a speaker, and a MR Yoda soundboard.
 
Is there gonna be a pepakura file for this?


LOL! AWESOME SABER! I sure wish they woulda shown this exact prop in one of the prequels! But the list of stuff I wish woulda made it into those movies is soo long...

Seriously though, I think I will always think of this as what the "real" saber in ANH And ESB had inside it! :)
 
And are you going to add them to this wonderful internal design?

-Chaim

But of course...

The yoda soundboard is on the way, my speaker is here, I have the blade adapter coming from the Graflex Shop, and I have my blade tube here.

Basically here's what's left to do:

Construct the 70 MAKO V3 Blue LED string for the blade
Install the Yoda Soundboard, make resonance chamber, install speaker
Hide the wires running throughout the chassis
install the switch under the original pushbutton
make a pressure switch that turns on the crystal chamber LEDs when the chassis is removed from the casing
Add t track grips - (I have a set from The Custom Saber Shop, are these the best? should I track down Gino?)
make the D ring retainer clip, install in handle.
make blade detach base and header connectors from blade to chassis
Make blade plug for use without blade
Photograph and document everything
Build a display stand.

...decide if I should sell it or keep it.
 
Hi there,

The grips from GINO are still the most accurate.

Perhaps you could sell 'Do It Yourself' Kits or even 'Finished Internal Parts' Kits for those of us with two left hands who are not so handy with electric components and also lack a CNC Lathe.

-Chaim

Read my thread and personal point of view on the D-Ring + Clip assembly :

http://www.therpf.com/f9/show-off-luke-anh-d-ring-clip-custom-made-hand-70121/


Oh, wow, Ok. I will have to have one of your D-ring and clips. That's exactly the look I am wanting.

Do you have any extras?
 
Hi there,

No sorry they are all sold out. Send you a PM with the templates that I made.

-Chaim
 
The radiator, nice touch. Thats the kinda detail that makes this a masterpeice.
 
Just profoundly beautiful. This fundamental combination of raw skill, originality and ingenuity is everything that makes this hobby so engrossing.
The use of found items is inspired, and the obvious tallent behind the craftsmanship and construction is inspiring.

Sorry man, I hate to sound like I'm blowing smoke, but I honestly never thought I'd get so excited about such a familiar prop.

Any chance of changing your mind and finishing it as an ESB instead of ANH? Just my opinion, but I think that the gold on the ESB activator would act as a nice complement to the existing interiors.


I do have two graflexes...

No reason I can't do both, and make an Ultimate Edition display..thing.
 
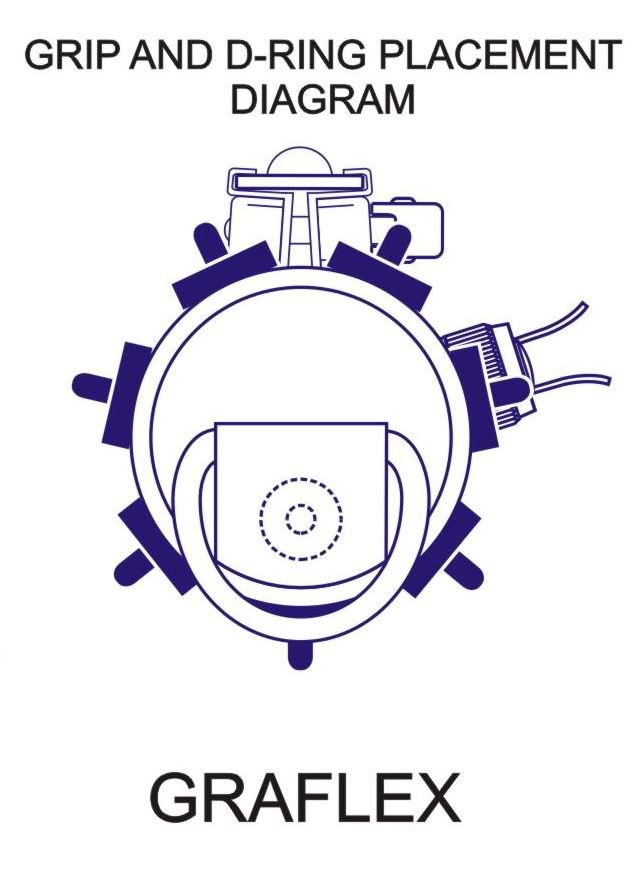
Here's Darthsabers Blueprint to show how to place the D-Ring:


luke_anhgrips.jpg


Also you can either decide on the the 'screen used' version with the bunny-ears on the right side of the clamp (like above picture) or the 'production used' with the bunny-ears on the left side of the clamp.


-Chaim
 
Here's Darthsabers Blueprint to show how to place the D-Ring:

Also you can either decide on the the 'screen used' version with the bunny-ears on the right side of the clamp (like above picture) or the 'production used' with the bunny-ears on the left side of the clamp.

-Chaim


Thanks much, Chaim. I'll go to work making that soon..

And now, some updates!
030.jpg

So now I have my battery pack and sounboard installed, I need to pass the wires almost from the back of the chassis to the front.
Mostly this is easily done, but where I have my radiator and crystal section, I'd rather not have exposed wiring, so I went to work today making a brass wire conduit to replace one of my threaded rods.

031.jpg

I drilled out enough space to fit 7 or 8 wires, and threaded the end. I'll drill and tap the harddrive retainer plate to accept this 1/4 x 20 threading.
032.jpg

Here I go peeling back my brass rod. I'll want something art deco as a style, as the Graflex comes from the 30's I think that would be appropriate.
033.jpg

And my conduit has shape! I had to drill it out from the other side, since my drill bit isn't long enough to go all the way through it. I left enough material to shorten and shape to fit at the top of my conduit.
034.jpg

Here, I have drilled the harddrive platter retainer and am tapping it for 1/4 x 20 threads to accept my conduit.
035.jpg

Once all set in place, my wires will run from my soundboard through these motor stators into my conduit, up through that into the blade socket.
036.jpg

Before, I just had a small screw and nut holding these together. Now I must drill out and tap for another hollow brass screw I'll need to make so my wires have a place to run.
037.jpg

And here's my hollow threaded brass rod that ties the two stators together.
More soon, as I begin the slow task of bringing this all together.

038.jpg
 
Last edited:
As with your OB1 ANH, this saber is mindblowingly outstanding!!! Your attention to detail lets your final peice be a work of art unto itself. I can't wait to see this peice completed:)
 
So I've had a few hours today to devote to this... And my approach today was to fix something about my design that's been bugging me.


You may have noted from previous posts that I made a wire conduit for passing wires across the crystal chamber. I do like my conduit. It makes me not like the random bits of brass tubing that I have on the other two posts underneath the radiator.

So, as the Slothfurnace Way dictates, we must make custom parts!


039.jpg


This is a section of brass cut down to match the wire condut base. Notice I have one section, but two pieces. I do this so my diameters match across the two pieces, then I will cut it in the middle and have two matching pieces. It's easier to do this than to start fresh twice.

040.jpg


Here you see the finished pieces that match the conduit. I don't thread these on the outside, but I do thread them 6-32 on the inside to act as nuts so I can tighten the harddrive platter retainer down, and get rid of the 6-32 nut between the brass tubing and radiator as seen in the previous photos.

041.jpg


Now I need to turn 16 brass 6-32 nuts down to cylinders. You'll see why in a minute, but it's to further remove unsightly non-custom parts from the chassis.

042.jpg


These are almost the right diameter, don't think I need to shave them down any further.

043.jpg


And this is why I need them! I will thread them in between the plates of my radiator. I needed to do this for a couple reasons. Mainly to make more rigid my radiator, as it was a bit floppy when installed because the way it went together meant I couldn't tighten it down. The other reason is, again, to hide the unsightly threaded rod.

044.jpg


MUCH better, I'd say. my three support posts now match aesthetically, and are more functional to tighten things down so nothing moves.

I will polish up a few pieces and re-assemble the radiator. Yes, it will be much more tedious this way, but it's worth it. Also, the with of the brass cylinders is just a hair thinner than the width of the brass guitar string bead ends, so I may leave those out, but I haven't decided.
 
Back
Top