Spider-Man Noir Costume Build 2019

EnfantDeGuerre

Well-Known Member
I know this costume has been done on this forum before, notably in this thread by joshspiderman23.

That was seven years ago and with the recent Into the Spiderverse and the Far From Home films I thought it might be time to revisit it. I also intend to do a Spider-Gwen Noir costume as well, but that is going to be a collaboration with my partner in cosplay crime so I might leave that for another thread. Keep it simple.

This is the basic look that I am going for.

4630704548_afa6d22b13.jpgsmsd-spider-man-noir6.jpgsmsd-spider-man-noir7.jpg

Pretty standard Noir Spider-Man.

I want to get it finished as quickly as possible and I feel like I might need to ask some questions of Spider-Man aficionados, particularly regarding the face shell.

I will be starting at the top with the face shell and leather "helmet".
 
The Face Shell

I realised that I wanted to use a face shell that would support the mask and leather helmet so I found a template on the internet and downloaded it. I didn't like the straight lines and so smoothed them out in Illustrator and I think ended up with a better template for the basic Spider-Man face shell.

Face shell.jpgFace shell modified.png

Then I needed to modify it because I am going to use aviator style goggles with this costume. That gave me this shell template with much smaller eye holes.

Spider-Man Noir Face Shell.png

The next thing I needed to do was to extend the shell so that it covered the whole top of my head as I want the shell to be the structure on which I will build the mask and the leather helmet.

Spider-Man Noir Face Shell Ext.png

The next step was to make a cardboard mock-up of the template. This was going to serve two purposes:
  1. Ensure that I can squeeze the shell over the top of my head
  2. To be cut apart for patterning the mask and helmet pieces.
IMG_0418.JPGIMG_0419.JPGIMG_0420.JPGIMG_0424.JPGIMG_0421.JPGIMG_0425.JPG

After trying this on I have made some further adjustments and developed a final Spider-Man Noir face and head shell.

Spider-Man Noir Face Shell Modified.pngSpider-Man Noir Face Shell Complete.png

Now this is where I am stuck. Should I make the shell out of worbla or 4mm EVA foam? I can squeeze my head into it but once it is completely covered with the leather and other stretch fabric will I still be able to if it is made of worbla? Will worbla be uncomfortable to wear? Is EVA foam solid enough to hold the shape and support the rest of the mask? Will EVA foam give in the way that I am thinking it will? Should I do the front in worbla and the back in EVA foam?

I have never really used either of those products and so am not sure how to proceed.
 
Last edited:
I use 6mm EVA foam on all my helmets and masks, it is formable and has some flex, I find 4mm to flexable...you might consider a 3D printed helmet covered with your material. There is another thread of a build and I recently uploaded a 3D file to share, it has the goggles as part if the print.
 
The Leather Skull Cap Pattern

As you can probably see in some of the pictures in the previous post, I had drawn the lines that I wanted to become my leather skull cap pattern pieces on to the face shell mock-up. I then cut the skull cap pattern pieces out of the shell mock-up.

I am going to try to explain how I transfer physical pattern pieces to my computer as accurate drawings - just in case anyone is interested.

I photograph the pattern pieces on a 1cm grid background that I have had specially printed and laminated so that I can stick things down to it and reuse it time and again.

Skull cap 1.JPGSkull cap 2.JPG

I then use a similar 1cm grid layer in Photoshop to help straighten my images before I import them into Illustrator and redraw them. I don't have enough space in my home to save pattern pieces and I often abandon a project for months or years, so this is the best way to make sure I keep track of a project. You will see how I have overlaid the pictures on the grid to straightened the pattern in the pictures below.

Pattern Straightening 1.pngPattern Straightening 2.png

...and the straightened pieces ready to redraw.

Skull Cap 1.jpgSkull Cap 2.jpg

After redrawing in Illustrator they should look like this.

Skull Cap Pattern 1.png

However, you need to check that the curves that are joined by arrows are the same length of at least very close. There is an easy way you can do this in Illustrator. If you click on the Document Information palette and select the Object drop down it will tell you the length of whatever object is currently active on your page. By comparing the two lines you can carefully tweak your curves so that they are almost exactly the same length (at least down to a few hundreds of a millimetre).

Skull Cap Pattern 2.pngSkull Cap Pattern 3.pngSkull Cap Pattern 4.png

It might seem a little pedantic but I have found that this makes a huge difference when you are sewing parts of garments with different radius curves. You can see in the following picture how I nudged my curve to make it fit with the one on the other piece.

Skull Cap Pattern 5.png

Then I added a 1/4" (6.35mm) seam allowance on all of the joining edges and my pattern is done. There is no seam allowance on the raw edges as I am hoping to bind these with suede.

Skull Cap Pattern 6.png
 
Last edited:
I use 6mm EVA foam on all my helmets and masks, it is formable and has some flex, I find 4mm to flexable...you might consider a 3D printed helmet covered with your material. There is another thread of a build and I recently uploaded a 3D file to share, it has the goggles as part if the print.

Thanks for the feedback.

I thought the 4mm might be too thin, but then I am concerned that if I use 6mm with with more than two millimetres of leather and fabric on top, that the mask might start to look too large. My head is already pretty big.

I think I am going to use worbla for the front and then 4mm EVA at the back, cross my fingers and hope that it works. I can always make another. The hardest part I think is getting the pattern sorted.

How thick would a printed helmet be? Could you post a link to the build where you have your 3D file?
 
Aviator Goggles

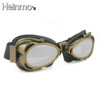
I wanted to find something sort of tear drop shaped for the goggles and I found these on Ebay. They are only plastic but they can be easily disassembled with a couple of screws and the plastic inner has little holes in it to allow it to be sewn to the faux leather padding. I am going to remove that and sew them straight onto the mask before reassembling them with the strap running around the back of the skull cap.

Goggles.jpgIMG_0430.JPGIMG_0432.JPGIMG_0431.JPG
 
The Ribbed Pullover

So I started knitting my own ribbed pullover out of cotton yarn. Figured that I could knit nice thick ribs into the body of it just like my reference images.

IMG_0437.JPG

I got about half a line into it and realised that it was never going to happen and so I bought a tight, ribbed, turtle-neck pullover from the internet.

IMG_0436.JPGIMG_0435.JPGIMG_0438.JPG

There's about a week of work I won't have to worry about. I can spend that time working on my guns which are, quite frankly, pathetic.
 
Leather Waistcoat

I am intending on making this myself. I have already made a pattern and a mockup.

Waiscoat Pattern.png

Excuse the fancy fabric that I use for my mock-up but it is what happened to be lying around at the time. I have noted some adjustments I will have to make to the pattern with a marker straight onto fabric.

IMG_0439.JPGIMG_0440.JPG

This is 22 square feet of black cow hide leather that I am going to be using to make the waistcoat and the leather parts of the skull cap. Cost was $6 per square foot so about $100 all up and there will be some left over for other projects.

IMG_0442.JPG

I am going to cut out the spider logo on the back to reveal a suede lining underneath. I will edge stitch the leather to the suede to hold the two layers together. I think it is a good solution to the logo problem. I will also be cutting strips of suede to bind the raw edges of the leather on the skull cap. I have laid the suede on top of the leather here but it might be a little difficult to tell the difference between the two. The suede will appear matt while the leather will have a little sheen to it.

IMG_0443.JPG

I am going to have a quilted lining as well. I have had a special lining printed by Spoonflower and am awaiting its arrival (hopefully any day). I will sew the lining down onto this padded calico and then stitch that onto the inside of the waistcoat which should give it a bit of body and bulk (and hopefully make me look a little less like a skinny rat).

IMG_0444.JPG
 
Last edited:
Here is the link...Spiderman build.
I use a similar method, I take the photo/picture and open in Inkscape, I then draw lines of the pattern I want with the Bézier tool it allows for curves etc. Once I have drawn my outline or details I then save as a svg and PDF this allows scaling when printing with ease. Sometimes my patterns are cut using my Cameo so I use svg, if I print on inkjet I use the PDF ...also with the svg I can import into Blender and make a 3D model base.
I need to learn how to sew, lol, that's my weak area when I build. Looks good anxious to see this as you progress.
 
Trousers

I have drafted a pattern for old-school, fish tail, trousers. They will be held up by suspenders and won't have any belt loops. I am going to run the seams square from the knee (dotted lines) so that the trousers will flare out a little where they tuck in to the top of the boots.

Spider-Man Noir Trousers.png

I have found some striped fabric which I am going to dye to create the black on grey stripes. One of the fabrics has about 12 stripes per metre while the other has 20 stripes per meter. I sort of figure that the larger stripes will probably be truer to the images I have seen but I am concerned that because the stripes are grey rather than black that when I eventually dye the fabric it won't look right.

IMG_0446.JPGIMG_0445.JPG
 
Last edited:
Boots

I found this pair of 10 hole vintage combat boots at a charity shop for $4. They look like they could be Vietnam War surplus . I am going to try to dye them black.

IMG_0441.JPG
 
Update June 5, 2019

Dyed the striped fabric a silver grey colour and achieved the look I was after.

IMG_0446.JPG
Before

IMG_0453.JPG
After

Made a mock-up of my trouser pattern and then made alterations and redrew it with very flarey hems. I figure I can always trim the seams back once they are made to get the right amount of comic book billowing at the bottom where they tuck into the boots.

IMG_0455.JPG

You can see where I adjusted seam on this mock-up. The idea is to make them very fitted to the knee and then to loosen them out from there down to the boot tops. This is my final pattern.

Spider-Man Noir Trouser Pattern.png
 
Update 6 June, 2019

I was giving some thought to the look of the striped trousers and comparing them to the comic and game references and it is clear that there is going to be a mismatch in the stripes on the outside and inside seam. That is going to really annoy me. So I think I am going to have to print my fabric for the trousers in a similar way to how some folks print those Spider-Man zentai suits. I have roughed out a basic pattern and I like it. I am going to have to finish the trousers I have already started to ensure that the pattern is right but I would want to get these done as soon as possible.

On the left is my new striped pattern to be printed and on the right is the pattern as I it will look using the store bought striped fabric that I spent about 3 hours dying yesterday.

Spider-Man Noir Trouser Pattern Update.png


Also, if I print my fabric, I won't have to compromise on my colours. I can print exactly the colour stripes I want.

Later that same day...

Mk I trousers finished (or near enough - buttons need to be sewn on).

IMG_0457.JPGSpider-Man Noir Trousers V1_2.jpgSpider-Man Noir Trousers V1_1.jpg

This is what I am basing my trousers on.

2161637_orig.png

The pattern looks weird but once they are on they have about the right amount of looseness that I was hoping for around the top of my boots. Now that I know that the pattern works I am going to have a MkII pattern trouser printed by Spoonflower. However, despite not being happy with the way the stripes look on the seam this trouser will do if the pattern doesn't arrive in time to be sewn up for the con. I am hoping to have the helmet finished by the end of the weekend.
 
Last edited:
Update 7 June, 2019

I have ordered my Mk II trouser printed fabric from Spoonflower. Made a pattern 54" wide and 36" deep and saved it as an RGB file at 150dpi in PNG format. For solid colours it always seems to be better to save as PNG format rather than JPEG. (JPEG for photographs but PNG for solids.) I took my colours from Spoonflower's grey palette on its Colour Map. The colours I used were HEX #636365 and #545559. The pattern I made was only one side which I flipped for the second yard. The idea for this MkII trouser is to effectively get rid of the side seam and make the stripes appear to be running parallel and to get a slightly darker colour.

Spider-Man Noir Trouser Spoonflower Tile.png
 
Here is the link...Spiderman build.
I use a similar method, I take the photo/picture and open in Inkscape, I then draw lines of the pattern I want with the Bézier tool it allows for curves etc. Once I have drawn my outline or details I then save as a svg and PDF this allows scaling when printing with ease. Sometimes my patterns are cut using my Cameo so I use svg, if I print on inkjet I use the PDF ...also with the svg I can import into Blender and make a 3D model base.
I need to learn how to sew, lol, that's my weak area when I build. Looks good anxious to see this as you progress.
Thanks for that link.

I have tried using Inscape. Can't get my head around it. Cameo? What is that? Is it like a Cricut?

Haven't got into Blender and the 3D printing thing yet. That is going to have to wait until I find a larger work space. However, I do have a project I want to do in blender but it isn't related to costuming.

Sewing is great. I think sometimes that I only do this because I like to sew. It is easier than it looks if you are patient, you have a good machine, good patterns and good fabrics.

I am anxious to see this costume done as well as I am hoping to wear it at Supanova at the end of the month.
Inkscape is tough the first few times but I watched some videos and now pretty much have it down for what I need at this point.
Cameo is just another version of Cricket somewhat a step up in features and designer software. It cuts and draws from svg files.
Pants look good! I just stated a Spider-man MK-1 build today, got the helmet/face shell done used 6mm EVA foam, pictures on the thread.
Your coming along really quick, can't wait to see more.
 
Update June 8, 2019

Just a bunch of pictures of the face shell and the fitting of the leather skull cap pattern to ensure that it will fit. I am not sure if the worbla and EVA composite shell is going to hold up. I might hit it with some more glue before I cover it. Hopefully the whole thing should be finished tomorrow.

IMG_0458.JPGIMG_0459.JPGIMG_0460.JPGIMG_0461.JPGIMG_0462.JPGIMG_0463.JPGIMG_0464.JPGIMG_0465.JPGIMG_0466.JPGIMG_0467.JPGIMG_0468.JPG
 
Looks good, it should hold up fine, I spray mine with Plastidip a few coats that adds some stability. Then paint or cover, I'm covering mine as well, probably with some Pleather 4 way stretch fabric. Are you using goggles for the eyes or making with EVA?
 
Looks good, it should hold up fine, I spray mine with Plastidip a few coats that adds some stability. Then paint or cover, I'm covering mine as well, probably with some Pleather 4 way stretch fabric. Are you using goggles for the eyes or making with EVA?
Plastidip! Great idea. I am going to spray it with that before I cover it.

I am using goggles but they are going to be sewn onto the shell. If you look at one of my earlier posts you will see how the goggles I have chosen have holes that will allow me to hand sew the inner part of the goggles onto the shell and then to rebuild the goggle around them.
 
Update June 9, 2019

Didn't get as much finished as I wanted to but I got the lower part of the shell covering finished. I have used a rubberised polyester looking fabric which has a honeycomb pattern on it. The pattern isn't perfect but it was a first version. Also, in the photos, you can see a lot of the texture in the worbla underneath but it isn't so obvious in real life. I attached the lower part of the shell cover to the worbla by first punching a heated awl through the worbla and then, painstakingly, hand sewing the fabric to the shell.

I cut the leather for the top and got it skived (I hate skiving). Should be sewing it together tomorrow.

EDIT: I was going to plastidip the shell but I am up against the clock and need to get this done ASAP. I will work on a MkII version eventually using everything I have leant making this one.


IMG_0467.JPGIMG_0468.JPGSpider-Man Noir face mesh pattern.pngIMG_0469.JPGIMG_0471.JPGIMG_0478.JPGIMG_0479.JPGIMG_0485.JPGIMG_0481.JPGIMG_0482.JPGIMG_0486.JPGIMG_0489.JPGIMG_0480.JPGIMG_0484.JPG
 
Last edited:
Back
Top