Success! Fabric Screen Printing Test Goes Well!

the one marked 0.5 is actually really accurate to the swatch I photographed, but it doesn't PRINT accurately. I'm really curious to see which one works the best.

Weird. Are you getting it bleeding under the negative space on your screen, or is the emulsion being exposed in such a way that makes the screen inaccurate?

Have you measured the discrepancy between the ideal artwork and what you're getting once it's printed? I'm just curious how far off it is once printed.

-Nick
 
The former. Bleeding. The screen is dead on to the artwork. I cannot blame the process that Westar is using. They do great work.

It's just something about the way the ink flows through the screen, or maybe how the fabric soaks it in. Or my technique. Not sure, but either way, when I use the thicker plastisol inks, it just doesn't look right. too thick.

I didn't do any measurements, but I suppose I could. It's just too thick :)
 
Wow,that's great work you're doing. Just had a look at your blog and yes,looks like the ink is coving too much of the fabric.Either it's bleeding too much or the artwork needs to be a little finer.You're very close tho,good job,and it's interesting to read you're progress with this..
 
What size mesh are you using for your screen. Maybe go to a tighter mesh or make the artwork tighter and let the process of printing enlarge it. If you determine how much bigger it is you can make the artwork smaller by that amount. Also is your screen real tight?
 
ZK, yes, mesh is another factor, though the blokes who made my screen felt that the mesh they used would be appropriate for the target inks I chose.

I guess at this point, I'm just trying to minimize the variables. I think that by altering the artwork, but keeping everyting else constant (like the mesh, inks, squeegee angle, etc) I should be able to work the kinks out.

Thanks again for all the support and feedback, folks. I really appreciate it.
 
Also, for reference, I use this company for all of my silk screening needs:

Westar Solutions.com

Jered is my main point of contact, and he's just super helpful. He's also REALLY patient with my n00b questions, which I definitely appreciate.
 
Do you know the micron size of your mesh? My friend has been doing screenprinting for over 10 years and if you need any questions asked let me know. I tried to call and ask about your problem but i think he is out of town for new years. I can probably pry some mesh from him or my niece who works there. Just let me know....
 
ZK, thanks for the offer of help! I actually JUST ordered my latest screen, and had a quick conversation about mesh. For the inks I'm using, and the fabric I'm using, apparently I have got the right stuff.

However, I may come a'callin if this round doesn't pan out the way I had hoped :)
 
I think your going to have to tighen up the mesh. One other question, is there any less bleed through at the edge of the screen or does it bleed the same amount across the whole surface?
 
Ok , just got off the phone with my friend, he is in DC at the ECU game. I'll try to remember everything. He says your getting what called "dot gain". 3-5% gain is OK and is better for registering. If you can see the different in size though he say that you probably have more than 10% gain. He thinks it has to do with the material your using. The ink is not soaking in and is sitting on top of the material and is spreading out . If you are printing off contact (screen has space between material) then that could be the issue too. Another thing he mentioned is material stretch but since your printed pattern is bigger than the screen pattern that probably isn't it. He ended up recomending going to a tighter/finer mesh. Also he mentioned not to flood the screen with ink. If your not in a hurry he will be back next week and i can pick his brain more. He was tailgating and i didn't want to bug him too much with work stuff.


Also he said do your tests on paper. Just make sure you wipe the bottom of the screen before going to fabric.
 
I did some tests today on the various printed fabrics I've been working with, and while doing it took a photo that shows the difference in results.

comparison.jpg


On the right is the plastisol inks, on the left is the speedball. It's subtle, but you can see how the plastisol seeps through the screen differently, and makes for thicker diamonds.

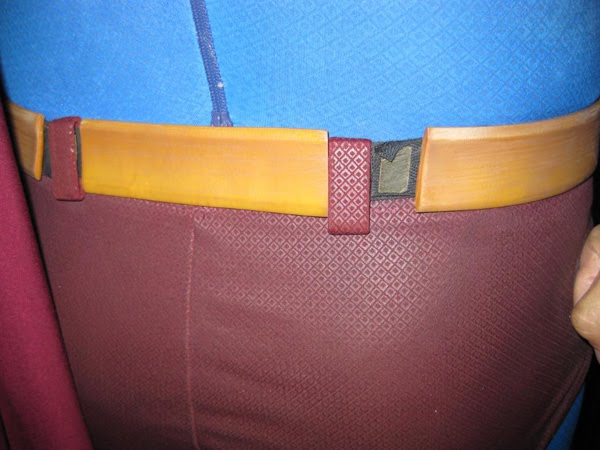
Perhaps for my own reference, here are a couple pics of different suits that show the diamonds. This first one has MUCH thinner diamonds, with significantly bigger inner-diamonds.
seams.jpg


This other one shows what look like thicker diamonds. But then, it's also not as good a photo.
trunks_seam.jpg


These are different suits, by the way. The first was the one that PSOL had on display at SDCC, and the second one is from Madame Toussauds in NYC.
 
WOW, much better. So there are actually 2 different sized patterns. The red is much tighter than the blue. So once you get the red fabric figured out your going to have to start again on the blue? Looks like 2 different kinds of fabric too. Awesome so far Matt.
 
Yup, the red and blue fabrics both have different patterns. Joy! The variety between suits is also frustrating. I think at the end of the day, I'll just pick one that I like the best and go with it.

After looking at the above three photos together, I made some changes to my original artwork. It appears as if the inner diamonds are bigger than I originally drew, so I fixed that, and incorporated it into my new test screen. Its all on my blog.

Fortunately, i have a tiny sample of the blue fabric, so the diamonds for that will be much easier to get right. For the red, I'm just going off a scan I have of a belt loop (which is ANOTHER diamond pattern) and some good photo reference.

I take comfort only in knowing that to the casual observer, or someone who is not holding reference photos next to my suit, there will be no way to tell the difference between mine and real deals.
 
So are you going to thank me or what?

For recommending the Speedball inks? YES! I even mention you by name on my blog :) I also owe you some thanks for giving some protips on the actual application of the ink and squeegee stuff.

So yeah, in short: without Laamberry, I am nothing.


better?
 
Hey Matt,

I went threw your blog, the research and work you put into this you will have the ultimate costume, just amazing how deep into the details your going with this, BTW like you recomended for a ready to display costume I ordered all the costume parts from BA and the boots from Keith, can't wait to put all togheter, I hope one day you will offer your version, I'm sure people would line up for one.

GFollano
 
Thanks for the support GF! It is indeed a fun project that is deceptively complex. But as I have said on my blog a few times, the fun for me is in learning all the new skills necessary to pull off something like this. Good times :)
 
Back
Top