Toy bash original design RC Sci Fi truck

I wired up and installed the Pololu rc switch using some cut up servo extension leads as plugs.
These switches work a treat. Thanks again to teslabe for the link.
They have an onboard flashing surface mount LED that blinks mostly off when the switch is off and mostly on when the switch is on.
I covered the tiny board with clear heat shrink to insulate the contacts and to be able to see the led indicator working.
The switch defaults to off so when you power up the RC receiver the switch is open and a push of the required control (in this case a button toggle) activates it.
Pressing the button again switches it off.
The button on the controller of the 3 channel wheel radio is usually employed for such tasks as changing gears on a two speed electric vehicle.
If you put a servo on that channel, toggling the switch makes it travel from the equivalent of fully rotated right to fully rotated left.
Toggling the switch again has the reverse effect.


I decided to add some rear red LEDs for tail lights.
The forward voltage drop on these clear red LEDs is about 2 volts each, I have a 6 volt supply.
I used the handy online led resistor calculator provided by the company I buy the LEDs from, to calculate the required resistor for the two LEDs in series at 6 volts.
This was a 150 ohm 0.5 watt resistor soldered before the LEDs in series on the positive rail.

The LEDs are mounted in chrome bezels.
They are retained in the bezel by a poly ethylene plug which goes behind the LED and just pushes into the back of the bezel relying on friction to stay in place.
This is not a very satisfactory system as you can easily push the LED back out of the bezel from the front.
I put a couple of blobs of hot glue behind to prevent this from happening.
I made a removable styrene cover to hide the wiring underneath. It attaches with a couple of plastic thread screws salvaged from a disassembled toy.


The cockpit console also has a couple of bright white LEDS buried in the cockpit console.
The bright whites drop 3 volts each so didn't need any resistor.
A model kit part was used as a dual screen console with a bit of thin acrylic (perspex) sanded with fine wet and dry to frost it on the back, glued in behind.
Some silver paint was added as a bit of a reflector before gluing in place.


The console illumination is wired up to the same feed as the headlights.


The screens throw up a small amount of light onto the driver figure.
The photo below is a longish exposure and shows it much brighter than in reality.


The driver figure has a plastic thread screw through the chair into his coight to keep him seated.


The Bruder toy's clear plastic windscreen has a wiper blade molded into it.
It will get painted or may have to be detailed with some styrene strip.


I also removed the old push switch casing that was on the side of the cab and covered the hole with a kit part or two.


I've added a few more kit parts here and there, mostly at the front.


The lower sides of the cab have been paneled and I added some smaller tanks on top of the larger ones to more fill the truck toy's rear wheel arches.


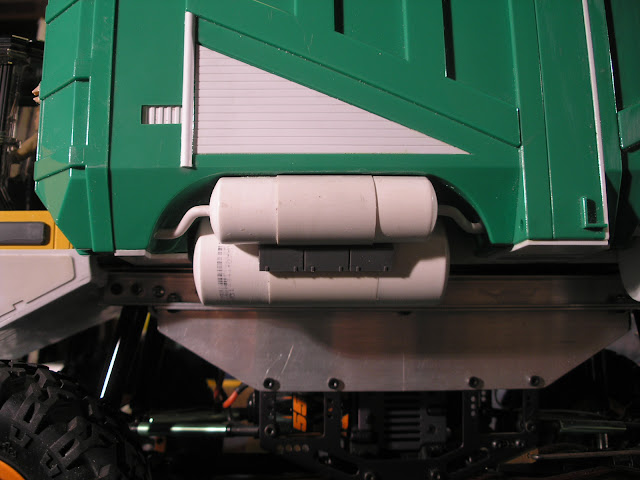


The piping for the smaller tanks is made from some single conductor electrical wire.
It is cheap and easy to obtain from a hardware store by the metre.
It is also easy to bend, stays bent, paintable and the pvc outer insulation is able to be securely glued with either thick or thin superglue.
It can be straightened by just clamping one end in a vice and pulling the other end.
You can get a few different sizes, the two pictured below are 4mm and 2.75mm in diameter.
Multi strand wire is no good as it cant hold a tight radius bend.
You can sometimes find this stuff in skips on building sites, though with the price of scrap copper these days it is harder to find for free.


There is an empty space on the chassis between the wheels that I am toying with filling with some detail or other.
I would also like to do a bit of work to the driver before finally cranking up the primer and beginning the paint process.
Mechanically and electrically the vehicle is complete and working.


More soon...
 
Really Awesome! Subscribed. What are you thinking for paint and decals? Are you gonna keep some of the bright colors?
 
Nice work on the kit bash. I'm an RC guy myself, so it's always cool to see what people are doing with RC stuff. It's nice to see someone using a Creeper still. Everyone does SCX-10 and Vaterra stuff now.

When it gets done...it can hunt my Alien Crawling Creature...

photo1_zps08ba3371.jpg


https://www.youtube.com/watch?v=sqcv_HbRV7M
 
Really Awesome! Subscribed. What are you thinking for paint and decals? Are you gonna keep some of the bright colors?

At the moment I am thinking orange or mining truck yellow, with heavy weathering. The cab sides will remain black as that part is molded from polyethylene or polypropylene which will not accept paint. I think it will look fine black anyway.
As to Decals I will look at designing something simple in inkscape for that.

When it gets done...it can hunt my Alien Crawling Creature...

Reminds me of the Mutt Cutts van in Dumb and Dumber.
 
Finally got some primer on it, after completing the detailing process.
I filled in some of the gaps underneath with an extra large tank and equipment box per side.
The tanks were made from the usual PVC pipe end caps with 10mm foamed PVC sheet mounting brackets.
The body was lightly sanded with fine wet and dry and washed with hot water and dish-washing detergent to
make sure the paint keys nicely.


The bit of detail above the large tank is from a disposable camera, in fact the little dome shape was the lens.
Disposable cameras have a pile of interesting styrene parts in them, and photo shops are only too happy to
give you a bag full as they are just thrown away. I originally got a pile of them to scavenge the flash capacitors
inside them which were used for some DIY valve guitar amp projects. One thing you have to be careful
of when disassembling them is the capacitors can hold quite a charge and will give you quite a shock that is
very unpleasant, I speak from experience.
I wouldn't recommend going near them if you have any form of electrical sensitivity.


My finger hurt after spraying three quarters of a large can of red oxide car primer on it.

I have started going over the edges with a silver paint pen. Liquid mask (latex) will then be brushed over this
so that the edges will appear pretty scraped up revealing bits of bare metal and primer under the top coat.

The current plan is to paint the sides orange ( a colour called tango) with the middle and underneath detailed
sections a dark grey (primer).


More soon...
 
Last edited:
Looks so Rad! I used to work in a photomat and can atest to the danger of the capacitors. We use to make them pop on purpose for entertainment by placing a screwdriver across the curcuit, (plastic handle screwdriver). My dude got zapped once pulling film out and got burnt by one on his hand.

Anyhoo the truck looks really awesome!
 
Brilliant progress , you know the body looks fantastic , in fact I think you should be able to separate the body from the chassis when not in use , that would look great hanging up, as if floating, lev units etc etc .....keep it up
 
Some work has been done on the cockpit of the truck.
In fact the whole model has been painted and weathered but that will follow in a subsequent post as I haven't taken
any photographs of it as yet.


I made up a helmet for the 1/16 scale Bruder toys driver figure. It possibly a little big but that's what he's getting.


It was made in two halves joined down the middle by pressing a half dome shape into heated 1mm styrene.
To heat the plastic I used my Bosch heat gun which is designed to strip paint among other things.
It looks like a hairdryer but it puts out industrial grade heat. You would not want to mix up the two.
I made a domed ended bit of broom stick and pressed that into a hole in a piece of wood that was slightly larger.
You can see the stick, hole, pressed plastic and end result below.


The two plastic domes were sawn off with a razor saw, sanded flat and joined with the usual methylene chloride solvent.
A dremel was then used along with a sharp olfa blade to cut away the hole for the neck and face.
I used a couple more presses of the 1mm plastic to make some side discs and added a strip of 0.5mm styrene down the join.
I also added some pieces of closed cell foam as padding on the inner sides which also makes it stay on his head.

Still needs a bit of sanding and then painting to finish.


To cover up the rolled up sleeves molding on the drivers arms I used some heat shrink tubing, with a smaller piece
as some sort of cuffs around his wrists.
I also put a larger piece around his neck.
You can see a bit of filler as yet un-sanded in the v neck of his shirt.
A few Drops of thin super glue has been flowed into his arm joints to fix them in position.
Eventually he will be painted to look more like he's wearing a jump suit with gloves.


The chassis has been disassembled so that it could be painted with flat black.
I always use a Rust guard epoxy style spray paint for any aluminium parts as it sticks very well without flaking off.
A couple of lightish coats are sprayed on without any primer.
It takes 24 hours to dry fully but a couple of extra days does no harm before reassembly with scratchy tools.
Here is the chassis hanging up on a wire hook.


On the shelf behind the chassis are a couple of my old spaceship models that were built many many years ago.

More soon...
 
Re: Toy bash original design RC Sci Fi truck ----COMPLETED----

The model was masked up and sprayed with orange car paint from a spray can.
The masking was reversed and the detail areas were sprayed with a "sandable" car primer which is
a darker grey than the normal car primer.
I'm not sure what the difference is, other than the shade of grey, as primer generally is usually easily sandable.


I also masked up and sprayed some white primer markings on the sides and added a few old decals from
some random model kits.


The liquid latex masking (applied earlier in previous post) was peeled off leaving chipped paint revealing the
original red primer and silver metal scrapes from the paint pen.


After the paint has been allowed to dry for a at least a day ( 2 days or more is better) I start the application
of "poo juice", a roughly five to one mix of methylated spirits ( alcohol) and Tamiya flat black mixed in a jar.
Essentially this is a wash that is flowed onto the surface into all the vents, grooves, depressions, edges, lumps etc.
Then metho dampened rag is used to wipe it off from the high spots leaving it in the low.
The rag is wiped in the direction that grime would run and flow leaving grubby streaks.
It is essential for this method to work that the underlying paint is not dissolved by alcohol, so any water based
hobby paint such as Tamiya is not suitable.
Acrylic car paints and primers are fine, and enamels such as Humbrol will work given sufficient time to dry.


I have seen Randy Cooper on You tube demonstrating his technique using a water based wash on a wet model
getting similar visual results.
I find that for me that the methylated spirits based wash flows along edges better with a capillary action that is
more effective than I have been able to get using a grime wash based on water.


After the poo juice wash has dried, (it dries pretty fast) I then dry brush white students acrylic paint using a stiff
flat oil paint brush onto all the raised spots and edges.
The student acrylic is a cheap artists acrylic that is not as densely opaque as a quality artists acrylic so builds up
slowly onto the models edges with a pleasing lightening of the underlying value.
If you make a mistake the metho dampened rag will easily remove the white for another go.


To people used to subtle pastel shaded weathering on 1/35 scale military models, the result to the eye may seem
ludicrously over the top, but in my experience you really have to exaggerate the weathering for the camera to see any of it.


After looking at the photos I realise the chassis needs a bit of weathering to tone down all the colorful anodising
on display.
More than likely a good run on some dusty dirt tracks will naturally take care of that.


Thanks for reading.
 
How fast is she ? It looks brilliant , would you risk oil paint into the chassis and detailed parts , I'm no expert but it might add a little more depth....but it really looks brilliant, and also has inspired me to try something similar (without the rc ) to practice paint techniques
 
That looks amazing!

....I would humbly suggest it needs a license plate :) Maybe a manufacturer's logo...
 
Back
Top