YAFF - Yet Another 5 Footer Falcon Build

Glad you’re back at the 5 ft. Falcon. All the photos are a great help to me even at the stage I am at. Really jealous of you guys with the CAD and 3D printing skill.

Certainly appreciate today’s technology but never went much past the slide rule, HP calculator and Fortran. Had to learn the PC computer as a phenomenal communication and data collection tool on the job. I need to stop with the excuses.
 
Certainly appreciate today’s technology but never went much past the slide rule, HP calculator and Fortran. Had to learn the PC computer as a phenomenal communication and data collection tool on the job. I need to stop with the excuses.

I have learnt that model builders generally always make good 3D CAD drivers.
They have the ability to think of objects in three dimensional space and can think in both 2D flat surfaces as well as lofted bodies etc, like a hull of a boat, shell of a car or profile and surface of a wing.

You would ace it John. Its never too late!
 
Cheers all, I appreciate all of the support, and take it from me, I wouldn't be attempting the modelling without all of the previous work that you guys have done, cataloging and taking photos of all of the kits. I, like Searun started my work life with a TI Calculator, slide rule and green phosphor monitors, so we might not be too far away in age ;)

This weekend was really just me learning the software, but I did get quite a bit of modelling done - I don't take credit for the Panther tank top, or the Sealab models - I just reused what already exists there. Pretty picture attached

BTW I will make the models available at some stage - I am sure people with the kits and calipers can tell me where they need fixing.
Some still require tweaking and finalizing but mostly getting there

Thanks Darrin
 

Attachments

  • engine bits.jpg
    engine bits.jpg
    539 KB · Views: 52
  • engine bits2.jpg
    engine bits2.jpg
    530.6 KB · Views: 54
  • bits.png
    bits.png
    1.6 MB · Views: 50
Last edited:
Bit of progress, hoping to have the upper engine deck completed by the end of the weekend
Then will move onto the lower part, then the fun part, how to split it all for printing, and what goes resin, vs FDM
 

Attachments

  • engine bits.jpg
    engine bits.jpg
    502 KB · Views: 44
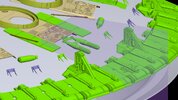
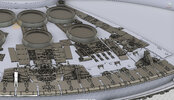
OK I managed to get onto the Cockpit while I wait for my new printer to arrive.

I remodeled the Nav Chair, Console, Bulkhead, and Sidewalls using Joshua Maruska's excellent models as a base. I was more going for something that could be printed easily and show a bit more detail - so a lot of artistic license there, and a lot lower poly count

This led me to a ton of questions - a lot of what I have seen the bulkhead seems too far forward, even the blueprints it seems too far forward, once you add in the seats - there is no leg room really. (I also based off an old photo that the Vickers yoke has a pipe going to the floor, so the Pilot seats cant go that far forward.)

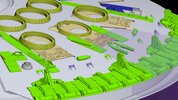
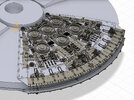
So I redid it, a lot of it based on the PG Bandai Model, which seemed to have it further back as well.

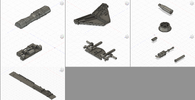
I have the panels for the nose cone to finish off, and a few extra internal wall details, and this one will be getting split and thrown at the printers.

It will be a mix of Resin for detail bits, FDM for the bulk of it.

Anyway, once I have these split and am happy with the end result, I will put the files up for everyone to use. and or refine.
At some stage I will do a version with support for lighting - but that might take a bit longer


1714336748991.png


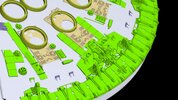
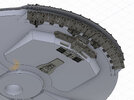
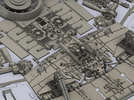
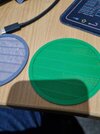
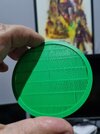
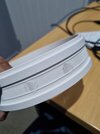
First few prints - It looks like its more than capable of showing a bit more detail, so I will be improving these models as well
1714337444424.jpeg


I also noticed Joshua's panels were missing this section which I am in the midst of adding, which in turn pushes the Bulkhead back as well.

1714337733046.png
 
Ok In answer to my own Question - it appears that the ESB Falcon did have a pushed back Bulkhead and the extra panels I outlined above -
I have found this old photo from ANH which showed those extra panels didn't originally exist.
I see from a few other posts it was fairly common knowledge, tho its a lot of reading here on the RPF to figure some of this stuff out.


1714369461947.jpeg
 
Last edited:
Small Update -
Most of the Upper Greebles modelled, just working on the underside ones and the Panther surrounds for the Grill at the moment
Decided I would model the cockpit based on the ESP version for a start.

Now the tricky question - Should I try where possible to model damage? I would be interested in everyone's thoughts on that - I could potentially do an undamaged one first, and then a damaged version as well.

I have also started splitting it for the printer - have my new Bambu arriving this week, so this will be the first thing on it.


1714484737293.png
 
OK after some thoughts and discussion with Manu, I started modelling some of the damage.

I also just set up the new printer, running full speed on a Bambu with some of the finer prints I can see issues, but i think slowing it down will help, so a few photos of the first few prints as well for reference, the grills worked far better than the resin for the time being.

I mean full speed, that thing is insanely fast. but for the finer detailing its just too fast


1714656545814.png
 

Attachments

  • 20240503_012050.jpg
    20240503_012050.jpg
    1.5 MB · Views: 27
  • 20240503_012100.jpg
    20240503_012100.jpg
    1.1 MB · Views: 28
  • 20240503_012135.jpg
    20240503_012135.jpg
    865.3 KB · Views: 29
Slower is always better for FDM printing. That includes the non-print travel speed. For larger prints and when the print bed is moving really quickly, the extra momentum on the print bed can cause the belts to skip and you get ruined prints due to massive layer shift. So keep things slow. It only adds an extra few minutes to the print time, and you're far less likely to get failed prints.
 
Slower is always better for FDM printing. That includes the non-print travel speed. For larger prints and when the print bed is moving really quickly, the extra momentum on the print bed can cause the belts to skip and you get ruined prints due to massive layer shift. So keep things slow. It only adds an extra few minutes to the print time, and you're far less likely to get failed prints.
Cheers, yes I will slow it down a lot, time is not an issue, and I'd rather have clean prints.
I was just more surprised how fast the Bambu was in comparison to the Prusa I was using.
The good thing about the Bambu is its not a plate slinger, the plate only moves up and down and the head moves , so less chance of layer shift. Which is why it can move so fast in the first place, but I definitely know of some other issues caused by the speed.
Thanks D
 

Your message may be considered spam for the following reasons:

If you wish to reply despite these issues, check the box below before replying.
Be aware that malicious compliance may result in more severe penalties.
Back
Top