Yet another 223 and 232 Pods Build

Hay thanks guy,really appreciate all the help, lord knows I need It!!!

- - - Updated - - -

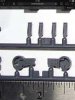
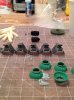
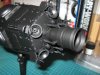
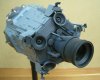
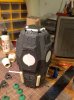
So I was wondering on the third rim, the one on the bottom, wondering if that is from the saturn? Here is Allen's nice close up of what I am talking about.


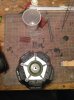
I used G25 from the 1/12 Tamiya Ferrari 312T. The outer circle of the rim has been cut away, leaving just the cone part of the rim.
 
Thank you so very much Allen for the help.....got to get this baby looking its best!! Also thanks you Niels for the complement, I am not the greatest at these,but I try. Thanks again to all the guys here that posted here and make these build possible by sharing, You make Star Wars studio scale models so achievable.

Mark
 
It had been so long I had to go back to the model and compare to all my F1 rims again. I can't recall if the nozzle on this version was ever positively ID'd.
On a separate note, I will say that the orientation of the 20mm parts on the bottom of my 232 are correct to the ref. Some have changed them on their builds for the sake of symmetry.
 
On the separate note ..... You talking about the exclamation looking part?thanks for the correct placement of these parts. Also do you have a pic showing all of the parts you could post Allen ?

also Allen is the round rod correct on the 232?
 

Attachments

  • image.jpg
    image.jpg
    317.8 KB · Views: 89
Ok guys going to put the grills in place but I was reading lees thread and he said in it " that he seen the back side and it was the screen accurate,maybe lee can chime in here, here is a pic. Most everybody here trimmed the henges off, so want to know what is screen accurate.
 

Attachments

  • TESBpods007.jpg
    TESBpods007.jpg
    76.1 KB · Views: 99
Well, if that's the case, then I'm going to have to think about reworking mine. I'm glad it's still just primed and not painted.
 
Would it be wrong to post the pic in the making of the empire strikes back book. Did a little research on it and found the picture in the digital book and shows the backside clear. I will post it if it is ok to do so.

this is the correct way to place the parts by the studio model. These are pics of Suburban Machine Company
 

Attachments

  • lr232_019.jpg
    lr232_019.jpg
    338.3 KB · Views: 120
  • lr232_023.jpg
    lr232_023.jpg
    450.4 KB · Views: 123
Last edited:
Got some more done,hoping to finish the 232 tomorrow.....work bench needs cleaned up!! Also going to reposition the pods on the base.
 

Attachments

  • image.jpg
    image.jpg
    652.7 KB · Views: 89
  • image.jpg
    image.jpg
    887.3 KB · Views: 97
This thread is more than 10 years old.

Your message may be considered spam for the following reasons:

  1. This thread hasn't been active in some time. A new post in this thread might not contribute constructively to this discussion after so long.
If you wish to reply despite these issues, check the box below before replying.
Be aware that malicious compliance may result in more severe penalties.
Back
Top