DancinFool - Iron Man Mark 3 Pepakura Foam Templates

Sorry to bother you with so many questions. Given that the scrap pieces are smaller and thinner, does the helmet get flimsy/bendable at the detail lines, or are the thicker pieces enough to hold the helmet together?
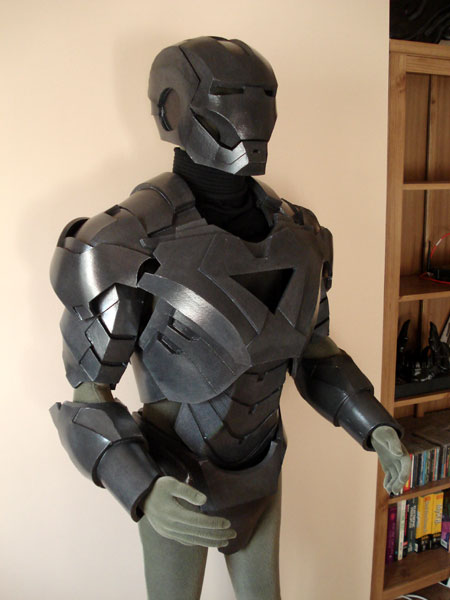
I thought it might be flimsy, but once everything was hot glued it was just as strong as the rest. Don't worry about asking too many questions I'm happy to answer them.
 
I had the same problem (missed the detail on the outside of the "eyes" section of the faceplate. You can see here my mistake:

13900-needs-serious-modifications.jpg


Here you can see the supports (little trapezoids on either side of the foam layout:

13975-supports.jpg


I am using 3mm foam, so an internal support to "lift and separate" the eye detail is pretty easy.
 
Question about the shoulders for anyone. Being new to all this, I figure I would go with what seems the easiest piece to make, but looking at this and the paper pep thread this is based off of, the shoulder is in two pieces. Are these two pieces glued together, or should they be allowed to move independently of each other? :confused
 
I'm pretty confused by the foam templates here - they still seem to have a lot of 'slots' in them where there's a complex bend (a bend in two directions). With foam there's no need to these because you can bend/stretch curves into foam with heat - so you should really have a new template with a different outline and just make these sections as one piece of foam, unless there's a defined bend/crease...?

I demonstrate this at in the following video with templates I modified manually on paper, and that's how I made the entire suit: (XRobots.co.uk - Iron Man MkVI Armour)

Actual demo from 1:45: YouTube - How to modify pepakura templates for foam - Iron Man suit

IM6_015.jpg
 
Last edited:
I'm pretty confused by the foam templates here - they still seem to have a lot of 'slots' in them where there's a complex bend (a bend in two directions). With foam there's no need to these because you can bend/stretch curves into foam with heat - so you should really have a new template with a different outline and just make these sections as one piece of foam, unless there's a defined bend/crease...?

I demonstrate this at in the following video with templates I modified manually on paper, and that's how I made the entire suit: (XRobots.co.uk - Iron Man MkVI Armour)

Actual demo from 1:45: YouTube - How to modify pepakura templates for foam - Iron Man suit

Hey XRobots,

For sure you can use a heat gun to generate those complex bends, unfortunately there's no way to account for this in pepakura designer. The only way to achieve it would be to remove the bends in the model and re-unwrap it in pepakura designer.
 
Hey XRobots,

For sure you can use a heat gun to generate those complex bends, unfortunately there's no way to account for this in pepakura designer. The only way to achieve it would be to remove the bends in the model and re-unwrap it in pepakura designer.

Yes I know - what's why I did it on paper with the original templates... however that's also why 50% of the IM foam builds on here are full of holes with glue hanging out ;-)
 
Yes I know - what's why I did it on paper with the original templates... however that's also why 50% of the IM foam builds on here are full of holes with glue hanging out ;-)

Hahah this is true, and most of the inner cut lines can be safely ignored, but it's up to the person building to figure out which cuts can be removed and which can't, it's part of the fun!
 
Hey DF, thought I would post a picture of the first piece I created using your templates. It's still not "pro", but it looks real good to me especially since this is only the second piece I've ever created, and I'd wear it. This is the under part of the shoulder pieces:
IMG_20120616_001855.jpg


Before I even read XRobots response, I decided to combine some of the pieces together and it worked like a charm. This work is only 4 pieces: the two sides, the top and the front (not including the little detail pieces). The next shoulder I do, I am going to try for two pieces only, the wraparound piece, and the top.
 
Hey DF, I want to work on your files but when i tried to do the biceps, it came out really huge with a scale of 24 !
My default printer paper size is A4 (I live in France).
Do you think the problem can come from this?
 
Hey DF, I want to work on your files but when i tried to do the biceps, it came out really huge with a scale of 24 !
My default printer paper size is A4 (I live in France).
Do you think the problem can come from this?

I had to scale mine down too. Apparently DF is some kind of giant. :lol
 
Hey Guys, I'll have to re-upload the arm, looks like it somehow got out of sync with the rest of the pieces. Probably a typo. I just double checked though exporting my human model the default scale on the rest of the pieces, 1.6395, should be perfect for a 6 foot person.

A scale of 22 might fit a 60 foot person lol.
 
Last edited:
Thanks J0wE, I'll add it up to the first post. I did a quick scan of all the other files and as far as I can see the scale is consistant but if anyone notices a file that's not the default scale of 1.6395 please let me know and I'll update it.
 
This is really really nice! :thumbsup Foam conversions from the original maker of the files! :)

i don't like this post. . .really


i'd modified foam files of his files and shared it over to stealth. . .
i don't know if DF received my pm regarding the conversions of the foam. . .
 

Your message may be considered spam for the following reasons:

If you wish to reply despite these issues, check the box below before replying.
Be aware that malicious compliance may result in more severe penalties.
Back
Top