You are using an out of date browser. It may not display this or other websites correctly.
You should upgrade or use an alternative browser.
You should upgrade or use an alternative browser.
division 6
Master Member
Looks like a long sleeve tee.
Doesn't have the texture of a thermal.
Doesn't have the texture of a thermal.

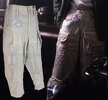
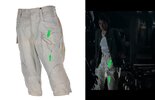
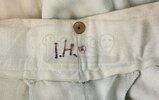
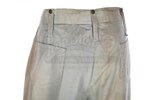
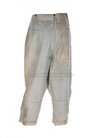
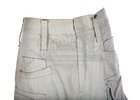
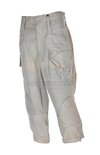
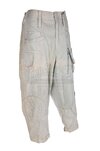
From Propstore: "The pockets of this pair appear to match Lambert's (Veronica Cartwright) death scene through distinctive folds and creases on the front left pocket. However, it seems these trousers were later repurposed for Ian Holm’s character, Ash. Modified for use in subsequent productions, the trousers' knee patches show evidence of alteration and the large shin pockets seen in the film are no longer present." Or were they Lambert's repurposed for Ash? Knee patches definitely lowered. If these are the Lambert death scene pants, why does the pocket appear closer to the belt loop on-screen? Also it looks like the pants close a lot closer to the right belt loop than on the Propstore pants. I've seen pix of Ash where there are small differing pants details so they must have had multiple costumes for each character.
Attachments
stephen210
Sr Member
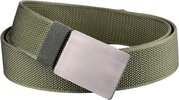
Here are the belts I make. The insignia I got from Patches N Pins. Ebay has the right size too.


Steve does excellent work!!!! Highly recommend!
I am happy to report my crew uniform is completed. All details and accessories have arrived and been finished. I very excited on this one.
I am still debating on getting some trousers from NostromoCrew in sea foam, though. haha. Anyways, pictures coming soon.
Until then, I hope everyone has a great Holiday. Stay safe and warm, crew.
I am still debating on getting some trousers from NostromoCrew in sea foam, though. haha. Anyways, pictures coming soon.
Until then, I hope everyone has a great Holiday. Stay safe and warm, crew.
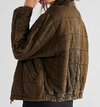
Having a go at a Kane version jacket (got my Mk3 from Merliner back in the day!) and pleased with my minimal efforts and a lot of help from SG-RB's excellent sleeve lacings.
However, my attempt at the Nostrom lettering on the back has turned into a bit of a mess. Years ago, Banzai88 was kind enough to supply a vinyl stencil, but after a continental move in late 2021 that is buried somewhere in storage.
However, many moons ago I scanned the stencil into my computer just in case I needed it one day. Stencil card was used and then my problems began. Either my paint was too thick so it took on a slightly lumpy appearance, or it would be too thin when mixed with some water thus bleeding under the stencil masssively leaving no sharp lines.
Most of the few letters that were attempted were washed out after I realised it was better to stop.
It did not help that my greatest error, probably, was not having the jacket completely flat with no lumps and bumps visible.
So calling on the RPF and anyone with experience applying the lettering to help me out...
On replacing my crap self-made stencils, is anyone out there producing these for sale? I'll need two, haha. I have two jackets...
I feel a message to Banzai88 is in my future to see if he still makes them.
Hope someone can help...
Thanks in advance.
Steve
ID10T
Sr Member
I’m also planning a Kane jacket (complete outfit eventually) and Adam will be doing the work on my jacket once his schedule allows. I don’t yet know what that schedule is, but once I do I’ll either send the jacket to him or purchase the shirt and pants…
I have everything to complete the shoes already. Need a pen and flashlight (or good files) to add to the collection.
I have everything to complete the shoes already. Need a pen and flashlight (or good files) to add to the collection.
joberg
Legendary Member
Stencils are easy to make since there's a lot of ways to go about it. I usually use cardboard (2mm) cutting out the letters/numbers and then spraying that with a coat of clear varnish to make sure it wont warp or get too wet with the many applications of your final coat/color. Don't forget to put some kind of weights around your letters/numbers to make sure that your stencil is really flat on your fabric and doesn't lift while you're spraying.Having a go at a Kane version jacket (got my Mk3 from Merliner back in the day!) and pleased with my minimal efforts and a lot of help from SG-RB's excellent sleeve lacings.
However, my attempt at the Nostrom lettering on the back has turned into a bit of a mess. Years ago, Banzai88 was kind enough to supply a vinyl stencil, but after a continental move in late 2021 that is buried somewhere in storage.
However, many moons ago I scanned the stencil into my computer just in case I needed it one day. Stencil card was used and then my problems began. Either my paint was too thick so it took on a slightly lumpy appearance, or it would be too thin when mixed with some water thus bleeding under the stencil masssively leaving no sharp lines.
Most of the few letters that were attempted were washed out after I realised it was better to stop.
It did not help that my greatest error, probably, was not having the jacket completely flat with no lumps and bumps visible.
So calling on the RPF and anyone with experience applying the lettering to help me out...
On replacing my crap self-made stencils, is anyone out there producing these for sale? I'll need two, haha. I have two jackets...
I feel a message to Banzai88 is in my future to see if he still makes them.
Hope someone can help...
Thanks in advance.
Steve
Spray can are tricky: you really have to apply very light coats on every pass. I prefer airbrushing for that: more control. Take your time.
If it takes 3 days to achieve the look; take 3 days.
Mottrex
Sr Member
This...Stencils are easy to make since there's a lot of ways to go about it. I usually use cardboard (2mm) cutting out the letters/numbers and then spraying that with a coat of clear varnish to make sure it wont warp or get too wet with the many applications of your final coat/color. Don't forget to put some kind of weights around your letters/numbers to make sure that your stencil is really flat on your fabric and doesn't lift while you're spraying.
Spray can are tricky: you really have to apply very light coats on every pass. I prefer airbrushing for that: more control. Take your time.
If it takes 3 days to achieve the look; take 3 days.
I made a stencil and air brushed, I was a little impatient and got some bleed but hey it still gets the looks..
Patients is a virtu.. I just don't trust my Patients

Got you covered, Steve. DM sent.I feel a message to Banzai88 is in my future to see if he still makes them.
Joberg, thanks for taking the time to offer your advice.Stencils are easy to make since there's a lot of ways to go about it. I usually use cardboard (2mm) cutting out the letters/numbers and then spraying that with a coat of clear varnish to make sure it wont warp or get too wet with the many applications of your final coat/color. Don't forget to put some kind of weights around your letters/numbers to make sure that your stencil is really flat on your fabric and doesn't lift while you're spraying.
Spray can are tricky: you really have to apply very light coats on every pass. I prefer airbrushing for that: more control. Take your time.
If it takes 3 days to achieve the look; take 3 days.
I wish I had clear-coated the card now. It was about 1mm thick and sourced from an arts supply store. Perhaps something heavier would have been better. Using weights is another thing I neglected to do. I taped the card down, but it was rolled up by the shop when bought so this caused other issues.
A round stipple brush was used to apply the paint, but being round and very flat it was not easy to get into the corners of the lettering causing repeated stippling and heavy paint build up. A catalogue of errors on my part really!
You mention spray cans. Do you have a recommendation? The colour is a little tricky to pin down. Looking at reference I did buy a variety of green shades from ArtDeco and FolkArt acylics and fabric medium that somewhat match the original jacket lettering, to my eyes at least.
However, spraying is definitely a faster and easier method.
Thanks my man...appreciate it.Got you covered, Steve. DM sent.
joberg
Legendary Member
Yeah...brushing paint on a stencil is a big no for me...better using foam brushes for that. And again: weights and more weights on that stencil
Spray-can should be used at a higher altitude than 6-8 inches from the surface. Think higher and in episodes. Better results and less stress in the end. I usually use an acrylic or Rustoleum paint for that stuff.
Spray-can should be used at a higher altitude than 6-8 inches from the surface. Think higher and in episodes. Better results and less stress in the end. I usually use an acrylic or Rustoleum paint for that stuff.
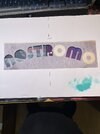
NOSTROMO Back Lettering
Here is my method for applying the NOSTROMO text on the back of the jackets, I experimented with different methods, but find this the most consistent and produces a result that is close to the screen worn jackets. After dying my jackets close to the correct color, I use a vinyl decal stencil, The ones Banzai88 offers are excellent.
1. The Set-Up - Using a flat hard surface to dress the back of the jacket against, making sure there are no folds under the area where the the text will go. In this order: Hard flat surface - jacket liner - middle mesh - outer jacket fabric.

2. Measure - Carefully making sure the stencil is at the center with the middle top of the “R” right in the middle and approximately 4 inches below the zipper.
(Since I do this a lot I made a jig that helps me align everything:


3. Apply the Stencil - to that exact spot. I tape the top to the jacket, then flip it over carefully removing the bottom paper, then pressing and adhering the sticky decal to the jacket. Now carefully remove the transfer paper. Use the first non sticky paper to go over all the text making sure all the corners are well pressed and stuck to the fabric. And loose bits, and you risk paint bleeding under the stencil. Now the jacket and surface are ready for the paint.

4. The LOOK - Since I wanted to achieve not just the text but also the texture that can be seen IN the text itself, which is not even and varies in shades and consistency. Early on I realized that this texture seen on the screen worn Kane jacket was there due to the aforementioned mesh lining that exists in every MK3 jacket. The costume department must have screen printed the text in this method, and that is why we can see the mesh “imprint” in the text on Kane’s jacket.
[Photo of the Kane screen used jacket, part of Bob Burns’s collection. Photo thanks to stephen210 . Note the mesh imprint and imperfections in the print. Beautiful!]

The Dallas jacket:

5. The PAINT - In order to achieve this same look, I use Speedball screen printing paint, which is of course intended for this exact purpose. Its fairly cheap and easy to come by. The color is a faded aqua, which I achieved by mixing the white and green paints. This paint is also fairly thick, so the risk of bleeding is low. I recommend testing on the beaver tail scrap fabric.


6. Room for Error - Tape all around the stencil to reduce the risk of getting paint on unwanted places.
7. Apply the Paint - I use a think sponge and hand apply the paint just a little bit at a time with light tapping against the fabric and you should immediately see the texture come out. Too much thick paint and the texture will be lost. This is because I do not want my print to be a uniformly even perfect print. This being said I do think that mine are still too pretty. They need to be even more unevenly applied.
8. Dry - Once you are happy with the paint job, leave the stencil and all on the jacket and let it dry. Ideally in the sun.

9. Heat Treating - After removing the stencil, it is time to follow the paint’s instructions in order to make the print permanent. Also called CUREING. 300-320℉ for about a minute. You can use a hot iron and parchment paper in between. Make sure to cover the entire text.
10. Done!


Dallas:

Kane:

Here is my method for applying the NOSTROMO text on the back of the jackets, I experimented with different methods, but find this the most consistent and produces a result that is close to the screen worn jackets. After dying my jackets close to the correct color, I use a vinyl decal stencil, The ones Banzai88 offers are excellent.
1. The Set-Up - Using a flat hard surface to dress the back of the jacket against, making sure there are no folds under the area where the the text will go. In this order: Hard flat surface - jacket liner - middle mesh - outer jacket fabric.
2. Measure - Carefully making sure the stencil is at the center with the middle top of the “R” right in the middle and approximately 4 inches below the zipper.
(Since I do this a lot I made a jig that helps me align everything:
3. Apply the Stencil - to that exact spot. I tape the top to the jacket, then flip it over carefully removing the bottom paper, then pressing and adhering the sticky decal to the jacket. Now carefully remove the transfer paper. Use the first non sticky paper to go over all the text making sure all the corners are well pressed and stuck to the fabric. And loose bits, and you risk paint bleeding under the stencil. Now the jacket and surface are ready for the paint.
4. The LOOK - Since I wanted to achieve not just the text but also the texture that can be seen IN the text itself, which is not even and varies in shades and consistency. Early on I realized that this texture seen on the screen worn Kane jacket was there due to the aforementioned mesh lining that exists in every MK3 jacket. The costume department must have screen printed the text in this method, and that is why we can see the mesh “imprint” in the text on Kane’s jacket.
[Photo of the Kane screen used jacket, part of Bob Burns’s collection. Photo thanks to stephen210 . Note the mesh imprint and imperfections in the print. Beautiful!]
The Dallas jacket:
5. The PAINT - In order to achieve this same look, I use Speedball screen printing paint, which is of course intended for this exact purpose. Its fairly cheap and easy to come by. The color is a faded aqua, which I achieved by mixing the white and green paints. This paint is also fairly thick, so the risk of bleeding is low. I recommend testing on the beaver tail scrap fabric.
6. Room for Error - Tape all around the stencil to reduce the risk of getting paint on unwanted places.
7. Apply the Paint - I use a think sponge and hand apply the paint just a little bit at a time with light tapping against the fabric and you should immediately see the texture come out. Too much thick paint and the texture will be lost. This is because I do not want my print to be a uniformly even perfect print. This being said I do think that mine are still too pretty. They need to be even more unevenly applied.
8. Dry - Once you are happy with the paint job, leave the stencil and all on the jacket and let it dry. Ideally in the sun.
9. Heat Treating - After removing the stencil, it is time to follow the paint’s instructions in order to make the print permanent. Also called CUREING. 300-320℉ for about a minute. You can use a hot iron and parchment paper in between. Make sure to cover the entire text.
10. Done!
Dallas:
Kane:
Similar threads
- Replies
- 0
- Views
- 295