You are using an out of date browser. It may not display this or other websites correctly.
You should upgrade or use an alternative browser.
You should upgrade or use an alternative browser.
Baylan Skoll / Shin Hati Dark Jedi Costumes - Ahsoka (Series) Star Wars
- Thread starter Peralton
- Start date
Bob
New Member
Thanks! At first, most people would ask if the costume was from an Old Republic game. But by noon when we were out at the Galaxy's Edge park, I would have random people come up and excitedly call out Baylan Skoll. And then the somber discussion about Ray. But it felt great to contribute to sharing in his memory of his last great character. I saw at least one person trying to subtly take a photo of me.Wow! It turned out fantastic! I think you did great for the belt.
The pauldrons do look really good. Matte for sure would work best.
You may be the first person to complete a Baylan cosplay!!!
Excellent outfit for the starcruiser. Nicely done!
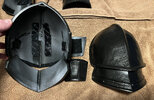
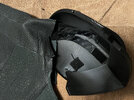
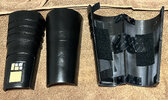
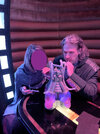
") Its funny they were trying to be sly about it as I wouldn't have cared and they could have even gotten in on it. So there may be some images floating out there in the wild. Here are the close ups of the pauldrons and the gauntlets, in case anyone is solutioning these also. The Pauldrons were printed in 3 pieces. the top section was two and then the guard over the bicep was the third. A lot of prime, sand, bodo, prime and sanding went into merging the top two pieces. But man did that bondo make it strong. You can see how I attached the top to the bicep guard as well as the velcro that I used to attach to the shoulder of the vest so it was hidden from sight. The bicep guard(?) I used waxed thread through the holes and then adhered them to the inside of the upper simply with some of the soft side adhesive velcro. (it was 2am and we flew out at 9a, so I used what I had a ton of) I also cut a thin strip of that soft velcro to line the bottom edge of the top part of the pauldron so the bicep guard didnt bang loudly when moving my arms. The hand guards, seen in between the pauldrons, I simply sewed the rough side of the velcro to a neoprene Under Armor glove and adhered the soft side on underside of the hand guards. Again, doing this allowed me to remove these to eat easier. I still looked ridiculous trying to get fork to mouth with the gauntlets on. Wife had a good laugh. The gauntlets proved more challenging to stay in place. cloth wrist guards with velcro held the gauntlets to the cloth, but couldn't get clothe skin tight, so they sagged on arms. So I created a hinge system with you guessed it, velcro. The shoulders turned out great, and velcro was totally hidden in the 3rd image. Had soft side of velcro facing toward skin and used the rough side to "bridge" the velcro under the vest and under the pauldron. Lessons I learned from the gauntlets were numerous. For starters, sizing was everything. But even with the gauntlets being slightly too small at 100% scale print, the hinge solution did work, albeit a bit scratchy from all the velcro. Also, the gauntlets were printed as 4 pieces, 2 on top and 2 on bottom. Its noticeable when you zoom on images where the seems are. Friends didnt notice when they were on me, but I knew they were there. I also made the mistake of sanding, cleaning and painting before realizing I had forgotten to merge the 2 pieces together. So with only 3 days left, I had to put them together, tape off 2" on either side of the seem, sand down the finish paint, bondo, prime and repaint that area and seal it. I would start with these being only 2 pieces, front and back. Then I would also take the area where I think it will end up being LEDs on the gauntlet and custom carve out a place for the apple watch on one and the Disney Magic Band on the other. Because, man that was a pain in the ass to constantly pull the Magic Band out of one of the only pockets I had on that thing. Possibly, run that waxed thread from inside the gauntlets up under the arm sleeve to attach inside shoulder of vest to keep it from falling. movement isnt bad, but the sliding down forearm, it kept rubbing on the top part of the hand guards. A lot of decisions were made based on shortened timeline. If I had found the 3D printer at the 30 day out mark, I could have addressed nearly all of this. Im guessing for those of you that this isn't their first rodeo at making costumes, you already knew most of this. Also, 30 days wasnt enough time for me to grow a beard as magnificent as Ray's in the show, that being from when my wife and her friend told us we were actually able to book the Starcruiser and when we went. It was still an amazing time and this time around nearly everyone at the Starcruiser was dressed up vs half of the people last year. You could tell everyone that was there knew it was their last and boy was it a party. Saw one dude drinking the Krayt Reactor, a special drink meant for 4 people in the Sublight Lounge, by himself. I had half of that thing and was feeling it (pictured below, had long hair last year). The Sublight Lounge bar tabs on that last night were insane.
Its funny they were trying to be sly about it as I wouldn't have cared and they could have even gotten in on it. So there may be some images floating out there in the wild. Here are the close ups of the pauldrons and the gauntlets, in case anyone is solutioning these also. The Pauldrons were printed in 3 pieces. the top section was two and then the guard over the bicep was the third. A lot of prime, sand, bodo, prime and sanding went into merging the top two pieces. But man did that bondo make it strong. You can see how I attached the top to the bicep guard as well as the velcro that I used to attach to the shoulder of the vest so it was hidden from sight. The bicep guard(?) I used waxed thread through the holes and then adhered them to the inside of the upper simply with some of the soft side adhesive velcro. (it was 2am and we flew out at 9a, so I used what I had a ton of) I also cut a thin strip of that soft velcro to line the bottom edge of the top part of the pauldron so the bicep guard didnt bang loudly when moving my arms. The hand guards, seen in between the pauldrons, I simply sewed the rough side of the velcro to a neoprene Under Armor glove and adhered the soft side on underside of the hand guards. Again, doing this allowed me to remove these to eat easier. I still looked ridiculous trying to get fork to mouth with the gauntlets on. Wife had a good laugh. The gauntlets proved more challenging to stay in place. cloth wrist guards with velcro held the gauntlets to the cloth, but couldn't get clothe skin tight, so they sagged on arms. So I created a hinge system with you guessed it, velcro. The shoulders turned out great, and velcro was totally hidden in the 3rd image. Had soft side of velcro facing toward skin and used the rough side to "bridge" the velcro under the vest and under the pauldron. Lessons I learned from the gauntlets were numerous. For starters, sizing was everything. But even with the gauntlets being slightly too small at 100% scale print, the hinge solution did work, albeit a bit scratchy from all the velcro. Also, the gauntlets were printed as 4 pieces, 2 on top and 2 on bottom. Its noticeable when you zoom on images where the seems are. Friends didnt notice when they were on me, but I knew they were there. I also made the mistake of sanding, cleaning and painting before realizing I had forgotten to merge the 2 pieces together. So with only 3 days left, I had to put them together, tape off 2" on either side of the seem, sand down the finish paint, bondo, prime and repaint that area and seal it. I would start with these being only 2 pieces, front and back. Then I would also take the area where I think it will end up being LEDs on the gauntlet and custom carve out a place for the apple watch on one and the Disney Magic Band on the other. Because, man that was a pain in the ass to constantly pull the Magic Band out of one of the only pockets I had on that thing. Possibly, run that waxed thread from inside the gauntlets up under the arm sleeve to attach inside shoulder of vest to keep it from falling. movement isnt bad, but the sliding down forearm, it kept rubbing on the top part of the hand guards. A lot of decisions were made based on shortened timeline. If I had found the 3D printer at the 30 day out mark, I could have addressed nearly all of this. Im guessing for those of you that this isn't their first rodeo at making costumes, you already knew most of this. Also, 30 days wasnt enough time for me to grow a beard as magnificent as Ray's in the show, that being from when my wife and her friend told us we were actually able to book the Starcruiser and when we went. It was still an amazing time and this time around nearly everyone at the Starcruiser was dressed up vs half of the people last year. You could tell everyone that was there knew it was their last and boy was it a party. Saw one dude drinking the Krayt Reactor, a special drink meant for 4 people in the Sublight Lounge, by himself. I had half of that thing and was feeling it (pictured below, had long hair last year). The Sublight Lounge bar tabs on that last night were insane.Attachments
Bob
New Member
Thank you. As before, if anyone has questions on building it out, I am happy to provide more details. I was worried I already flooded this page with too much text. Also, found this site that will actually print the stl files for you and look identical to the ones off the 3Demon site I paid someone else to print (though his needed a lot of sanding and finishing): Baylon Skoll - Ahsoka Dark Jedi ArmorThis costume inspires me for whole new options
Missing the belt buckle, ring, greebles for the gauntlets and the saber. But a huge time savings if they do in fact print at a quality that will require little or no sanding.
Peralton
Well-Known Member
Hi, everyone!
I was finally able to grab some high quality screenshots of Baylan and Shin from the first full-length trailer (previous shots are from the teaser). Of most interest is a great shot of the back of Baylan's costume without the cloak as well as better detail of the trim around his hood. Many details!
I hope this helps!!


.png")
.png")
.png")
And some details of Shin, including a bit more of her gloves and greaves.


.png")
I was finally able to grab some high quality screenshots of Baylan and Shin from the first full-length trailer (previous shots are from the teaser). Of most interest is a great shot of the back of Baylan's costume without the cloak as well as better detail of the trim around his hood. Many details!
I hope this helps!!
And some details of Shin, including a bit more of her gloves and greaves.
4str0m3ch
Active Member
Oooh, is that a A-180?Two new images from Entertainment Weekly!
Nice cord detail on Baylan's collar.
View attachment 1725742
Half-useful view of Shin's greaves and shin guards.
View attachment 1725743
corby
New Member
The robes seen in Rosario's IG post aren't part of their costume. Lucasfilm is big about keeping things under wraps so when going to and from set the actors wear these robes over the top of everything. You can see Mando wearing one in this shotI had the same thoughts that based on some of the trailer stills as he raised his arm. The thing that made me question it, and it could very well be a mistake on the crew's part or maybe he has a robe too (unfortunately, the show airs after our trip), was the IG photo Rosario posted. If you look under his left arm behind Ivanna Sakhno, you can see his arm out and away from his body and the planter(?) both under and behind his shoulder.
So don't worry, you don't need a robe and a cloak, Baylan just has the cloak.
CleverThe robes seen in Rosario's IG post aren't part of their costume. Lucasfilm is big about keeping things under wraps so when going to and from set the actors wear these robes over the top of everything. You can see Mando wearing one in this shot
View attachment 1726473
So don't worry, you don't need a robe and a cloak, Baylan just has the cloak.
I love the shoulder armor..The Star Wars twitter account put out some new character posters today:
View attachment 1726663
View attachment 1726664
Peralton
Well-Known Member
One of the best shots of him yet! I've been looking for a good 4k version of that trailer to grab a picture with good detail.
Peralton
Well-Known Member
I had not seen those yet! Lovely!!!! Thanks for sharing!!!The Star Wars twitter account put out some new character posters today:
View attachment 1726663
View attachment 1726664
Peralton
Well-Known Member
Thanks so much for these HQ images! The frayed parts at the bottom of Shin's outfit was fascinating to see. I'd been avoiding trailers, myself, since I'm behind on the canon, but at least I think I can mock up her top from the references here.
You should totally have enough to get started on Shin's outfit. Can't wait to see it!
beardedoscar
New Member
I’m working on a costume as well. I used a print model for the armor. Primed first, then used black enamel and sanded w/ 3000 grit to take the sheen off and let a little of the grey show through.
Also working omwh the tunic, I’m using stretch faux suede and braided cord. I’ll have to find a way to weather it a bit, but it’s a start.
Any feedback welcome!


Also working omwh the tunic, I’m using stretch faux suede and braided cord. I’ll have to find a way to weather it a bit, but it’s a start.
Any feedback welcome!
Last edited:
beardedoscar
New Member
This is great. Do youWell, we finished the costume in time for our Starcruiser voyage. 2 weeks of sewing and sanding and inhaling bondo dust. The hook I made for the 3D printed lightsaber didnt secure it and within the first hour, wife and I were walking and it fell off and landed in front of her boot. Saw and heard the crunch and knew it was over for that thing. Also, wished I had more time to find a better finish. The black I used was Rustoleum Hammered Black and the Matte clear finish. Came out shinier than I was hoping, but didnt have time to correct. I would do Matte Black instead. The belt was a challenge, but figured how to cheat the folded lower belt look. Riveted 2 pieces (short piece with finish facing inward and long piece with finish facing out) Allowed me to loop it. Though I spent 30 mins trying to remove a rivet when I did it incorrectly the first time. Then for the upper belt, I simply used velcro to attach the 3D printed buckle and used riveted posts to open and close belt loop. Since we knew I would be wearing this FL 90+ heat and 70+ humidity for one day, the base layer of the shirt and pants was a gauze like material, then the tabard was a two-piece. Top was a vest, 2nd layer, that was used to attached the pauldrons with a velcro hanging setup for mobility. The top layer was distressed leather sewn vest we got lucky finding at a fabric warehouse. We attached the bottom half of the tabard to the obi fabric under the belts as a velcro'd skirt of sorts. this allowed for mobility but also for fast removal if needed. The gauntlets were the most difficult to keep in place. We tried a fabric forearm wrap with velcro to attach to the gauntlets, but they would sag. The being because the gauntlets were printed as front and back side. Ended up just creating a velcro hinge setup inside the gauntlets. The were also a tad too small for my forearms. But we ran out of time to reprint. If you use the stl files that were linked earlier, I would tell you to upscale to at least 105% if you have slight larger forearms and are 5'9" ish. The 110% scale was a little too large and the printer cut off the section near the elbow joint. I have more photos and info on the making of this if anyone is curious. It was my first time making a costume from scratch. Learned a lot. Like dont try to do this in 2 weeks. let me know
Thanks for sharing. Do you have any pictures of the back of the tunic? I’ve been trying to gather glimpses from trailers. It seems like the same pattern of the front is repeated on the back.Well, we finished the costume in time for our Starcruiser voyage. 2 weeks of sewing and sanding and inhaling bondo dust. The hook I made for the 3D printed lightsaber didnt secure it and within the first hour, wife and I were walking and it fell off and landed in front of her boot. Saw and heard the crunch and knew it was over for that thing. Also, wished I had more time to find a better finish. The black I used was Rustoleum Hammered Black and the Matte clear finish. Came out shinier than I was hoping, but didnt have time to correct. I would do Matte Black instead. The belt was a challenge, but figured how to cheat the folded lower belt look. Riveted 2 pieces (short piece with finish facing inward and long piece with finish facing out) Allowed me to loop it. Though I spent 30 mins trying to remove a rivet when I did it incorrectly the first time. Then for the upper belt, I simply used velcro to attach the 3D printed buckle and used riveted posts to open and close belt loop. Since we knew I would be wearing this FL 90+ heat and 70+ humidity for one day, the base layer of the shirt and pants was a gauze like material, then the tabard was a two-piece. Top was a vest, 2nd layer, that was used to attached the pauldrons with a velcro hanging setup for mobility. The top layer was distressed leather sewn vest we got lucky finding at a fabric warehouse. We attached the bottom half of the tabard to the obi fabric under the belts as a velcro'd skirt of sorts. this allowed for mobility but also for fast removal if needed. The gauntlets were the most difficult to keep in place. We tried a fabric forearm wrap with velcro to attach to the gauntlets, but they would sag. The being because the gauntlets were printed as front and back side. Ended up just creating a velcro hinge setup inside the gauntlets. The were also a tad too small for my forearms. But we ran out of time to reprint. If you use the stl files that were linked earlier, I would tell you to upscale to at least 105% if you have slight larger forearms and are 5'9" ish. The 110% scale was a little too large and the printer cut off the section near the elbow joint. I have more photos and info on the making of this if anyone is curious. It was my first time making a costume from scratch. Learned a lot. Like dont try to do this in 2 weeks. let me know
Peralton
Well-Known Member
This picture from tghe 2nd trailer has the best view yet of the back of the tunic.This is great. Do you
Thanks for sharing. Do you have any pictures of the back of the tunic? I’ve been trying to gather glimpses from trailers. It seems like the same pattern of the front is repeated on the back.
The pattern copies the chevrons from the front, with the addition of a zipper (or some sort of closure, but I bet it's a zipper) and some diamond-shaped decorations.
The pauldrons look fantastic!!! Really nicely done. I think you have captured the texture really well.I’m working on a costume as well. I used a print model for the armor. Primed first, then used black enamel and sanded w/ 3000 grit to take the sheen off and let a little of the grey show through.
Also working omwh the tunic, I’m using stretch faux suede and braided cord. I’ll have to find a way to weather it a bit, but it’s a start.
Any feedback welcome!View attachment 1727518View attachment 1727519
The tunic looks to be coming along really nicely!
Similar threads
- Replies
- 4
- Views
- 787
- Replies
- 3
- Views
- 1,068
- Replies
- 12
- Views
- 869
- Replies
- 1
- Views
- 1,339