ItsThatGuy
Sr Member
Thanks for those pics! I was thinking about making one and putting it on my keyring...I wonder if I could get through airport security with one.
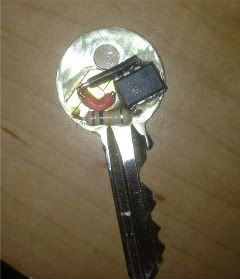
Its not a Yale key actually, its an ERA key, as for style and number I would have to look that up, but there was a group run for these a couple years back.
Those are your Keys Birdie? Sweeeet! Great job!
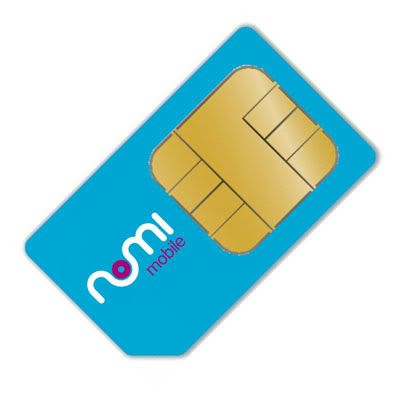
I believe so. Regular (lead-based) solder likely would not stick to the material of the key. There does seem to be a blob of solder on the end of the red wire where it connects to the gold SIM card contact pad.a) It looks as if the components are attached to the key with a clear epoxy, as opposed to solder. Is this correct?
The key blank is a standard Yale 8 or Y1 (different name same key way) 5 pin blank the one's used on the show are not Yale original blanks but nickel plated knock offs (Yale originals are brass in color) The heads of these keys have been filed so that you can not tell the brand name (It's probably Taylor, Ilco or ESP) Ive been a locksmith for 25 years, I know from whence I speak. I was also a professional prop maker for 2 years. It's obvious from the picture of the three together that continuity was not up to par because there are different Ohm resistors on each key as well as the solder points being off kilter.
that's exactly what I was thinking!


Ok...a bit of a necro-post/bump...but here's my meager attempt at this prop...


and then of course add that strange sealed look to it. I'm thinking I might do that with Future Floor Polish since that has a high gloss and durable finish to it when dry.
May I suggest you just get some 20-30 minute clear epoxy (look at the stuff, some has a yellow tint some doesn't it's not a huge issue but it will slightly alter the color) anyway mix some up and use a toothpick to pick up small drops of it and dabble it on the key... It will self level and slighlty dome up, as long as you don't put too much on it won't spill over the edge due to it's surface tension... You can work it around with the toothpick as well...
And now the reason I suggest 20-30 minute epoxy, after you have it all spread out, take a small bowl and cover it, let it sit for 5 minute and then return with a heat gun or a hairdryer on low air but hot heat (or even a butane torch)... Using the heat source swipe over the key a few times, this will pop any bubbles that have risen to the top... Cover with the bowl again and wait 5 minutes again, repeat the heat... You cover it to keep out settling airborne dust...
The end product should be a visibly bubble free clear coat, and look just like the original...
Neat idea but I'm not a fan of that method and here's why. Epoxy can be messy and the process would take too long. I'm thinking they did fast and dirty here. Also epoxy can be too thick and based on the actual size of these parts won't be as thin or subtle as something as thin as Future. I'm guessing they assembled the parts off the key and soldered it all together then glued it on, then sealed it with some sort of clear coat. I think the yellow coloring is the brass/steel alloy of the metal the key is made of. Once the chrome plating is sanded off to blank the key it will have a yellow-ish tint to it. Future is pretty hard stuff and is an old modellers secret. It drys pretty fast and hard and can be controlled easier as a liquid that epoxy can't. I think I'm going to try the Future in an experiment but I really think that's my best bet for this one.
while the chip is an 8-pin DIL. It could be either a 555 or a 741 Op-Amp IC. But I would like to guess its a 555 too.
I'm well aware of what future is, it's a water like viscosity acrylic clear coat... As for the epoxy being messy, I beg to differ, what I described is how a vast majority of all clear DIY jewelry is made... I have done it more times than I care to count and I would never once call it messy, in fact the heavy viscosity of the epoxy makes it a charm to work with... I would easy argue it's easier to control than Future in this application... I would also argue that the clear is not really subtle, it's quite obvious and to me, even the slight doming effect is evident as you see no height transition from the key's surface to the smart card pad, suggesting that it's easy applied thicker than the smart card pads height... As for taking too long, I honestly don't think that 10-15 minutes of my time is too long, just like Future most of the time is going to simply be waiting for it to dry, and that is hardly time I would be concerned about...
But, it's your prop you can do whatever you feel is appropriate...
It looks to me like they just soldered the parts together off of the key, brushed clear epoxy on the key face and stuck everything to that (brushing the epoxy over the contact pad. It does not look like there is any kind of clear coat on the parts just under them (the chip and the resitor don't seem to have any king of coating on them) and it looks like the middle of the contact is missing whatever the coating is over the edges of it.
I am not thinking the clear coating was a deliberate step on this prop. From the looks of that original key I bet they just glued the parts down brushed it over the pad and called it a day. You can see where the epoxy got on half of the black wire but not the other half while covering the pad.
It looks like they roughed up the key surface with some sand paper to make the epoxy stick to the surface better.
