Free Guy “Guy” Costume

Quick note on the round Garrett Leight opticals, they are out of production/discontinued and not many are left. I visited one of their stores and was able to purchase their last remaining pair at that location, so if you’re able to snag one, I’d recommend doing it soon.
 
Quick note on the round Garrett Leight opticals, they are out of production/discontinued and not many are left. I visited one of their stores and was able to purchase their last remaining pair at that location, so if you’re able to snag one, I’d recommend doing it soon.
You want OOP and hard to find? Try looking for Tony Stark's glasses. Some of those sell so fast! Last week I was actually looking at Ebay listings the moment a pair of Persol 2430 hit... they sold before I could finish loading the listing page on my phone!
 
  • Wow
Reactions: JPH
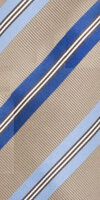
For anyone that's running into the issue of the exact tie design being out of stock, I managed a pretty solid but not perfect workaround. I created a copy of the pattern based on the photos I had and then used several of these layered on a "custom printed ties" site, there is a bunch of them out there, but I used Zazzle.

I think my proportions were slightly off on mine as the lines are a bit thicker, and one slighyl misaligned layer but it honestly came up better than I expected.


1632102928950.png
 

Attachments

  • Freeguytieedit2.jpg
    Freeguytieedit2.jpg
    103.4 KB · Views: 125
Quick note on the round Garrett Leight opticals, they are out of production/discontinued and not many are left. I visited one of their stores and was able to purchase their last remaining pair at that location, so if you’re able to snag one, I’d recommend doing it soon.
I found a NIB pair on Ebay for somewhat under retail, got some old-school GLCO factory clip-ons they put out for these in the deal as well, quite a bit classier than a sheet of lens-shaped plastic.
 
Did some 3D modeling and printing today, trying to fix up the glasses I bought to look more like the Garrett Leight Kinney Combo frames:

Left Frame 1.png


Printed in transparent PLA and sanded:

20210920_193854.jpg


And after a quick and dirty proof-of-concept with some Sharpies:

20210920_203444.jpg


The real glasses for comparison:
Kinney Combo 1.png


I haven't screwed it in place yet, the new rim's just resting in place in the pics. I need a smaller drill bit for the two screws on the back - I modeled the front screw head since it's too close to the actual screw hole in the back. I lost detail on the screw when printing, had to add it back after. I'm pretty happy with the results so far. I plan on altering and painting the metal frame as well, and grinding down the original lenses to fit the new frames.
 
Last edited:
Did some 3D modeling and printing today, trying to fix up the glasses I bought to look more like the Garrett Leight Kinney Combo frames:

View attachment 1496332

Printed in transparent PLA and sanded:

View attachment 1496329

And after a quick and dirty proof-of-concept with some Sharpies:

View attachment 1496330

The real glasses for comparison:
View attachment 1496333

I haven't screwed it in place yet, the new rim's just resting in place in the pics. I need a smaller drill bit for the two screws on the back - I modeled the front screw head since it's too close to the actual screw hole in the back. I lost detail on the screw when printing, had to add it back after. I'm pretty happy with the results so far. I plan on altering and painting the metal frame as well, and grinding down the original lenses to fit the new frames.
Those glasses looks amazing! Good job!
 
So gave up on my cup and ended up making something similar or "good enough", will be more useful as well ;)

Travel mug that looks close enough to a take away cup for me. Quick design in PS dumped onto a new redbubble profile as I'm not a fan of their platform.

1633379560564.png
 
Dyed my laces to match my shoes better. Turned out great, especially because I just guessed on the proportions of water, dish soap & dye, and how long to dye them. I used brown Ritt Dye More, and the directions are for larger items, so that's why I guessed. I only dunked the laces in for a few seconds, took them out, rinsed them well and let them dry.

Went from this:

20211005_022436.jpg


To this:

20211005_022027.jpg
 
I ordered a new name badge on Amazon from the same retailer, lasercrafting.com, but I went through the regular buying customizer instead of ordering their pre-configured "GUY" tags. It's the same blue/white color and I chose Verdana as the font (which isn't exact, but pretty close), but I specified 3" x 1.5". Here's a comparison of the rwo:

20211006_181929.jpg


Pic of screen worn badge for comparison:

20210821_171406.jpg


Not only is the tag now the correct ratio, but the name is closer to the right size too, slightly smaller than the old badge.

There was a small hiccup in the process as they mistakenly sent out another tag just like the old one, with the wrong size, but I messaged and they apologized and sent out the new one right away, no extra charge, didn't even have to return the wrong one. All in all, I'm glad I ordered the new one.
 
Last edited:
Pics of my final costume (sorry about the quality). My coffee cup is my own version, which I printed on a standard home ink jet printer on standard paper, and glued to a 16 oz cup from a pack of plain, white paper coffee cups from Walmart (I also sprayed it with Krylon clear gloss acrylic paint to seal it, so it wouldn't bleed if it got wet. I'm still tweaking it, but when it's finished, I'll post it here for others to use. One thing I noticed when I rewatched Free Guy is that the word "COFFEE" appears on two sides of the cup.

20211019_024135.jpg
20211018_212804.jpg
 
I managed to get the tie when it was back in stock for a short time, but it came like this:
F7B46535-FDD4-4176-8991-45CD4C1E88A8.jpeg

The lines were misprinted. I will likely just keep the tie, since I don’t want to go through the process of returning/exchanging it and potentially not having it for completion/display this month. I will most likely use this for the time being until I can get another one, they’re cheap enough that I don’t feel the hassle worth much.
 
I ordered a new name badge on Amazon from the same retailer, lasercrafting.com, but I went through the regular buying customizer instead of ordering their pre-configured "GUY" tags. It's the same blue/white color and I chose Verdana as the font (which isn't exact, but pretty close), but I specified 3" x 1.5". Here's a comparison of the rwo:

View attachment 1501114

Pic of screen worn badge for comparison:

View attachment 1501116

Not only is the tag now the correct ratio, but the name is closer to the right size too, slightly smaller than the old badge.

There was a small hiccup in the process as they mistakenly sent out another tag just like the old one, with the wrong size, but I messaged and they apologized and sent out the new one right away, no extra charge, didn't even have to return the wrong one. All in all, I'm glad I ordered the new one.
I believe the font on the nametag is Frutiger.
Now that I'm looking at it, I think the coffee cup is Frutiger, too.
 
Well, just broke out my steelbox copy of the movie. Still, it really is THAT GOOD. Reeling Buddy in for a hug, just the bestest!!
Millie realizing why Keys wrote the code. :)

Oh, and stuff BLOWIN' UP!!!!
 
Here's the coffee cup graphic I made that I said I'd post. I made a couple adjustments, but I don't have time to print it again to check if it's perfect. But I figured I'd post it here in case anyone wants to try to use it - I just don't want to see it show up for sale on Etsy or something. I figured it was a collaborative effort here so no one can claim ownership of something like this, even if I worked on this particular version.
As I said before, print it out, trim around the orange area, and affix it to a 16 oz paper coffee cup. I used standard inkjet printer paper and a normal glue stick. I did spray the whole front of the paper with Krylon clear coat (for paper and other materials) to protect it and give it a nice sheen. But you could print it onto self-adhesive paper or vinyl or whatever. I left the bottom and side long so it's easier to make sure it lines up and covers the whole cup fully. You can trim it if you want, but I just rolled the excess over on the bottom and glued it to the bottom of the cup and it worked well.
Enjoy!
COFFEE CUP Template.jpg
 
Here's the coffee cup graphic I made that I said I'd post. I made a couple adjustments, but I don't have time to print it again to check if it's perfect. But I figured I'd post it here in case anyone wants to try to use it - I just don't want to see it show up for sale on Etsy or something. I figured it was a collaborative effort here so no one can claim ownership of something like this, even if I worked on this particular version.
As I said before, print it out, trim around the orange area, and affix it to a 16 oz paper coffee cup. I used standard inkjet printer paper and a normal glue stick. I did spray the whole front of the paper with Krylon clear coat (for paper and other materials) to protect it and give it a nice sheen. But you could print it onto self-adhesive paper or vinyl or whatever. I left the bottom and side long so it's easier to make sure it lines up and covers the whole cup fully. You can trim it if you want, but I just rolled the excess over on the bottom and glued it to the bottom of the cup and it worked well.
Enjoy!
View attachment 1506833
Thanks!
 
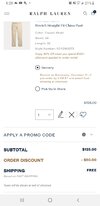
I believe I’ve found Guy’s pants from the start of the film, they appear to be Ralph Lauren chinos, the straight fit in particular:
View attachment 1490265
View attachment 1490264
View attachment 1490266
View attachment 1490267View attachment 1490268View attachment 1490269

They’re still available, unchanged from the film here: Stretch Straight Fit Chino Pant
Definitely more affordable than the Rag and Bone pair.
Happy Turkey Day!

Pants are on sale for 2 days
 

Attachments

  • Screenshot_20211125-062820_Samsung Internet.jpg
    Screenshot_20211125-062820_Samsung Internet.jpg
    305.3 KB · Views: 123
Back
Top