I used Mr Surfacer 500 first just to glue everything in place (on top of the CA glue) then I’ve been using perfect plastic putty. I’ve found that it isn’t perfect - probably because I’m using fairly flexible sanding sticks I’ve found that I’m still left with a “dent” where the putty was even if I sand carefully. I assume this is because the plastic is much harder than the putty. I’m going to try again with Mr Surfacer 500 as it does get very hard but sands well. Would appreciate any tips though!
You are using an out of date browser. It may not display this or other websites correctly.
You should upgrade or use an alternative browser.
You should upgrade or use an alternative browser.
Hasbro U-Wing modification
- Thread starter Analyzer
- Start date
Im glad the wings worked out. I worked for a while on those dxf files ;-). Looks goodThe wings look great! I am glad they worked well!
Just installed the cockpit consoles (side and front) with a little light box for the front one. Light leaks sealed up with Mr Surfacer 1200, and by using aluminium tape on the reverse sides of the styrene.
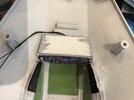
One thing which complicates this is that all of the undersides of this will be visible through the bottom windows, and from the passenger bay, so I can’t just leave it looking raw as I usually would for a cockpit

One thing which complicates this is that all of the undersides of this will be visible through the bottom windows, and from the passenger bay, so I can’t just leave it looking raw as I usually would for a cockpit
Analyzer
Master Member
Just installed the cockpit consoles (side and front) with a little light box for the front one. Light leaks sealed up with Mr Surfacer 1200, and by using aluminium tape on the reverse sides of the styrene.
View attachment 1381661
One thing which complicates this is that all of the undersides of this will be visible through the bottom windows, and from the passenger bay, so I can’t just leave it looking raw as I usually would for a cockpit
I love using that aluminum tape for light blocking. It also has the duel purpose of taping down the wiring in addition to light blocking and it fits complex shapes nicely
Last edited:
And on top of all that it helps to diffuse the light from LEDs by bouncing it around inside the light box! Great stuff.I love using that aluminum tape for light blocking. It also has the duel purpose taping down the wiring un addition to light blocking and it fit complex shapes nicely
I feel like I made some good progress on this lately. All the electronics are now finished and installed. I nearly set the thing on fire by wiring up the flasher chip for the cannons wrongly...otherwise all working well.
Installed the battery under the floor, and glued the floor panels on top. I had to put silver tape under the panels as you could see the bright blue battery underneath.
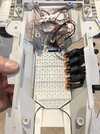
I ran the wires from the front consoles down the sides, and stuck them down with thin CA. If I had thought about it I would've run the black wires down the other side, so they're less visible with the side door open. Never mind.
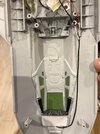
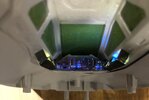
At this point I wanted to make sure that the door still fits on with everything else inside. Since I want it to be able to close, I used 8 little magnets, two sets to hold it in the closed position and two sets to hold it open, on the outside. They're about 1mm thick so hopefully won't look too bad once its painted.
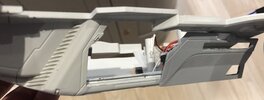
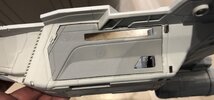
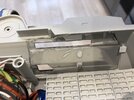
I also cut out the windows for the front lower section of the cockpit and for the side doors, from .5mm clear plastic. The next stage is to put the front and rear bulkheads in. Oh, I also put in the LEDs to light up the rear bulkhead:
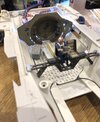
Installed the battery under the floor, and glued the floor panels on top. I had to put silver tape under the panels as you could see the bright blue battery underneath.

I ran the wires from the front consoles down the sides, and stuck them down with thin CA. If I had thought about it I would've run the black wires down the other side, so they're less visible with the side door open. Never mind.


At this point I wanted to make sure that the door still fits on with everything else inside. Since I want it to be able to close, I used 8 little magnets, two sets to hold it in the closed position and two sets to hold it open, on the outside. They're about 1mm thick so hopefully won't look too bad once its painted.


I also cut out the windows for the front lower section of the cockpit and for the side doors, from .5mm clear plastic. The next stage is to put the front and rear bulkheads in. Oh, I also put in the LEDs to light up the rear bulkhead:

Last edited:
Beautiful work! I always look forward to these updates. I need to get started on mine!
Not much of an update, but I would was just watching Rogue one again and I noticed one thing - the landing gear placement on this model is completely wrong. It looks like the front landing gear comes out of the wings, and the rear comes from the sides of the main body, not the engines as in this toy. Which actually is good, as it means I can abandon my abortive attempt at making the landing gear work and just cover up the gear bays with styrene!
I also bought the Star Wars legion Bistan gunner figure on the basis that he would be good to put in the open doorway of the ship. I worked out two things: one is that the legion figures are even bigger than 1/46 (I think?) and the other is that the cutaway picture of the U-wing in the rogue one book is probably not quite in scale to the film. In the film Cassian and Jyn have to bend down to get into the U-wing side door, whereas in the rogue one book the door gunner is standing upright with his gun out the door.
I also bought the Star Wars legion Bistan gunner figure on the basis that he would be good to put in the open doorway of the ship. I worked out two things: one is that the legion figures are even bigger than 1/46 (I think?) and the other is that the cutaway picture of the U-wing in the rogue one book is probably not quite in scale to the film. In the film Cassian and Jyn have to bend down to get into the U-wing side door, whereas in the rogue one book the door gunner is standing upright with his gun out the door.
Not much of an update, but I would was just watching Rogue one again and I noticed one thing - the landing gear placement on this model is completely wrong. It looks like the front landing gear comes out of the wings, and the rear comes from the sides of the main body, not the engines as in this toy. Which actually is good, as it means I can abandon my abortive attempt at making the landing gear work and just cover up the gear bays with styrene!
I also bought the Star Wars legion Bistan gunner figure on the basis that he would be good to put in the open doorway of the ship. I worked out two things: one is that the legion figures are even bigger than 1/46 (I think?) and the other is that the cutaway picture of the U-wing in the rogue one book is probably not quite in scale to the film. In the film Cassian and Jyn have to bend down to get into the U-wing side door, whereas in the rogue one book the door gunner is standing upright with his gun out the door.
Any new updates on your U-Wing?
I’m afraid it’s been on the shelf for quite a bit. I got round to fitting the rear bulkhead inside the main bay, which ended up taking a lot more work than expected. For some reason it didn’t fit at the top, I think because I hadn’t properly taken into account the depth of the floor panels which are now in place when I printed the bulkhead piece. It is also weirdly off-centre, which I can’t work out, as it looks perfectly symmetrical.Any new updates on your U-Wing?
Anyway - I got it in place and I need to figure out one of two things: how to print a new piece that fits better (I can’t currently do this as my Elegoo Saturn is currently waiting for a new screen as there was a resin leak onto the screen through a hole in the FEP, and nowhere seems to stock the replacement screens) or how to fill the gaps around the bulkhead without it looking awful.
I think I’m going to have to go with option 2, given that there seems to be no prospect of fixing the Saturn any time soon. Plus I’ve already spent quite some time painting and installing LEDs for the bulkhead which I don’t fancy repeating.
Anyway, thanks for the reminder, I really do want to finish this one off and there’s not a lot to be done now before I can seal the hull and start painting! I’m pretty much decided on this paint scheme:
I love that paint scheme and I think it will look great! I haven’t even started mine yet so you are still way ahead of me. Thanks for the update, I am glad to hear it is still in progress and hope you figure out those issues soon.
