You are using an out of date browser. It may not display this or other websites correctly.
You should upgrade or use an alternative browser.
You should upgrade or use an alternative browser.
Making the Carlyle Elysium SMG
- Thread starter scornflake
- Start date

And pop, it's awesome. However, I think the one on the movie prop has "authentic battle damage" on the lower right corner. Maybe just the angle of the pic.Filled in the white/missing parts with a fine art line pen. Here’s the result.
For sure. None of these are weathered yet. I suppose that's also a matter of taste too. The more I stare at the props the more I see that the gold one is "utterly fecked". The others are far more mild, weather wise.And pop, it's awesome. However, I think the one on the movie prop has "authentic battle damage" on the lower right corner. Maybe just the angle of the pic.
The bleed was the trick for sure, looking great.For sure. None of these are weathered yet. I suppose that's also a matter of taste too. The more I stare at the props the more I see that the gold one is "utterly fecked". The others are far more mild, weather wise.
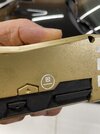
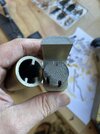
Time I think to glue the sight rails on. Want to ensure they seat well (there’s a groove they sit in) and flat. Hmmm. Where’s a straight, flat bit of metal?

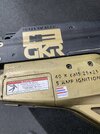
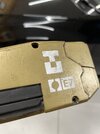
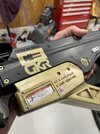
This hints at no clear vinyl on that sticker, because of the way you phrased it? If so and the solvent in the clear affects the color of the print, you just proved why testing is awesome.I’ve gloss cleared my test piece. So far so good! I can see a bit of motteling on the danger sticker, but I think this is just the clear before it’s set. Only painted 10m ago.
This is already goosebump worthy. Looking GREAT!More stickers. This time with a little weathering. Not tooooo much.
Just need my black vinyl to show up, then can cut the last sticker.
In this case, I think that's true. For the stickers I'm putting onto the gun, I did clear them.This hints at no clear vinyl on that sticker, because of the way you phrased it? If so and the solvent in the clear affects the color of the print, you just proved why testing is awesome.
(opps - I should have tested that)
Here's (cough cough) a test (aka: the actual real finals)
I have horror stories of grabbing the production part when I thought I was holding my test material.In this case, I think that's true. For the stickers I'm putting onto the gun, I did clear them.
(opps - I should have tested that)
Here's (cough cough) a test (aka: the actual real finals)
View attachment 1911988View attachment 1911989
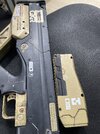
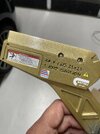
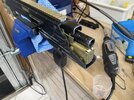
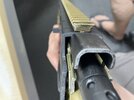
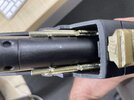
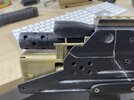
Final assembly of the front barrel parts...
Attachments
-
 IMG_2012.jpeg1.9 MB · Views: 31
 -
 IMG_2011.jpeg1.7 MB · Views: 33
 -
 IMG_2010.jpeg1.2 MB · Views: 30
 -
 IMG_2009.jpeg1.3 MB · Views: 28
 -
 IMG_2008.jpeg1.2 MB · Views: 31
 -
 IMG_2007.jpeg1.4 MB · Views: 28
 -
 IMG_2022.jpeg2.9 MB · Views: 28
 -
 IMG_2021.jpeg2.9 MB · Views: 29
 -
 IMG_2019.jpeg2.3 MB · Views: 28
 -
 IMG_2018.jpeg2.4 MB · Views: 28
 -
 IMG_2017.jpeg3.3 MB · Views: 32
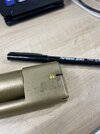
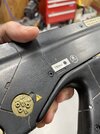
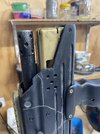
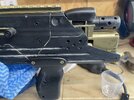
I love the removeable charge pack.
Hah! where do you see this? I didn't create it intentionally!
Hah! where do you see this? I didn't create it intentionally!
You play this right and you can add a couple contact points on the sides and tell people that if they pull it out wrong it will shock them and of course it will shock them.... because it will every time regardless. Or you could put some real batteries in there and add a sound pack that does the capacitor charge whine when you plug it in to the gun. Oooooor you could call it done and ignore the peanut gallery because some projects could live forever.
I love how he totally dominates a replica project like this, ready to be a stand in prop for retakes, and it is just ho hum like just anyone could pull this off. I can't say it enough, designing is a crazy skill set, designing a replica means even your audience knows how to pick you apart because it isn't just a new thing they have never seen, but designing a replica and then making said replica AND assembling AND painting AND adding accessory decorations (also self created) AND weathering....... I have more AND to and and more .... to .... so just accept the compliment or I will go on. Great project and wondering if you are sucker enough to ask the group for another suggestion?This is why I'm on this thread: lots of things you did (experimenting with paint, labels, etc...) to show us your tribulations and for us to soak all of that knowledge for ourselves...my question is: "Am I a vampire?"")
Before I am stupid enough to ask for more suggestions (which I am well stupid enough to do!)
On and 'green', to your comment re batteries and never ending. Yes. Never ending! (I did actually consider all this - the sight is hollow for a reason, and the switch area is modelled from a real part).
I have put it up on my etsy page, but I want to be careful not to overstep bounds here. I've put up a post in the Project Runs forum for anyone interested (both stl and printed kit)
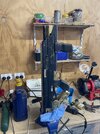
I wanted to mark this build as FINISHED. Just today.
It's on the wall!


On and 'green', to your comment re batteries and never ending. Yes. Never ending! (I did actually consider all this - the sight is hollow for a reason, and the switch area is modelled from a real part).
I have put it up on my etsy page, but I want to be careful not to overstep bounds here. I've put up a post in the Project Runs forum for anyone interested (both stl and printed kit)
I wanted to mark this build as FINISHED. Just today.
It's on the wall!
Last edited:
Similar threads
- Replies
- 53
- Views
- 3,070