Razor Crest

I'm currently building this too, I'm planning on using Alclad Chrome for a shiny finish but I'm also planning on dirtying it up a bit and toning down the shine to reflect the way the ship's shine deteriorated as the show progressed. I'm aiming for something a bit shinier than how it ended up after the dodgy repairs earlier in season 2 though.
 
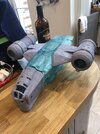
I got hold of some Rustoleum Chrome and it seems to be a good option. I’m planning on heavily weathering this (mainly to hide bits where I haven’t finished the surfaces very well!) so I think this will work well. I may do some panels with rub-on metallising powder on top of the chrome for variation.

this was just a single coat over Tamiya fine primer.
8458AB07-6986-4545-ACAE-83C15344D897.jpeg
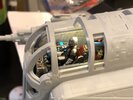
Also finished the inside of the cockpit this week
0BEF1D8A-7BB0-4962-9BCC-8CE9F5F750A6.jpeg
 
Nice, looking good! I do like that color for sure, and like you said, the weathering will knock it back a few notches which is perfect.
 
Truly enjoying this build, thank you for sharing your work!

I've used Rustoleum Chrome with some mixed results, IMExp finger oils can permanently discolor the painted surfaces prior to clear coating (and of course clear coating can kill/flatten the finish).

I've been toying with using bare metal foil (BMF) with some good results, but it's been tough to work with. I've been ending up with a few wrinkles and micro tears, but I've seen entire aircraft kits finished in BMF that look amazing... personally, I love the way ILM finished their filming miniature, all with BMF.

Anyway, just sharing some thoughts, thanks again for the thread, it's looking awesome! -- Cheers
This is really useful - I was planning to weather/panel line using oils and wondered whether it would mess up the chrome. I may have to do a few tests.

I normally don’t bother clear coating prior to using oils etc, just give most stuff a matte clear coat when everything’s completely finished. But clearly a matte coat would ruin the metallic finish. I don’t really know which gloss varnish to use over metallic paint - any recommendations? I have future/pledge but I only use it for dipping canopies as I don’t have an airbrush.

I thought about using metal foil too, I saw them using it for the “studio” razorcrest, but I definitely don’t have the skill or patience to do it properly over all those uneven surfaces.

Just remembered something I was going to mention earlier - I weighed my razorcrest in it’s current form ( minus the front part of the hull & cockpit, which won’t be attached until I’ve sorted the electronics) and it came in at over 4lbs. That means (not including all of the bits I have reprinted, which is a lot) it has cost $80 in resin alone!

7C4E4439-647C-4A7B-88D5-556581E956B6.jpeg
 
I got hold of some Rustoleum Chrome and it seems to be a good option. I’m planning on heavily weathering this (mainly to hide bits where I haven’t finished the surfaces very well!) so I think this will work well. I may do some panels with rub-on metallising powder on top of the chrome for variation.

this was just a single coat over Tamiya fine primer.
View attachment 1381662
Also finished the inside of the cockpit this week
View attachment 1381663
The Rustoleum Chrome seems to work nicely.

Did you get the cockpit lit up, or is it a trick of the light with bright colored paints that read as lit when photographed?

Also where did you get the seated Mandalorian and the child? Those are perfect
 
The Rustoleum Chrome seems to work nicely.

Did you get the cockpit lit up, or is it a trick of the light with bright colored paints that read as lit when photographed?

Also where did you get the seated Mandalorian and the child? Those are perfect
Yes, the cockpit is lit - one SMD on the ceiling plus the cockpit is printed from translucent resin. I coated the outside with aluminium tape except where I wanted the light to come through. I masked the buttons, screens etc off with maskol and then primed and painted the inside. Then peeled off the maskol and painted the lit panels with Tamiya clear paints. Two 3mm LEDs are inside the front hull to backlight the cockpit panels. I wanted to do the front console as well but I couldn’t get enough light transmission to light it up, so I just painted it up normally.

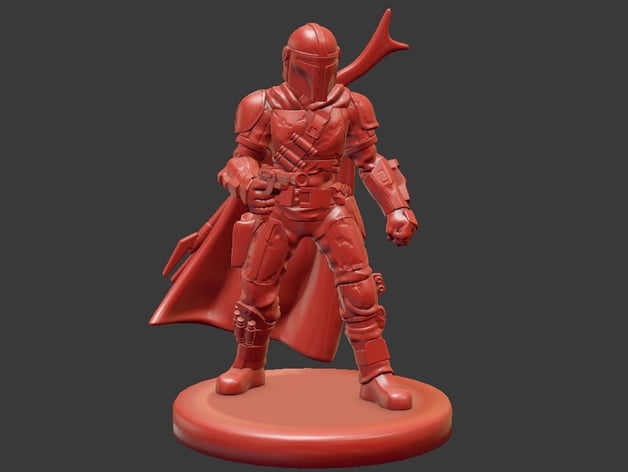
The baby Yoda and Mandalorian figures are from thingiverse - I adapted a model of the Mandalorian by chopping off the top in mesh mixer and adding it to the legs of a seated pilot. I didn’t realise the legs would be so visible in the cockpit, as they’re low poly. I had to add the thigh armour in styrene afterwards. I’ll check the original files I used and post links to them.
 
Yes, the cockpit is lit - one SMD on the ceiling plus the cockpit is printed from translucent resin. I coated the outside with aluminium tape except where I wanted the light to come through. I masked the buttons, screens etc off with maskol and then primed and painted the inside. Then peeled off the maskol and painted the lit panels with Tamiya clear paints. Two 3mm LEDs are inside the front hull to backlight the cockpit panels. I wanted to do the front console as well but I couldn’t get enough light transmission to light it up, so I just painted it up normally.

The baby Yoda and Mandalorian figures are from shapeways - I adapted a model of the Mandalorian by chopping off the top in mesh mixer and adding it to the legs of a seated pilot. I didn’t realise the legs would be so visible in the cockpit, as they’re low poly. I had to add the thigh armour in styrene afterwards. I’ll check the original files I used and post links to them.

I'll have to try something similar

Maybe I should consider reprinting the cockpit in translucent resin as well. Forgot about that
 
I'll have to try something similar

Maybe I should consider reprinting the cockpit in translucent resin as well. Forgot about that
Baby Yoda by vegetalatino

I used this baby Yoda - I just positioned it on the seat in chitubox and printed them both together. One of the ears failed to print but I just made one out of a tiny bit of styrene.


I used this Mandalorian, cut most of the cape off in meshmixer, and added the bottom half of an x wing pilot. I can’t find the link for the pilot at the moment.
 
This is really useful - I was planning to weather/panel line using oils and wondered whether it would mess up the chrome. I may have to do a few tests.

I normally don’t bother clear coating prior to using oils etc, just give most stuff a matte clear coat when everything’s completely finished. But clearly a matte coat would ruin the metallic finish. I don’t really know which gloss varnish to use over metallic paint - any recommendations? I have future/pledge but I only use it for dipping canopies as I don’t have an airbrush.

I thought about using metal foil too, I saw them using it for the “studio” razorcrest, but I definitely don’t have the skill or patience to do it properly over all those uneven surfaces.

Just remembered something I was going to mention earlier - I weighed my razorcrest in it’s current form ( minus the front part of the hull & cockpit, which won’t be attached until I’ve sorted the electronics) and it came in at over 4lbs. That means (not including all of the bits I have reprinted, which is a lot) it has cost $80 in resin alone!

View attachment 1381706
I'd recommend doing some testing and playing with alternate paints/coatings prior to diving in and hitting the entire ship. I can't, and never would, speak for others, but I've had issues with using the Rustoleum Chrome. The last time I used it was on a ST: DISCO phaser about 2-3 years ago. I'd used the same brand and color several times in the past and never noticed any issues (not the type I'm talking about), but I also hadn't used it on any parts that had been touched very much.

My daughter was the first to notice it right after she brushed her fingers across a couple of parts when she was looking it over for recommendations and version 2 improvements. After each touch or rub the chrome painted parts turned grey, almost tarnished. I pretty much shelved the project shortly after actually watching season 1... Anyway, I just checked it and the paint is still reacting to being touched. I didn't apply any coatings to the end model and don't recall what my plan was. If I were to guess, I would've added a coating of some kind, mainly because it would have been a handed prop.

Here're a few photos for your reference that show what I'm talking about... red arrowed surfaces have been touched or brushed and green arrowed surfaces are untouched. Maybe I didn't shake the can well enough, but I don't think so. Anyhow, just trying to help.

Untitled-1.jpg

Untitled-2.jpg

Untitled-3.jpg
 
I'd recommend doing some testing and playing with alternate paints/coatings prior to diving in and hitting the entire ship. I can't, and never would, speak for others, but I've had issues with using the Rustoleum Chrome. The last time I used it was on a ST: DISCO phaser about 2-3 years ago. I'd used the same brand and color several times in the past and never noticed any issues (not the type I'm talking about), but I also hadn't used it on any parts that had been touched very much.

My daughter was the first to notice it right after she brushed her fingers across a couple of parts when she was looking it over for recommendations and version 2 improvements. After each touch or rub the chrome painted parts turned grey, almost tarnished. I pretty much shelved the project shortly after actually watching season 1... Anyway, I just checked it and the paint is still reacting to being touched. I didn't apply any coatings to the end model and don't recall what my plan was. If I were to guess, I would've added a coating of some kind, mainly because it would have been a handed prop.

Here're a few photos for your reference that show what I'm talking about... red arrowed surfaces have been touched or brushed and green arrowed surfaces are untouched. Maybe I didn't shake the can well enough, but I don't think so. Anyhow, just trying to help.

View attachment 1381758
View attachment 1381759
View attachment 1381760
Wow, that’s quite a pronounced effect. I’ll make sure to clear coat it with something at least. Mine will be sort of a toy for the kids to play with so it will be handled to death
 
Wow, that’s quite a pronounced effect. I’ll make sure to clear coat it with something at least. Mine will be sort of a toy for the kids to play with so it will be handled to death
I'm not that experienced with trying to get a chrome-like finish with paints, but I think that the issue of metalic paints turning grey when handling is pretty common. Also, from what I've seen, any clear coating will greatly diminish any chrome effect, even with Alcad's products. So anything other than an actual electroplated chrome finish just won't have the same durability. I've tested Amaco's Rub 'n Buff Silver Leaf and found it can have a good metallic effect, and got the Silver Leaf varient looking similar to aluminum. But since it's wax based, it also won't stand up to too much handling, and clear coating it will run into the same problems of limiting the metallic effect as with any metallic paints.
Fortunately, the finish of the Razor Crest isn't really a mirror finish chrome, so you can probably get the effect you want with most of these methods. Maybe a clear coat would be okay, if you really need it to be fingerprint proof, but I'd do some test painting on some scrap objects before deciding.
 
Analyzer, interesting build and some interesting input from everyone on the metallic finish.

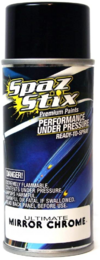
As to that paint brand, you'd never get away with that 'name' in England! Far too close to spastic.

1611441564275.png
 
Truly enjoying this build, thank you for sharing your work!

I've used Rustoleum Chrome with some mixed results, IMExp finger oils can permanently discolor the painted surfaces prior to clear coating (and of course clear coating can kill/flatten the finish).

I've been toying with using bare metal foil (BMF) with some good results, but it's been tough to work with. I've been ending up with a few wrinkles and micro tears, but I've seen entire aircraft kits finished in BMF that look amazing... personally, I love the way ILM finished their filming miniature, all with BMF.

Anyway, just sharing some thoughts, thanks again for the thread, it's looking awesome! -- Cheers
Metal foil sounds interesting. Especially after seeing ILM apply that to their physical 3d print model of the Crest. I keep forgetting to look into the cost of it.
 
Metal foil sounds interesting. Especially after seeing ILM apply that to their physical 3d print model of the Crest. I keep forgetting to look into the cost of it.
Yeah, in my experience with foiling you've got two cost ranges; #1: using the branded product Bare-metal Foil, it comes ready for installation with a an adhesive backing and in several finishes. For me, the the only drawback is how thin it is and the thinness is also why I like it. Cost range #2: regular household aluminum foil, it's cheap, thicker, and very durable. With this option the tough part for me is applying an adhesive in a way that doesn't show through the end application and making sure the adhesive doesn't attract "in-air" debris and trash. Foil is unforgiving and shows every spec of dust left on the surface.

I recommend anyone wanting to use foil just play with it until you find the techniques/glue that work best for you. For me, I'm still learning and haven't used it on any finished product...but I'm about to. ;)
I never even would have thought of using household aluminum foil. I'll look that up. I have a bunch of practice stuff to practice on.

Thanks for the tip.
 
I never even would have thought of using household aluminum foil. I'll look that up. I have a bunch of practice stuff to practice on.

Thanks for the tip.
This is the article (attached PDF; Fine Scale Modeler, Jun 2002) that got me thinking about using home foil... of course there're endless other references, articles and videos out in the interweb that cover the subject.
 

Attachments

  • foiledlightning1.pdf
    400.9 KB · Views: 208
Back
Top